Photo cropping is one of the primary but absolutely essential skills in photo editing. You can use the Crop Tool to straighten, crop, add extra space to photos, and adjust your composition. But right now, this article will focus just on cropping. Everyone knows how a crooked building, something at the edge of the frame, or a crooked horizon can ruin a really good picture. That is the reason why every photographer uses this tool.
With this article, I will help you learn the basics of how to crop a photo in Photoshop, so you won’t have to struggle with crooked buildings and horizons anymore.
How to crop an image in Photoshop?
There are not many different ways to crop a picture, but within the main crop tool, there is the option to use ratios which change how the crop is applied. Still, the Crop option is an easy skill to learn that everyone uses and needs.
For starters, you need to import the picture into Photoshop.
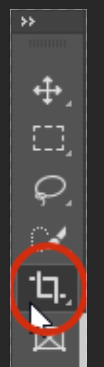
Then, on the left side, in the Toolbar, you will find the Crop Tool. You can select the tool from the Toolbar or by using the Crop shortcut – in other words – pressing the C button on your keyboard.
After selecting the Crop Tool, you will see that a cropping border is automatically placed on your photo.
You can move the crop as needed by dragging the handles of the Crop Box in the desired way. This is called Free Crop. It is similar to Free Transform, except here, you crop part of the picture. Remember, the dimmed area appearing outside of the crop box means that this is the part of the image that will get cropped away.

You can lock both the aspect ratio and resize the border from the center. You can do it by pressing Shift+Alt (Win) or Shift+Option (Mac) when you drag the handles. That way, the border will move equally from all sides, like so:
Also, if you want you can reposition the crop border. You can do it by clicking the swap icon in the options menu.
Or by pressing X on your keyboard. It will go from horizontal to vertical and vice versa.
If you want to keep the proportions of the crop the same as the original photo, press Shift. That way, the crop will always be in one of the corners or edges, in other words – locked. Like so:
That means that you will have to reposition the Crop Box afterward, and here is how to do it using the Classic and Regular Crop methods.
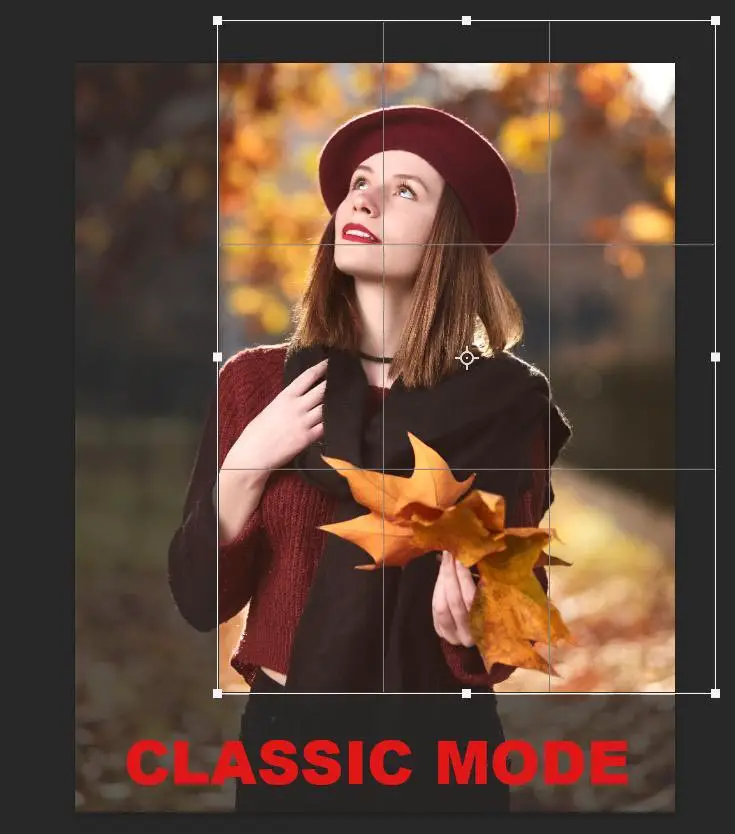
Classic and Regular Crop
There are two crop methods: Classic and Regular Crop.
You can find the classic mode box in the Gear Cog icon in the Options Bar, and you can change it back to regular at the same place.
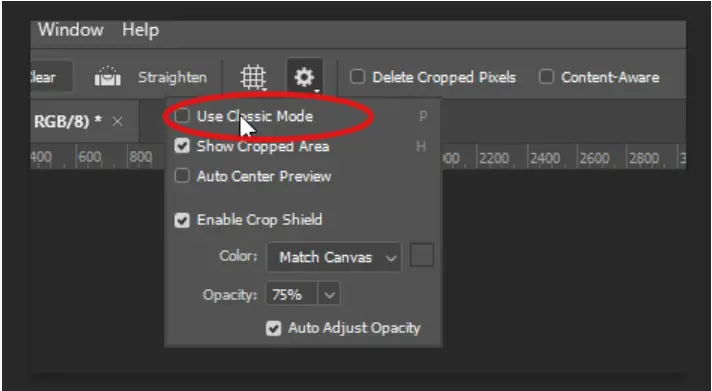
If you have the Classic Mode box ticked, now you are moving the crop area around the image.
But, if you untick the box and go back to the Regular mode, you are moving the image around the crop area.
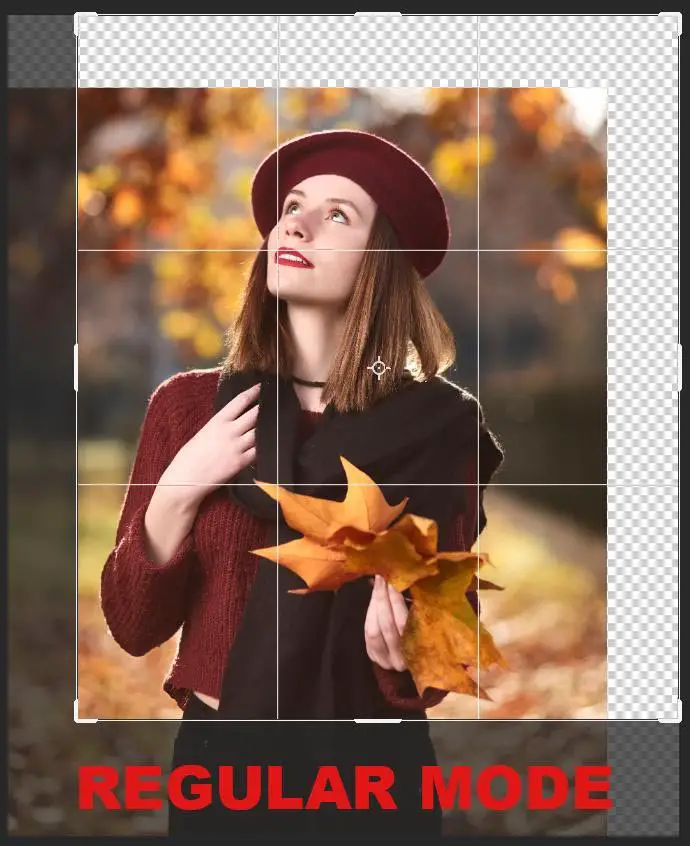
You are essentially doing the same thing but with a different method, although most photographers prefer the Classic mode.
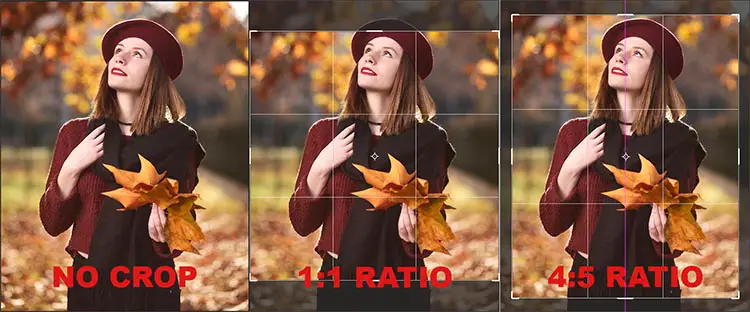
Aspect Ratio
Aspect Ratio presents the ratio between the width and the height of the image you see on your screen. You can find the aspect ratio in the form of W:H. W presents the pixels in width for every H pixel in height or vice versa.
Bu default, Photoshop leaves the aspect ratio blank, but you can set this to your liking as below.
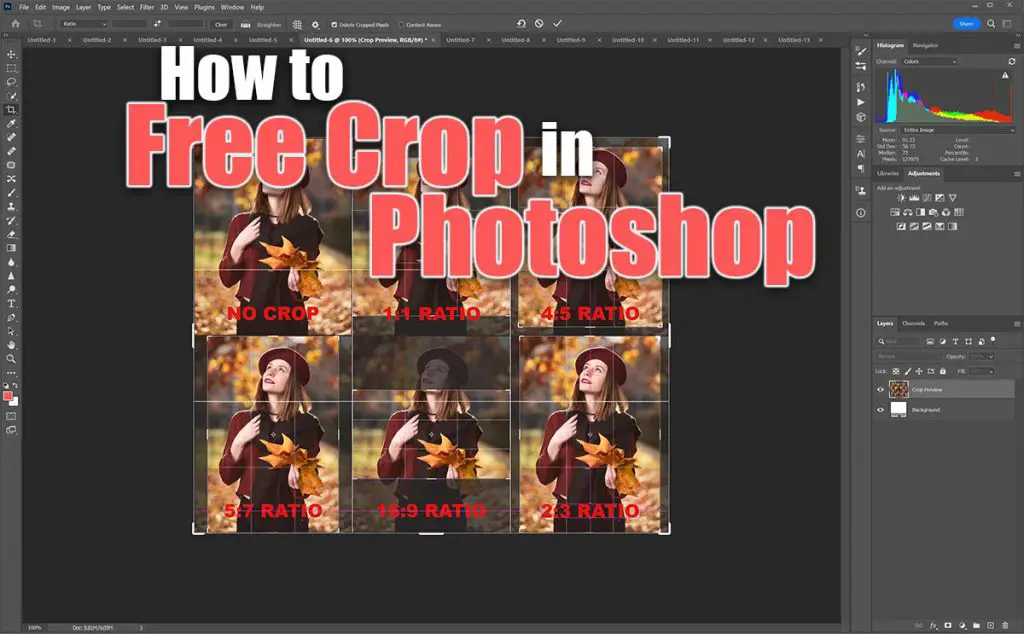
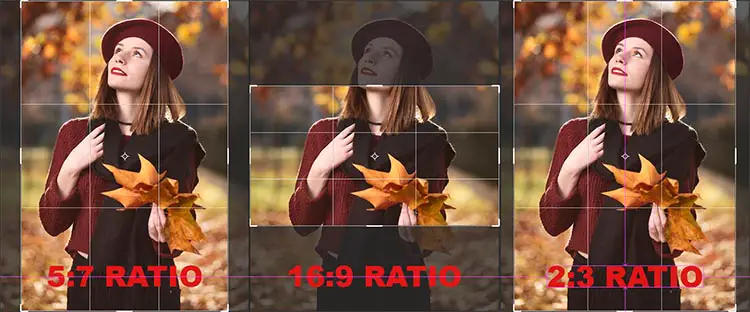
You can find the aspect ratio in the Options Bar at the top of the screen. In the drop-down menu in the Options Bar, you can choose which one works for you and crop the picture. There are few options. The standard aspect ratios to crop a picture are 1:1, 4:3, 5:4, 5:3, 3:2, and 16:9.
You might want to use any of these aspect ratios to crop photos for printing, or for display on the web.

I will show you how all of the preset aspect ratios look in the following examples:
You can also enter aspect ratio values by yourself, and you will lock the crop to that aspect ratio.
You can input the values in the empty fields next to the Ratio Menu. First select Ratio in the drop-down menu.
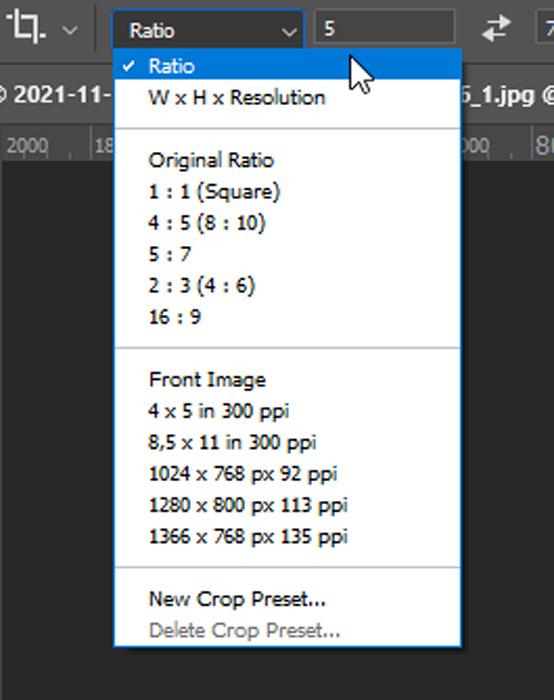
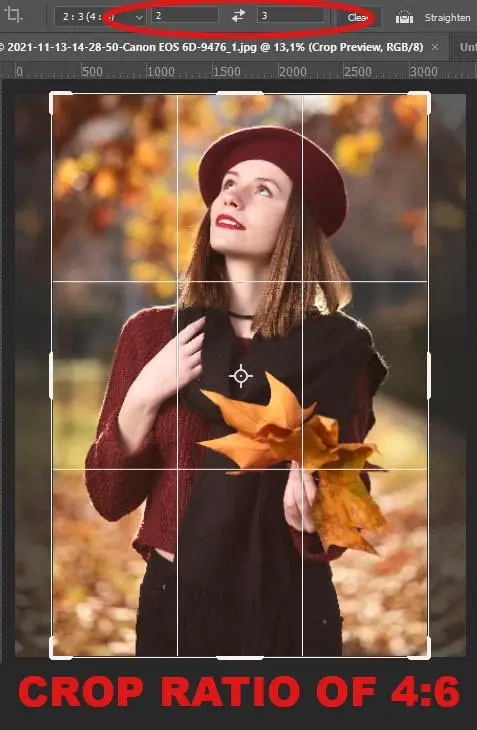
Then, in the empty fields, enter the Width and the Height values.

When you input the values, the crop overlay will change to match the values you entered.
Once you finish, press Enter/Return or click the Tick icon in the Options Bar at the top of the screen.
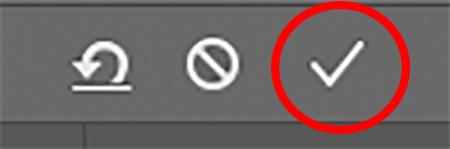
Once you press enter or click the Tick icon, you have successfully cropped your photo. Or, if you want to cancel the crop, setting click the Cancel icon in the Options Bar.
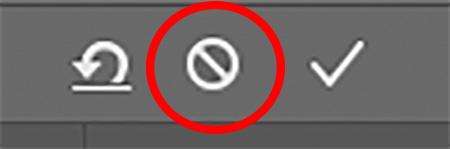
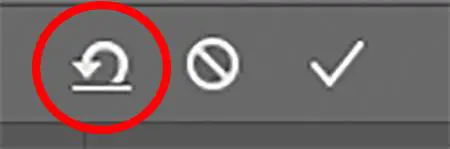
If you want to reset the crop, press the Reset icon, and you are done.
You can also Free Crop by using the Ratio Option.
You can do that by leaving the fields empty instead of writing down values. If you leave them empty, you can crop the picture to your needs. If there are any values set, you can remove them by clicking the Clear button.

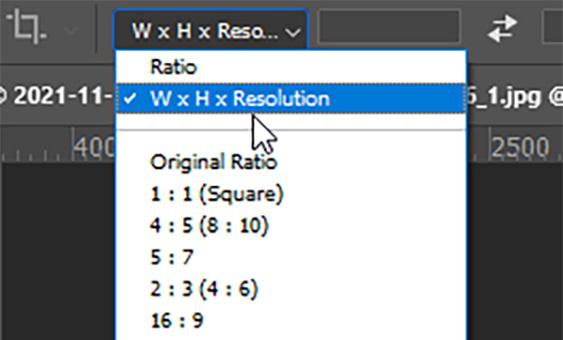
W x H x Resolution
The Crop Tool can also crop your image to a specific size and resolution.
So, to do that, go back to the Ratio Menu, but this time instead of selecting the Ratio option, choose the W x H x Resolution option.
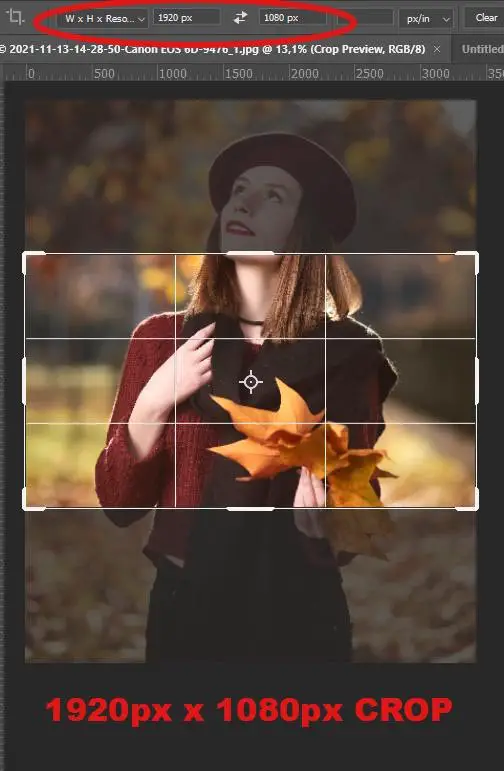
With this crop option, you can adjust the crop dimensions and crop resolution based on your needs. For example, if you want a crop for screens, like 1920×1080 px at 72px/in, that can be done too. Or, if you want a crop for print that is 8×10 inches at 300 px/in, you can do that too.
You should remember that the resolution field accepts values in px/cm or px/in (ppi). The industry recognizes px/in (ppi) most of the time. These values are interchangeable, as they are just pixel density measures.
Pixel density is a value that determines how many pixels can be crammed into one square inch or one square centimeter. For screen view, this value is meaningless because the screen you use determines that. But, this value is important for printing. The higher the pixel density, the more detailed the printed photo is. If you intend to print the image, you should use mm/inch dimensions for your crop instead of px. That way, Photoshop will do the correct calculation for optimal print quality.
The crop dimension fields accept dimensions in px (pixels), cm (centimeters), and mm (millimeters). If you enter dimensions that are not in pixels, Photoshop will calculate the pixel dimensions using the metric/imperial dimensions with the pixel density you chose. Or it can use the default one.
With this crop option, you can adjust the crop dimensions based on the dimensions of your image in pixels or resolution. For example, if you want a crop of 1920 x 1080 px, you can add your desired dimensions and change the size of your crop overlay.
You have the option to change the resolution from px/cm to px/in and vice versa. To do that, select the drop-down menu next to the bars where you entered the dimensions. From the drop-down menu you can choose which pixel density calculation to use.
Or you can use some of the already given dimensions presets.
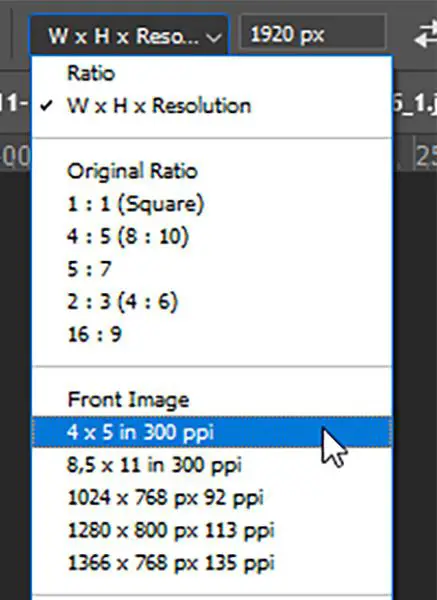
The given dimensions presets are very common cropping ratios that you can use to crop your photo. Each preset presents the aspect ratio that will apply to your crop overlay. They offer useful crop ratios that correspond to common print or screen crops. That can be helpful if you don’t feel like doing the math at the moment.
But, all of the presets are helpful if you want a fixed crop, although you can’t use those for free cropping because the presets limit the crop ratio. The presets are with default ratios, usually used for YouTube Thumbnails (16:9), Instagram Post (1:1 ор 4:5), and so forth. You can use them just the same as the default ratios before. Select the desired dimension from the presets, crop the picture, and press enter/return
But, like before with the Ratio Option, you can also crop freely with W x H x Resolution. It is also known as Unconstrained copping. It lets you have total manual control. Some say that the easiest way to free crop a photo in Photoshop is with W x H x Resolution. So, let’s see if this will be the easiest way for you, too.
Now that you have selected the W x H x Resolution option make sure that there aren’t any values set in the boxes.
By clearing the already given dimensions, you can use the crop tool freely, without any restrictions. You can adjust the width and height of the crop to your needs and how you want the photo to look.
When you are finished, hit enter/return, and you are done. Following this, you can check if the final cropped size is correct for your needs by using the Image Size dialogue.
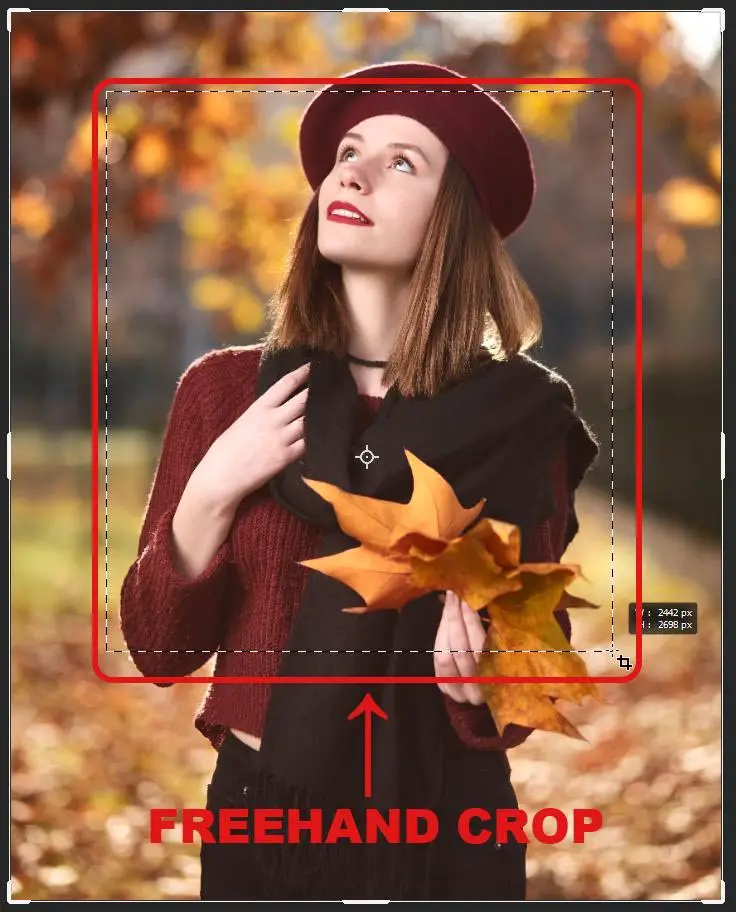
How to Free Crop in Photoshop
You have learned how to do the basic crop, but one method is left: the Freehand Crop.
To do the Freehand Crop, first, you have to select the Crop Tool and simply drag over the area you want to crop.
The selected area will remain visible, while everything else will be cropped out. Don’t worry about the crop border that shows up. You still can Freehand Crop the photo.
When you put down the crop selection, your new area will appear, and you can adjust it by moving the handles as before. You can also click and drag the photo inside the border to reposition it.
How to use the additional options that the Crop Tool offers
By now, you have learned how to use the Crop Tool. Mainly with the default settings and how to free crop the photos. But, there are several other options that you can use. These options allow you to use the crop tool on a more advanced level. So, let’s go through them.
Crop Overlay Options
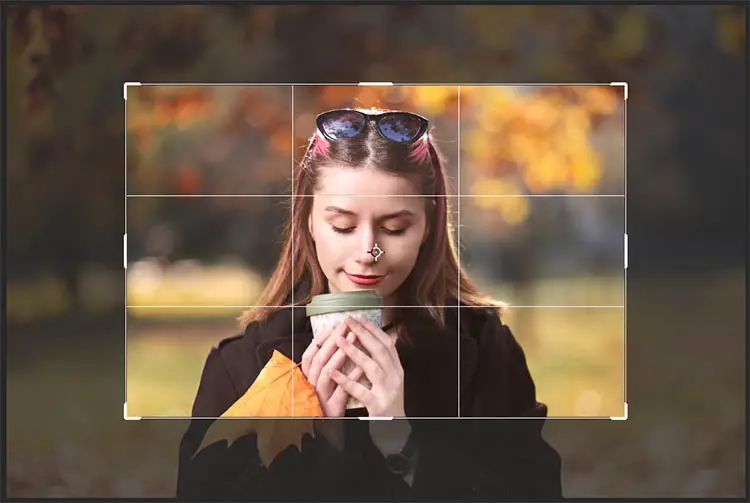
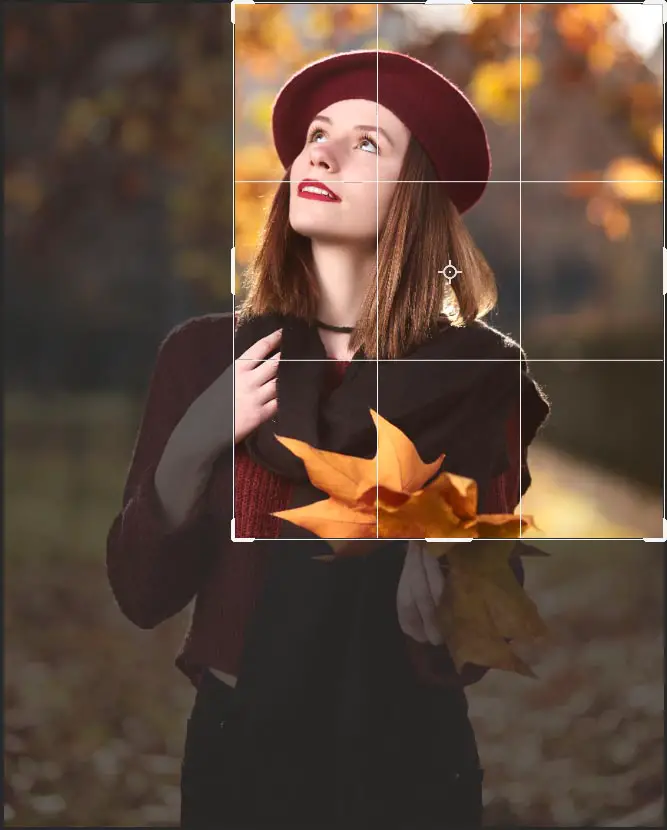
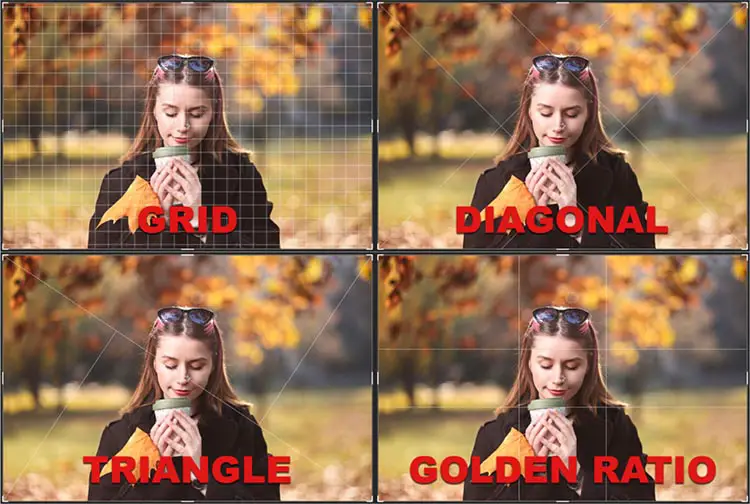
There is a handy feature in Photoshop, also known as a Crop Overlay. It is used for composition. When you click on your image with the crop tool you will notice the Grid. The 3×3 grid. Which is also known as the Rule of Thirds.
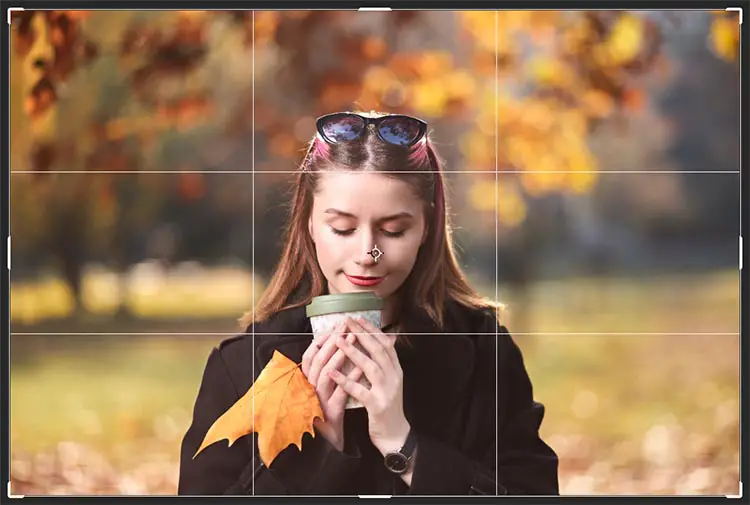
The Rule of Thirds is usually used so you can create a composition by placing your subject near the spots where the grid lines connect.
There are a few more overlays that you can use in addition to the Rule of Thirds.
To check the other overlays, click the Overlay icon in the Options Bar. From the drop-down menu, you can choose between the given overlays.
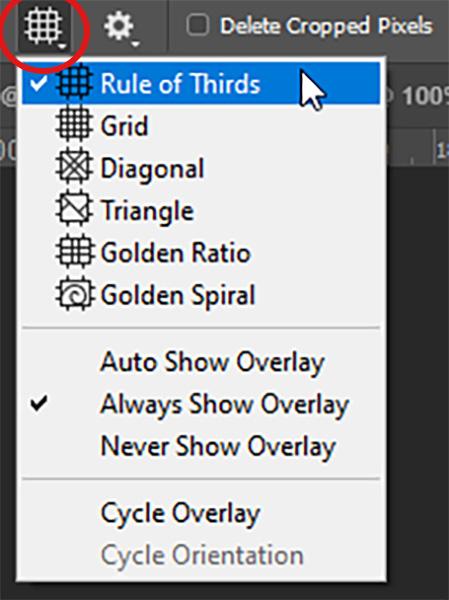
There are 6 overlays in total, which are all used to aid your compostion when cropping.
Once you choose the overlay and find the composition you need, double-click the photo inside the border, so the crop will apply. You can easily switch between the overlays by pressing O on your keyboard. In the following pictures, I’ll show you what the grids look like.

Delete Crop Pixels
There is a future in the Crop option known as Delete Cropped Pixels. You can find it in the Options Bar, next to the Gear Cog icon.
If you tick the Delete Cropped Pixels once you crop the image, everything that is cropped out is permanently deleted.
You cannot recover that part of the image by cropping again. It is gone.
But, if the Delete Cropped Pixels is unticked, everything that is cropped out is still there. Just not visible. That means that if you change your mind about the crop, you can always go back and change it.
If you leave the Delete Cropped Pixels unticked when you cropped the image and you save it as a PSD, the file size will be significantly larger, while if you tick the Delete Cropped Pixels option, it will be smaller.
That is why people usually use the Delete Cropped Pixels option. This is because the data you don’t see is still there. Even if you open the file 5 years later, you will still have the ability to change the crop.
How to reset the crop tool in Photoshop?
There is an option to reset the Crop Tool. To do that, go to the Options Bar. When you put your cursor on the Crop Tool icon, right-click (Win) / Control-click (Mac). If you click it, you will see two options named Rest Tool and Reset All Tools.
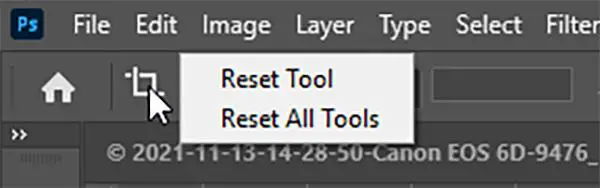
When you click the Reset Tool option, it will reset the Crop Tool only. After you reset the Crop Tool, the values in the width and length boxes will go away, and the Aspect Ratio option will become Ratio.
And there it is. You have learned how to Crop pictures in a couple of ways. And now you know why the Crop Tool is an important tool for anyone working with photos.
Read More:
How to Remove White Background in Photoshop
How to stretch an image in Photoshop?
How to unmerge layers in Photoshop?


Leave a Reply