Lenses come in a wide variety of mounts and designs. This article gives you a brief overview of the most important parts of a camera lens, which are common across most, but not all, lenses.

The Outside Lens Parts
The parts of a camera lens can be broadly segregated into those that you can see from the outside and those that remain inside the lens barrel. The parts of a lens on the outside are the ones that form the user interface of the lens and assist in the control of the lens’s operation.
1. The Focusing Ring

The focusing ring of a camera lens helps in manually adjusting focus. This is usually a large well-damped ring that’s mechanically controlled with the lens’ focusing elements located inside the barrel.
Older lenses incorporated a system where the lens’s manual focusing ring was connected with the focusing elements inside the lens. You turned the lens’s focusing ring, and in turn, it moved a gear inside the lens, which then moved the focusing elements.
Most modern lenses incorporate a fly-by-wire design that includes an electronic system that measures how much you’re turning the focusing ring, and it, in turn, directs the lens’ gears to move.
On older lenses, there is usually a window or a scale visible on the lens showing you the distance to the current focal point. Fly-by-wire lenses lack this, but often display the same information electronically in the viewfinder.
2. The Zoom Ring
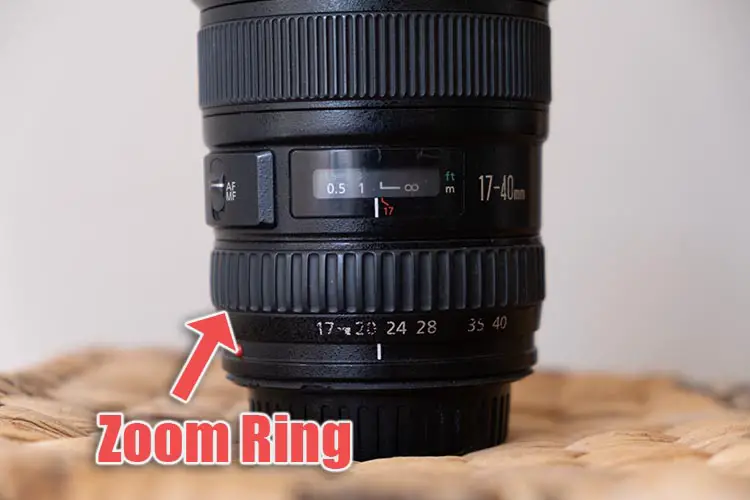
The Zoom Ring helps adjust the lens’s focal length and controls the lens-camera combination field of view. Traditionally, the zoom ring is smaller than the focusing ring and is located closer to the camera’s end of the lens. Note that this is not present on prime (fixed focal length) lenses.
3. Focus Delimiter Switch
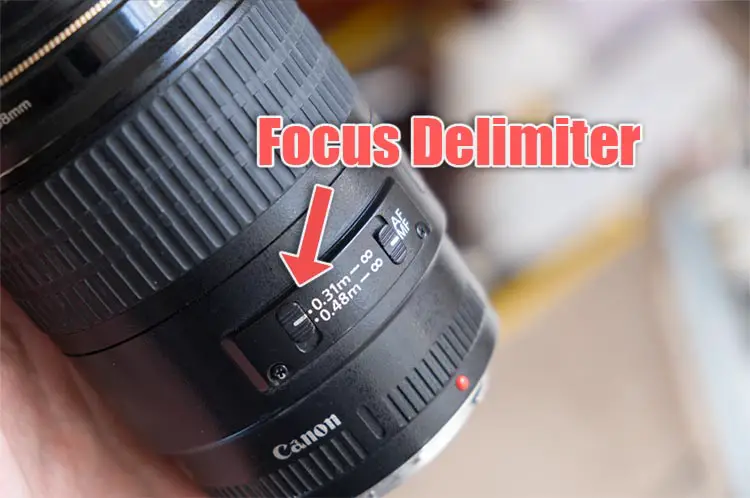
The Focus Delimiter switch locks the focusing range of the lens to a zone that you want to limit the lens to. This switch is available primarily on super-telephoto lenses and macro lenses. Such lenses are used for birding, wildlife, and sports photography.
If set to hunt for focus across the entire focusing range of the lens, it can take an awful long time to lock focus. To save time, especially when the photographer is aware of the minimum distance the subject is located, it makes sense to lock the focusing range to match the subject’s distance.
4. Zoom Lock
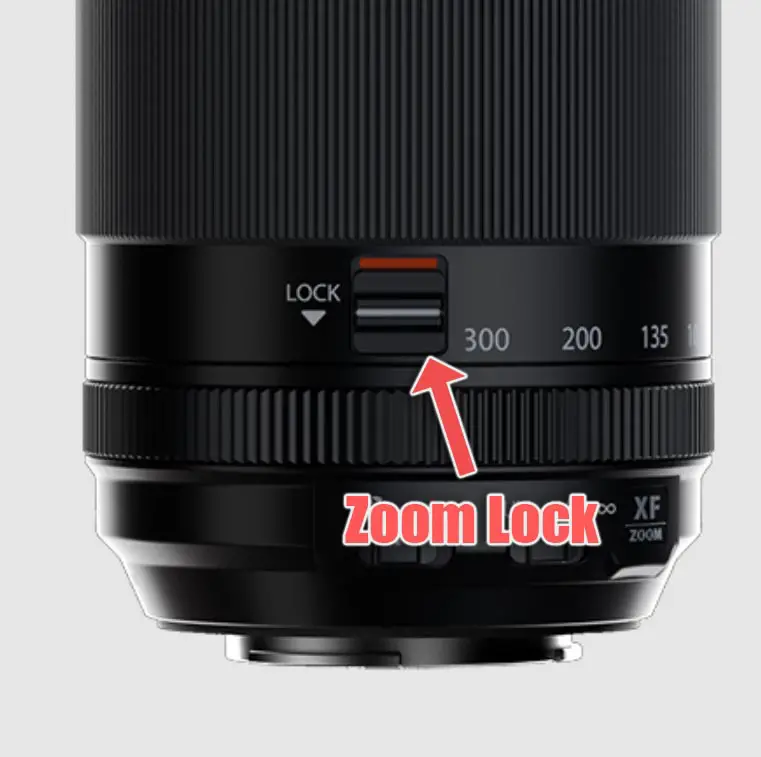
The Zoom lock is a safety feature of some zoom lenses that has a dual purpose. When someone is shooting a subject that’s at a fixed distance, one can lock the zoom function to prevent accidental change of field of view.
The second use is when the lens is being transported. The zoom lock feature prevents the lens from dropping under its weight and prevents any risk of damage to the front element.
5. The Depth of Field Indicator
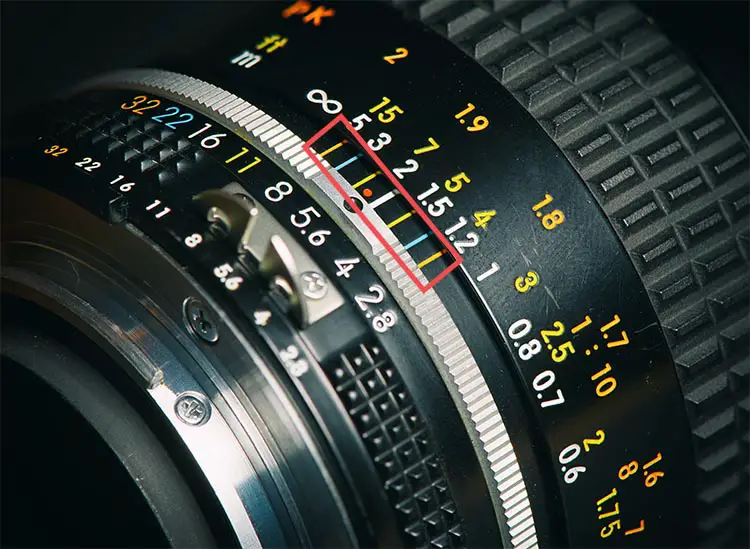
So, at the current settings, f/11 will show everything in focus from about 5ft to 8ft, while f/32 would have a focal range of 4.5 ft to 10ft.
The Depth of Field Indicator is available on some manual and autofocus lenses. It indicates the extent of the depth of field of the image. Many older lenses had a complete DoF chart printed on the lens barrel.
This chart had a combination of two rings and lines marking the DoF. It gave photographers a way to calculate the approximate depth of field for the focal length and aperture that they have selected and based on what distance the subject is located.
The depth of field chart is no longer printed on modern lens barrels. However, the DoF indicator in an electronic format is still used on most autofocusing lenses.
6. Manual to Auto Selector Switch

The Manual to Auto selector switch is for switching between Autofocusing (AF) and Manual Focus (MF) modes. Some camera systems come with a built-in autofocusing motor. This motor works in tandem with lenses with a built-in AF motor.
When using such a combination of lens and camera, if you’re switching to Manual from Auto mode, you’ve to make sure that you switch both the camera and the lens to manual mode.
7. Image Stabilization On/Off

Image stabilization aims to stabilize footage/stills when the camera is being used hand-held. The Image stabilization button isn’t available on all camera lenses. It’s only available on select photography lenses that come with this functionality.
You can choose to switch this function Off, especially when using a tripod, or leave it On when required.
8. The Markings of the front element and body
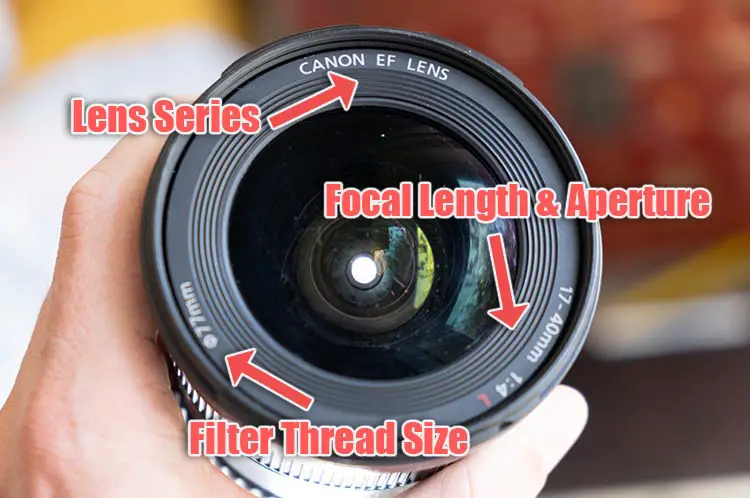
There are, at times, markings on the front (and sometimes on the side of the lens barrel) of the lens that provides a lot of info about it. These include the focal length, the maximum aperture, and the brand and series to which the lens belongs.
If you look at the front element of the Nikkor 50mm f/1.8D lens, you will notice the letters 50mm 1:1.8 D and Nikon written.
Additionally, markings will tell you if the lens has built-in image stabilization (VR, IS, OIS) and any special lens elements such as Extra-low dispersion elements, Nanocrystal coating, etc.
9. Front Lens Cap

The Lens cap protects the lens’ front element from getting knocked or scratched, or damaged during transportation. The reverse of the lens cap usually has the filter thread specification mentioned on it.
10. Rear Lens Cap

The Rear lens cap prevents the lens’ rear elements from getting damaged or scratched. Rear lens caps of similar mount lenses are compatible, especially if the same brand makes them.
11. The Body Mount

The body mount contains couplings and electronic connectors that connect the lens with the camera body and establishes an electronic connection with the camera. This allows the lens to be controlled via the camera interface.
Parts on the Inside of a Lens
These are the lens parts that form the central image-making core. Not all of these elements are likely to be inside every lens. Although they do a similar job, many of these elements are known by different proprietary names.
12. Front Element
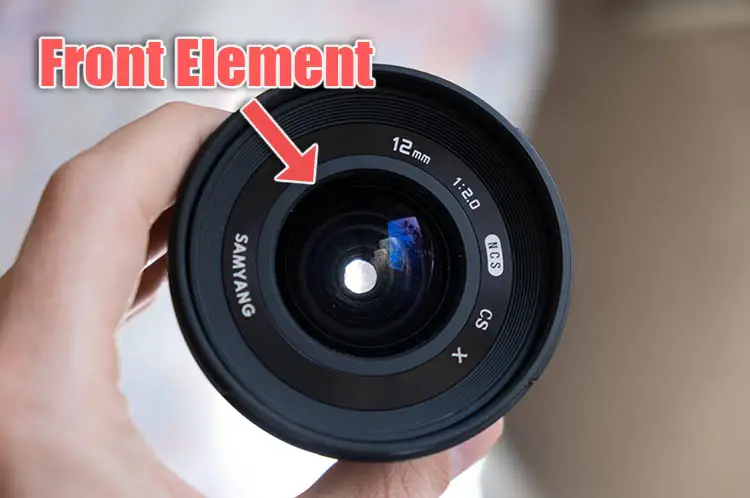
It is the first element of a photography lens and the first surface that receives light. Many photographers use a UV filter to protect the front element of the lens from scratches.
13. UD Element (the same as ED)
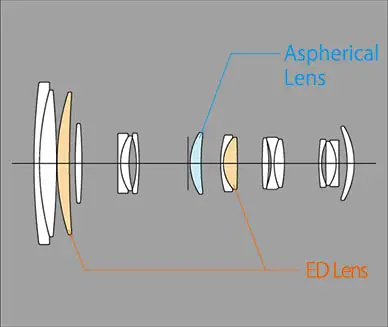
An ultra-low Dispersion element is an element used in lenses to prevent chromatic aberrations (CA). These elements have a low refractive index and low dispersion and are much better than ordinary glass elements in suppressing CA.
UD is a Canon terminology, and similar technology is used by other manufacturers named differently. Nikon, for example, terms it as ED (Extra-low Dispersion) element.
14. Focus Lens
These are the elements inside the lens responsible for focusing the image coming through the lens and making sure that they form a sharp image on the image plane (sensor).
15. Aspherical Lens
These lens elements are responsible for countering spherical aberrations.
16. Lens Coatings

One of the most crucial aspects of a lens’ design is the multiple layers of coating used on the lens elements. The first and foremost layer is the Multi-layer coating used on the front lens elements. This coating reduces light reflection, improving images’ overall contrast and color accuracy.
The multi-layer coating is used on both sides of a lens and signifies that the coating has been used in three to five layers.
Different manufacturers use different proprietary coating technologies. For example, Nikon uses the Nano coating technology to reduce ghosting and flares and improve contrast and color significantly.
Read More:
What are the parts of a DSLR camera?


Leave a Reply