This site is part of various affiliate programs. Links may give us a small compensation for any purchases you make, at no additional cost to you. Please read the disclaimer policy for full details.
A Sharp TV with no sound or with the volume control not working is quite a common problem, particularly with older Sharp Aquos TVs.
In most cases it’s pretty simple to fix, but because there are quite a few possible causes of Sharp TV sound problems I’ve compiled this list of every working easy fix, whether you have an older Sharp TV or a Sharp Aquos TV with no sound.
These troubleshooting steps are arranged in order from simplest to most complex. If you follow them in order then you’ve got the best chance of getting a working TV again.
Sharp TV No Sound
If your Sharp TV has no sound, fix it by power cycling your TV, unplugging it for 60 seconds with the power button held down, swap your HDMI inputs, change audio out to PCM mode and diagnose mainboard issues with a multimeter.
You can fix your TV by following the steps outlined below, which will look at all possible causes of your Sharp TV volume not working.
You can also watch an overview of these fixes in the video below.
1. Sharp TV Muted
It almost goes without saying, but make sure that your Sharp TV isn’t muted and the volume is turned up.
Sorry for pointing this out, but you would be surprised how many people overlook this!
2. Power Cycle Your Sharp TV to Fix Sound Software Glitches
Although this might seem a basic step, power cycling your TV is often the best way to fix a Sharp TV.
Resetting your TV will clear out any issues with non-permanent memory and reset your main board without losing your personal settings.
This is quick and painless and won’t cause you to lose any of your saved settings.
To reset your Sharp TV:
- Make sure your TV is switched off and unplug it.
- Hold down the physical power button on the TV for at least 15 seconds.
- Wait for at least 2 minutes for any residual power to drain from the TV’s capacitors (which are capable of storing charge for several minutes).
- Plug your TV back in and try switching it on. You should see a light blinking if you have been successful.
Make sure you do wait for the full 2 minutes before plugging your TV back in – you would be surpised how long the components within your TV can hold charge, and you want to make sure it has fully reset.
Although this seems a very basic step, don’t overlook it because in the vast majority of cases a simple soft reset fixes most issues.
Most people will now have their TV fixed and back up and running, but if your Sharp TV still has a black screen after resetting, then we’ve got a few more basic fixes to try before getting into the hardware fixes.
3. Sharp TV No Sound Through HDMI
HDMI issues are at the core of many problems with sound on Sharp TVs.
If you are trying to connect a soundbar to your Sharp TV and are not getting any sound through it, or your Sharp Aquos audio settings are disabled, then try changing your audio output.
If your Sharp Aquos TV audio menus are greyed out:
- Press Menu on your remote.
- Go to Initial Setup or System Options, depending on model.
- Then go to Input Settings or Input Terminal Settings.
- Change Output Select to Fixed.
- This will unlock your Sharp audio menus.
- Back on the main menu, under Audio Settings, set Auto Volume to Off.
If you’re still struggling with HDMI sound issues, then try using an optical cable to connect your TV to your speakers. You can also have a look at your HDMI cables themselves, as you can often find a:
- Faulty HDMI cable with a break in it
- Damaged HDMI port with broken pins
- Poor HDMI connection where the cable and connector are not fully making contact
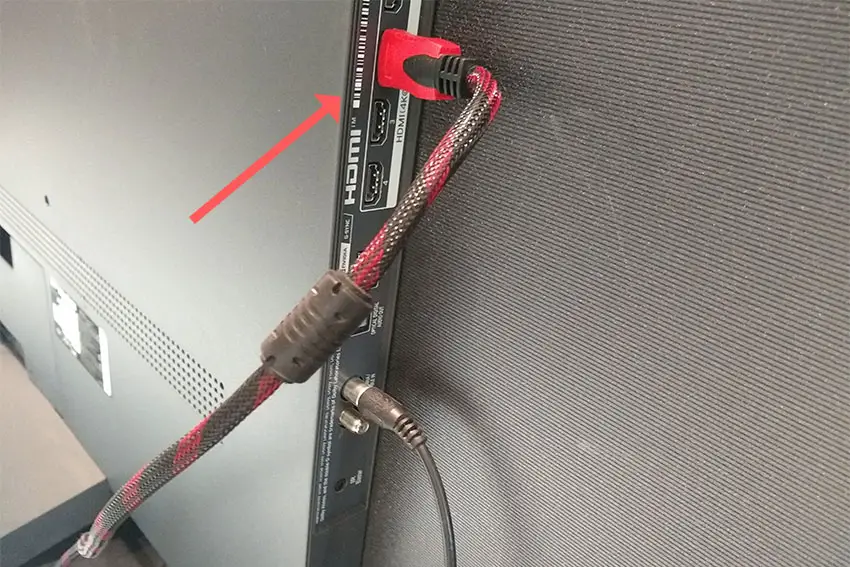
To check your HDMI and other cables:
- Switch off your TV.
- Remove any HDMI or other physical cables connected to the back of your TV.
- If you have any compressed air, use that to clean the contacts both of the cable and in the connector on the TV. If you don’t have compressed air, then blow gently on them.
- Firmly push the cables back into their slots on the TV.
- Switch your TV back on again.
It that hasn’t fixed the problem, then try using a different HDMI input. Most TVs have 3 or 4 HDMI ports.
If you have one that is on a different part of the TV then that would be the best one to try, as it this should have a separate connection to the TV’s main board.
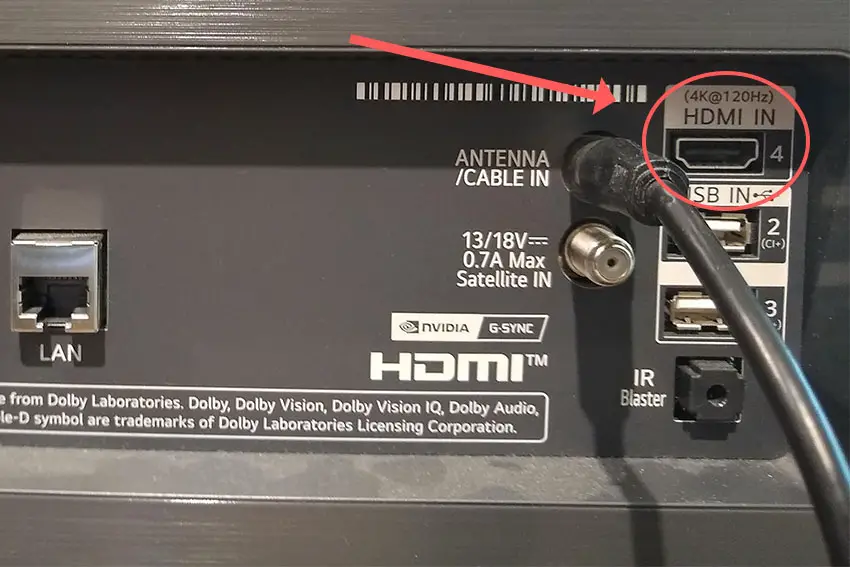
Plug you HDMI cable into the new port, note the number next to it, then choose this HDMI input on your TV, by using the Input or Source button on your TV remote or the Input or Menu button on your TV itself.
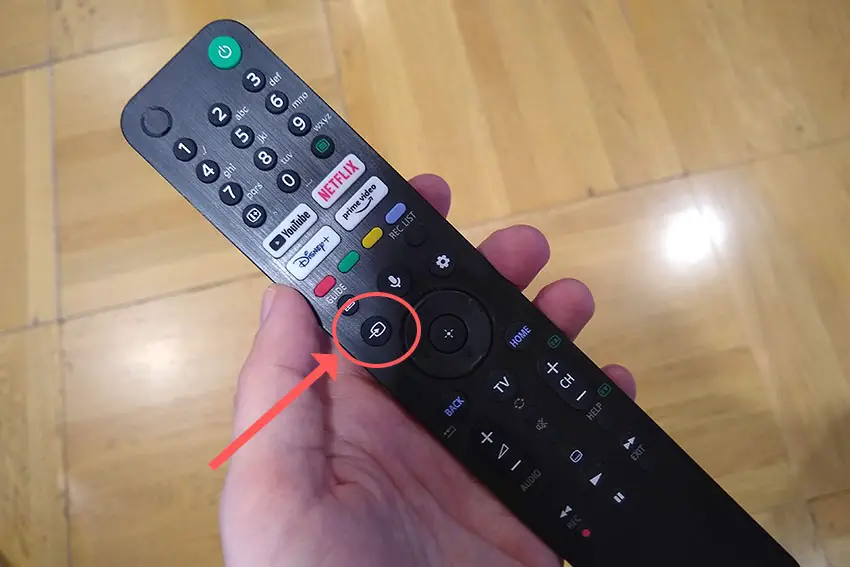
If this fixes the issue, then you either have an HDMI problem, or a mainboard problem if the no sound issue persists using a different HDMI port and cable.
If you’re using an external speaker connected via HDMI, try switching your audio between the TV’s speakers and the external speakers.
If the TV speakers work but the external speakers do not, then there is either a problem within the HDMI connection, for which you should try a new cable, or something wrong internally in either your speaker or TV, which we’ll get to later.
If you are getting sound through HDMI for a period of time, but this then cuts out, try switching your TV’s input to TV and back to HDMI.
If this solves the problem, then there could be a software issue and you should update your TV.
4. Update Sharp Aquos TV Firmware
It’s always sensible to check that your TV’s firmware is up to date before diving into the more complex fixes.
To update firmware on a Sharp TV:
- Press Menu on your remote.
- Go to Settings.
- Then Setup.
- And choose Software Update (NET) in the first instance.
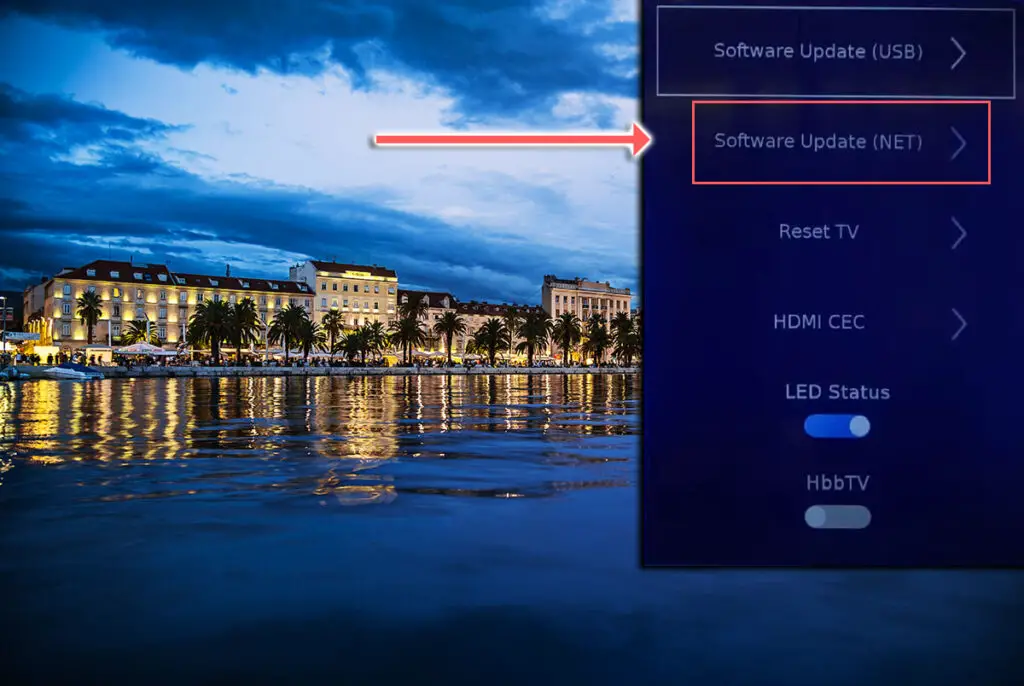
If you do not have an active Internet connection on your TV, then use the Software Update (USB) and download the updated firmware from Sharp’s website to a USB drive.
5. Factory Reset Your Sharp TV
Returning your TV back to its factory settings is a more extreme step, as it will delete any personalization features or connected devices, but it’s always worth a shot when other methods haven’t worked.
To factory reset a Sharp TV:
- Press Menu on your remote.
- Select Settings.
- Then Initial Setup.
- And Reset.
If your remote isn’t working, you can get some tips on how to reset your Sharp TV in the video below.
6. Check for a Broken Amplifier
A more serious issue, but one that is still easily fixable at home, is a failure of the amplifier located on a chip in the mainboard.
To check this, you will need to remove the back panel of your TV, which will invalidate its warranty, so this is only practical for older TVs.
To remove your TV’s back panel:
- Unplug your TV, hold down the power button and wait for at least 15 minutes. There are large capacitors in the power board for the backlight and these can hold charge for an extended period of time.
- Place your TV face down on a large table or workbench. Make sure there is nothing that can scratch the screen on your work surface.
- Ground yourself.
- Open your TV by unscrewing the screws in the backpanel. It should come apart in two pieces: front and back.
- Put the back panel somewhere out of the way and take a look at the circuit boards that have been revealed.
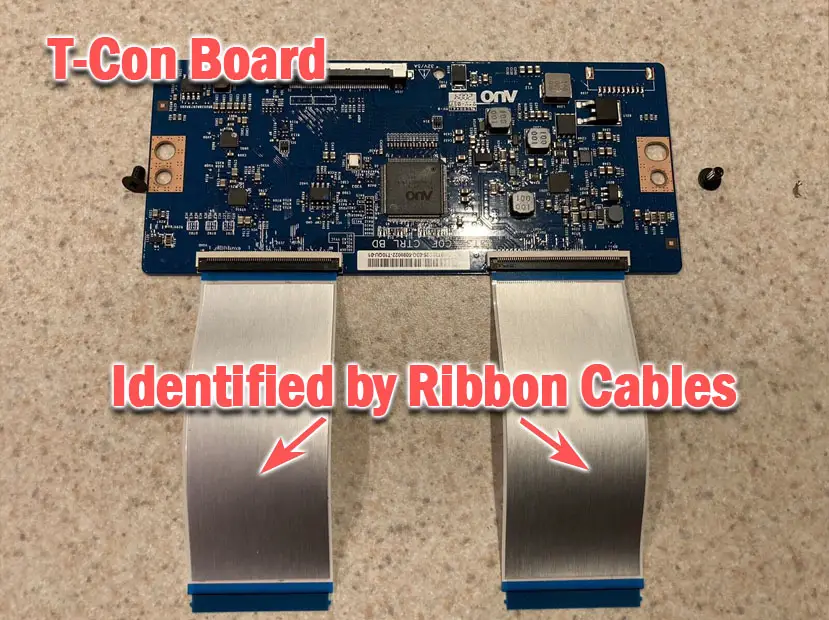
- You will see a T-Con panel for translating the signal into a TV picture, a power board and a main board.
The Timing Control (T-Con) board is a small PCB board that drives your TV’s panel, sending the signal to each pixel row of your screen using internal clocks to keep each row in sync.
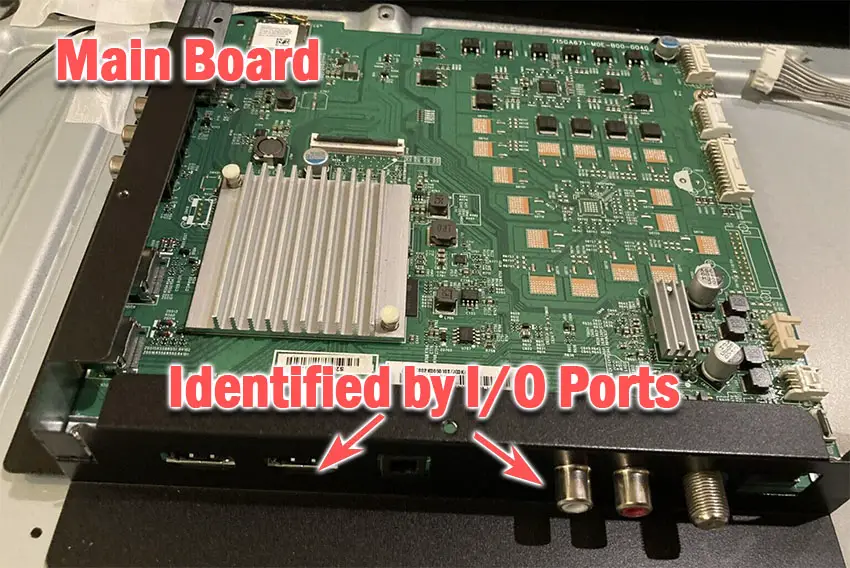
The Main Board is a larger PCB where you plug your HDMI and other connectors into. This does a lot of the work of translating the input into signal, which then goes to the T-Con board. The amplifier will be integrated somewhere on this board, with a cable coming off it which connects to your TV’s speakers.
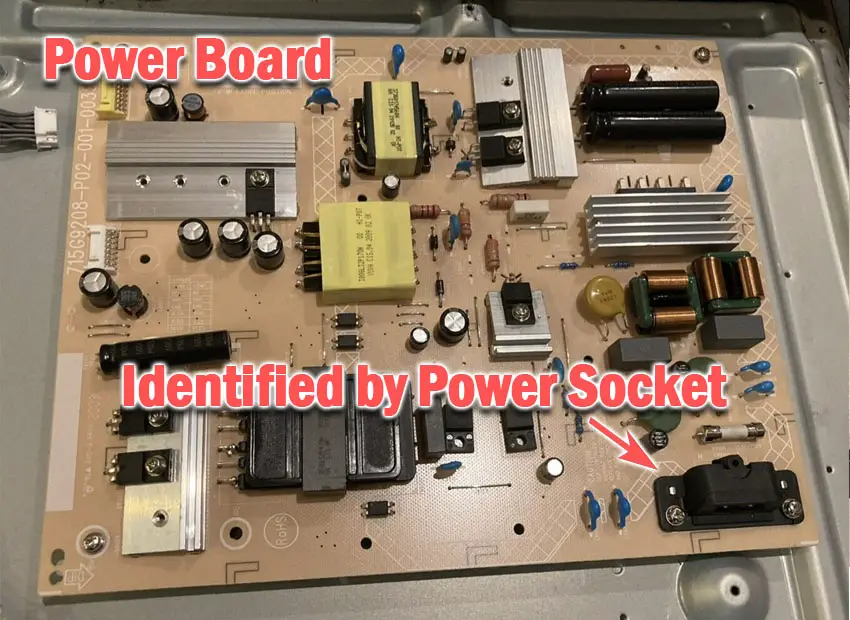
The Power Board is where you plug in your power cable, and which converts your home electricity supply into a voltage and current that your TV can use.
There may also be a number of additional boards, such as a backlight inverter or WiFi board, but these vary between models and shouldn’t be the cause of sound problems with your Sharp TV.
You want to find the cable going from your TV’s speakers to your mainboard, and that should help you to locate the amplifier chip. You will then need a multimeter to check whether it is functioning correctly.
If you do find that the amplifier is at fault rather than the cable connection to your speakers, then you will need to replace your mainboard, which is around $30 – 50 from eBay.
To get the correct board, note the Power / Main Board model number written on the label on the board, and put this into eBay. You can also search for the specific chip if you are confident you have identified it.
See how to replace the board in the video below.
If you don’t want to go to the trouble of replacing the mainboard, you might find that you can use the optical out or Bluetooth for connecting sound, as these should bypass the amplifier chip.
Sharp TV Support & Warranty
It goes without saying that if your TV is under one year old, then you should contact Sharp customer support to get it replaced under warranty.
You can call Sharp directly on:
- 1-888-935-8880 (Mon – Sat, 10am – 9pm EST,)
Even if Sharp won’t fix your TV, they might still offer you a discount off a future model if you pester them hard enough! This is always worth a try in my experience.
Sharp Aquos TV Volume Not Working? How to Fix
To fix your Sharp TV’s sound not working:
- Check your TV isn’t muted.
- Soft reset your TV by power cycling.
- Change your HDMI cables.
- Check firmware is up to date.
- Factory reset your TV.
- Replace any failed internal components.
If you haven’t been able to fix your problem using the steps above, then your next port of call should be customer support, who can advise you if they are able to fix it.
If not, then you can try a local TV repair technician, but if they are unable to help, then unfortunately you are most probably looking at having to get a new TV.
Read More:

Leave a Reply