How often do you look at your own images at 100%? Probably a lot, right? But how often do you look at anyone else’s images at 100%? Unless you’re trying to learn some specific technique, I guess almost never.
So why do you need to view your own images actual size? Maybe it’s perfectionism, trying to do the best you can?
I think that’s the wrong way to think of it. The ‘best you can’ relates to more than the sum of each pixel of your photo. There’s a danger that if you spend too much time on the details, you miss the bigger picture, the story and emotion of your photos.
When we look at other peoples’ photos online we might only give them a few seconds each. Even those we really like are not going to occupy us for more than a minute, on average.
Ultimately, we are all time limited. Everything is a time-based trade-off, and we only want to give so much of our lives to photography. By spending time perfecting your images, going through them at 100%, you are neglecting the parts that others will notice.
And that brings us to the fit screen challenge. For a week, why not try processing your images at ‘Fit Screen’ size. Do not go 100% and don’t tell anyone. See if they notice (they won’t) and use your extra time to work on the story element of your photos, and the emotions and feelings, the big picture, not the details.
Let me give you an example to put this into some context.
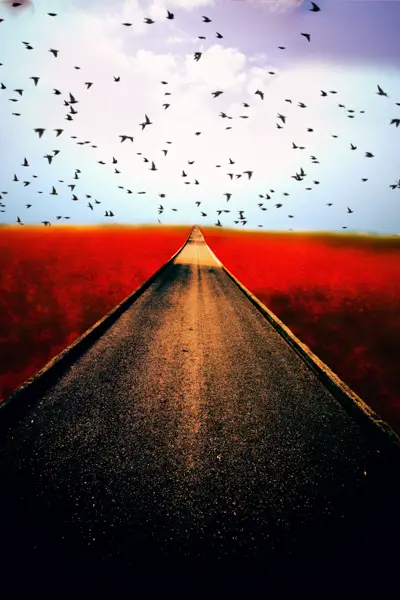
I license a good number of my photos for book covers. One of these is below. If you looked at it at 100% you would reject it. Even seeing it this size you can see some problems with how it has been put together. But, this photo has sold twice for two different book covers making me a few hundred dollars total.
This is because the story element overrides the technical imperfections. So, for most people, for most photos, the technical details come second to how a photo makes you feel. I think we must all know this instinctively, but how many of us put this into practice?
How This Photo Was Made
Aperture: f/11
ISO: 50
GPS: 34°40’7″ N 135°30’8″ E
Lens: Canon 17-40 mm f/4L
No. of Exposures: 1


This is the Dotonbori district in Osaka. It’s quite an experience to walk down a street where the shop signs are literally jumping off the walls.
There was a giant octopus just behind me as I took this, and a giant angry looking chef not much further along. It really shows you how different Japan is from anywhere else.
When you are shooting illuminated signs like this, you only have a very short window of time in which the sky is dark enough and the signs and streetlights are light enough for you to only have to take one exposure.
Usually, you would have to take two or more exposures then blend them. But if you time it right, you can get everything in one shot.
For this photo, I did most of my processing, as always, in Lightroom using the Lightroom Develop System (this is based around a modified version of the ‘2k Sidelit Sunset Cooler’ preset found in the Recipes folder).
I first added colour depth by pushing the white balance down to 3550, and using graduated filters to selectively restore it, as in the how to add colour depth with white balance tutorial.
I increased exposure, contrast, clarity and vibrance, and gave the tone curve a boost in the shadows. I then reduced Highlights and Whites, and increased Shadows.
In HSL, I added large saturation boosts in orange, yellow, green, and in purple and magenta. I then added a blue vignette and reverse yellow vignette to the centre, using the circular gradient filters.
In Photoshop, I created saturation masks and used them to adjust colour balance and contrast according to the get colours like the pros tutorial, then I ran the pro contrast, highlights glow, add warmth to shadows and shadows sharpening actions found in the free Photoshop Colour Control ActionPack.
If you want to create them yourself, without using the actions, take a look at the end of the Landscapes Masterclass tutorial. I finished the photo with a little bit of dodging and burning.
Subscribe to the mailing list and get a free download link right now