This site is part of various affiliate programs. Links may give us a small compensation for any purchases you make, at no additional cost to you. Please read the disclaimer policy for full details.
On the surface, Skylum’s Luminar Neo and Luminar AI might seem redundant, but there are definitely some key differences that you must be aware about:
- Luminar AI, as Skylum themselves describe, is designed to be a simple photo editing software, and very broadly is more comparable to Adobe’s Lightroom. The AI powered modules in the software allow anyone, whether beginners or professionals, to get quick and fantastic results.
- Luminar Neo is packed with features that are more tailored for the professionals, and is more similar to Photoshop. While you can still go about editing your photos quickly with Luminar Neo, just like with Luminar AI, it offers so much more.
Skylum has been in the forefront of developing AI-powered photo editing software for quite some time now. When Luminar AI came out towards the end of 2020, we really got to see how capable the software was. Now, with the announcement of Luminar Neo, Skylum is claiming a significant performance boost over Luminar AI with the addition of a couple of more useful AI-powered editing features.
In this article, we will compare the two exciting programs side by side and see if the latest iteration of Skylum’s offering i.e. Luminar Neo is worth upgrading to. So, read on to see who comes out as the winner in the Luminar Neo vs Luminar AI battle.
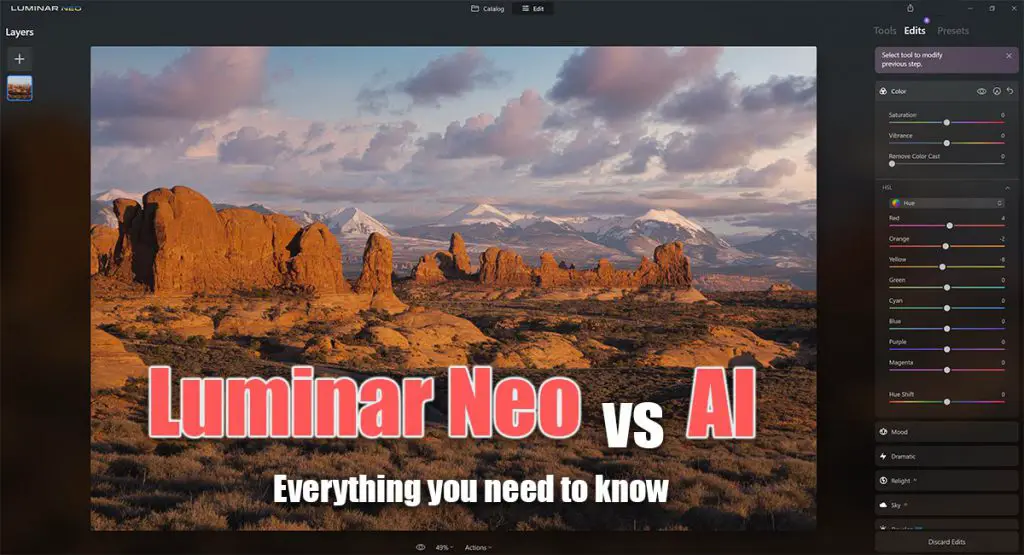
Luminar Neo vs Luminar AI: Pros and Cons
My Top Pick
Packed with pro-level features
- Offers most of the features of Luminar AI and much more viz. Relight AI, Erase Power Lines, Dust Spot Removal, amazing history management, and the ability to work with layers
- Features the Develop module that bundles up all the basic and essential adjustments
- Fantastic history management
- Ability to work with layers
- Powerful AI Masking features
- Layers are limited to other images or effects; no support for layer adjustments or even text layers
- Still lacks proper image management features such as ratings and keyword tagging
More basic photo editing

- Misses out on the latest AI-powered offerings from Skylum, but still packs some amazing bundle of features to help you edit your photos quickly and easily
- Templates make editing photos such a breeze
- The AI feature and editing tools are more than sufficient for the average user
- Does not support layers
- Lacks image management features such as rating and keyword tagging
Get $10 off Luminar Neo with code TimDaniels10
Skylum claims to have redesigned the entire engine that drives Luminar Neo from scratch and promises a performance boost over Luminar AI. But since Luminar AI itself runs pretty well, we weren’t able to tell much difference on the performance side. However, when it comes to the features that they have to offer, there’s definitely a lot to see. Let’s have a look at them in detail below.
What Does Luminar Neo Do Well?
We got the chance to spend an extensive amount of time using both Neo and AI to edit some of our photos. Based on our experience with the software, we have prepared a list of differences each of them have to offer in a real-world scenario, and not just on paper.
Generally speaking, Luminar Neo has an upper hand when compared to Luminar AI in terms of granularity of controls, and the introduction of some newer features. You can make the edits to suit your taste and the new groundbreaking features will definitely save you a lot of time. Let’s have a look at the benefits in detail.
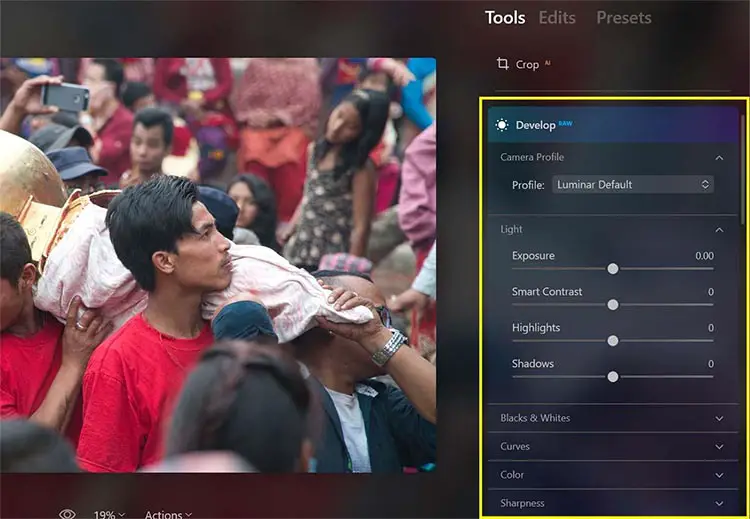
The Develop Module
Those of you who’re used to working with other photo editing tools like Lightroom or Capture One amongst others to edit your images, must be familiar with the handy Develop module there. For most of us, this is where we start our editing workflow.
Skylum really seems to be turning their game up by introducing this module in Luminar Neo, which groups together the various color profiles, exposure correction, black and white adjustment, curves and color adjustment, sharpness adjustment, and noise reduction.
The Develop module even supports various camera and lens profiles to compensate for any sort of distortions. This feature is the first hint that clearly shows how Luminar Neo is targeted towards the more serious and professional users.
And while the Develop module is available for both RAW and jpeg images, you will see better results when working with the RAW files due to the greater amount of information they store.
(Image Credit: Sunny Shresta)
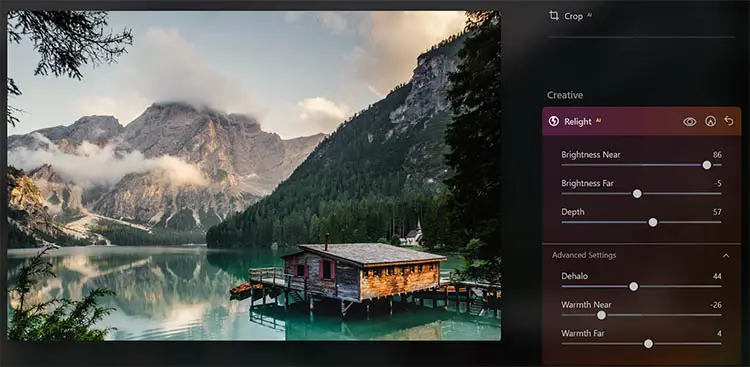
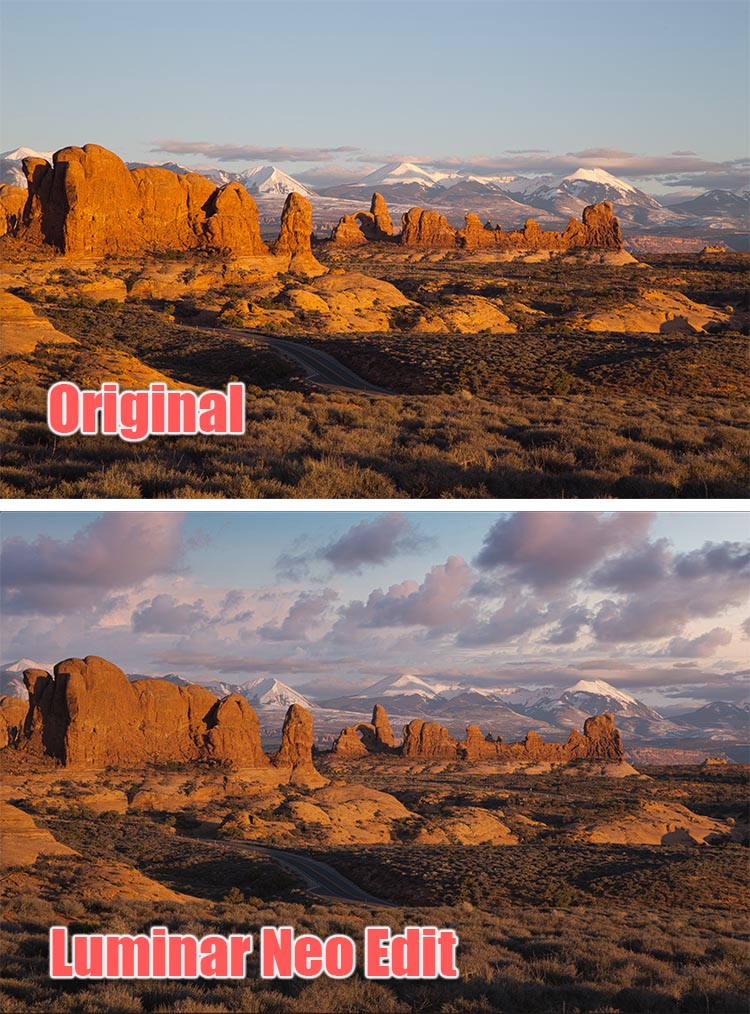
Relight AI
Correcting the exposure in scenes with a high dynamic range can be a pain. Keeping this in mind, Skylum has introduced the Relight feature in Luminar Neo which makes use of AI to evaluate and fix the lighting on the foreground and background elements of an image.
With no need of drawing gradient masks manually, the entire process is as easy as it could get, thanks to the 3D-mapping technology that Skylum has implemented for this feature.
Besides fixing the lighting, you also get the option to change the color temperature to set different warmth in the foreground and the background.
See how we were able to easily brighten the foreground and change the color tone in the background with just a few adjustments in the image below.
Before:

After:

AI Masking
One of the newest features of Luminar Neo is the ability to have the program create AI masks for you. After running for 15 – 20 seconds on an image, you then have the option of clicking a button to select masks that correspond to:
- People
- Sky
- Flora
- Architecture
- Water
- Mountains
- Man Made Ground
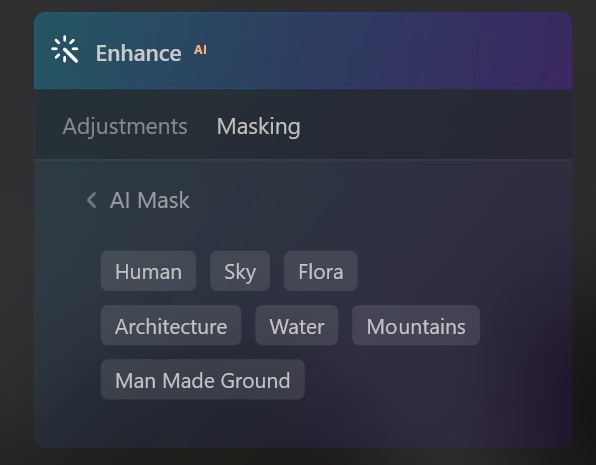
These masks generally work very well (although somtimes give some odd selections). When they do work though, you can really see how much time it can save you – there’s no longer a need to spend ages creating complex masks by hand.
In the example below, you can see how the AI mask has selected the dirt road in the photo, when asked to select ‘Man Made Ground’, avoiding selecting the people and anything else in the scene.
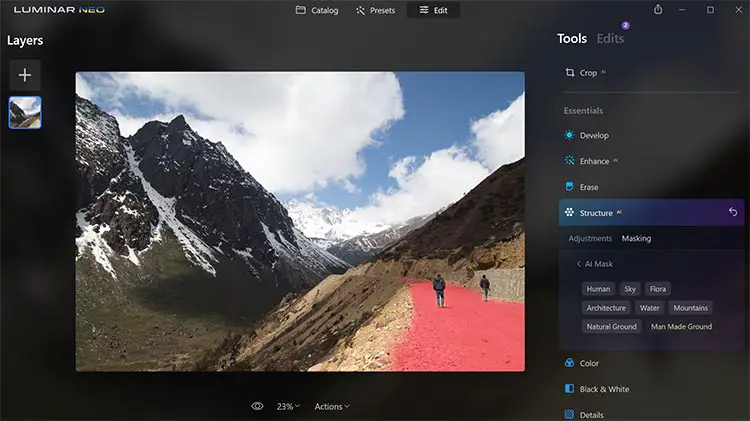
(Image by Tim Daniels)
And in this example, the trees have all been selected for the ‘Flora’ option:
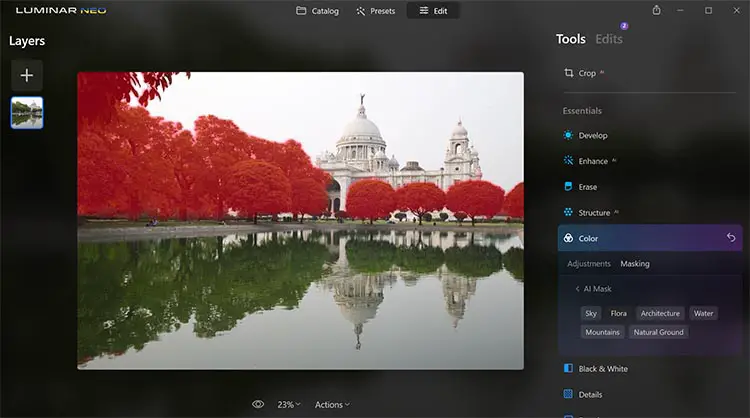
(Image by Tim Daniels)
AI masks can of course be edited manually, but they often produce exactly the mask that you want, with minimal fuss, and are one of the high points of Luminar Neo.
Working with Layers
With Luminar Neo, you can work with layers that basically let you stack your adjustments on top of the image. This allows for a non-destructive editing process as the original image remains untouched throughout the editing process.
With each layer that you add, you still get to work with all the other editing tools which opens up endless possibilities with each image. Furthermore, working with layers means you can even play around with the various opacity and blend modes to add richer effects to your photos.
Note that layers cannot be used in the Photoshop way though, where you add adjustment layers. Instead, you add additional images and textures as separate layers and blend them into the base image.
We added two built-in Light Leaks and Sparklers layers to my image and they truly add a different mood to the image.
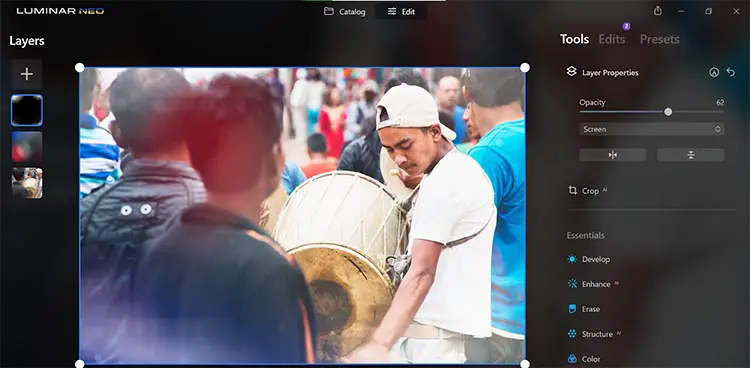
(Image Credit: Sunny Shresta)
Erase Power Lines and Sensor Dust
Cityscape and architecture photographers know how painful it can be when a composition is ruined thanks to ugly power lines. Getting rid of them can be painstaking, but Luminar Neo wants to change that with this new feature.
With a dedicated feature to remove power lines in the Erase menu, getting rid of power lines is now a matter of just a single click. And in case the software doesn’t get it right 100%, you can still use the Erase Tool to get the job done.
While the idea sounds promising, we realized that Skylum might need to work on this a bit more. During our time testing this feature, the software seemed to struggle even with the simplest of images and we found ourselves using the manual erase function quite often. We’re sure Skylum will definitely make this feature better with the future updates.
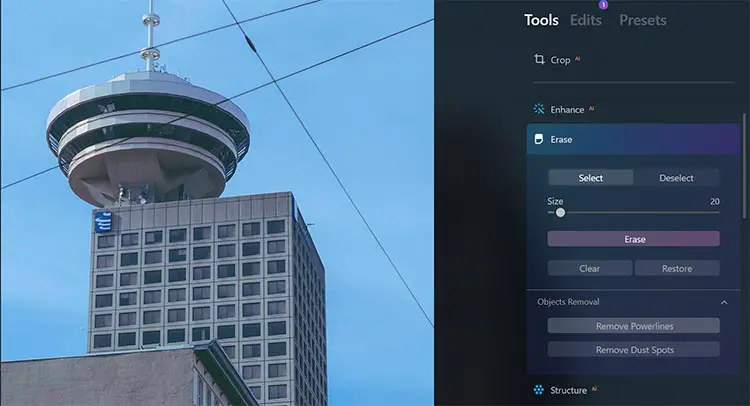
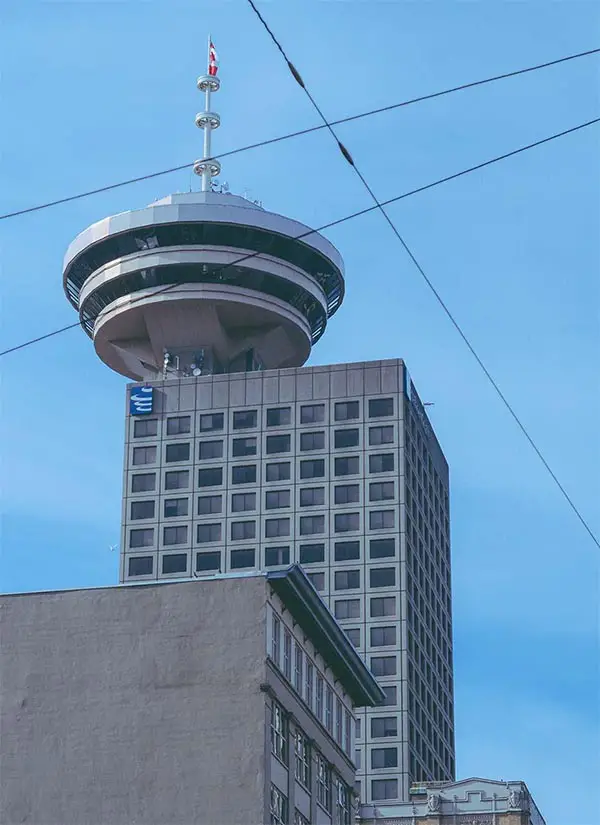
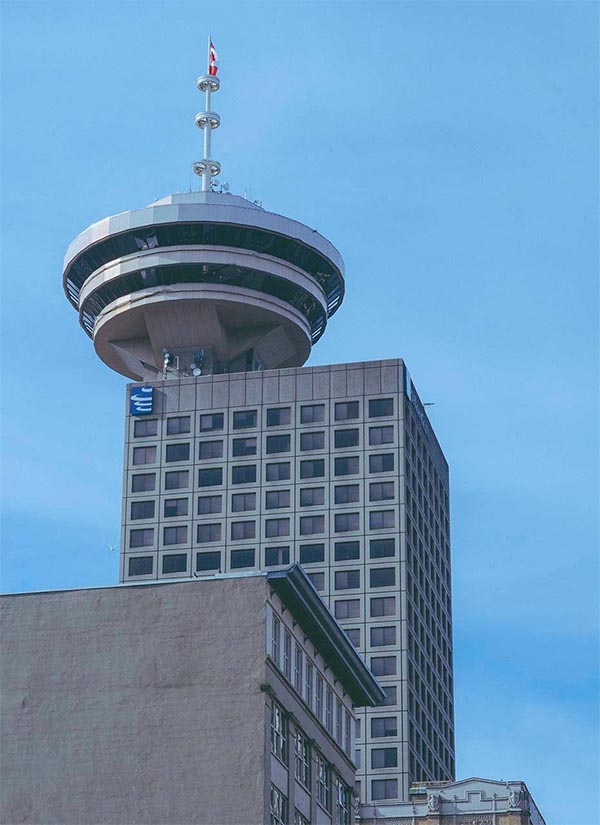
You can see the result in the comparison below.
Before:
After:
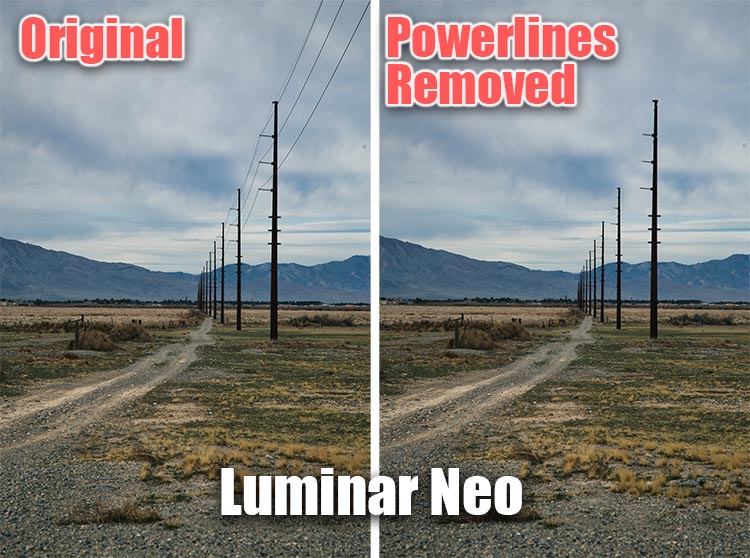
Below is a one-click powerline removal, with no attempt to clean this up using masking. For simple applications like this, powerline removal works very well, although some of the lines in the far distance were not removed.
On the same note, Luminar Neo also has a feature that allows you to remove sensor dust from your images conveniently. While this feature will be useful for any sort of features, mirrorless users who usually travel to dusty areas will surely love it.
Unlike the powerline removal feature, the option to remove dust spots worked like a charm for me. It was just a matter of pressing the Remove Dust Spots button.
Before:

After:

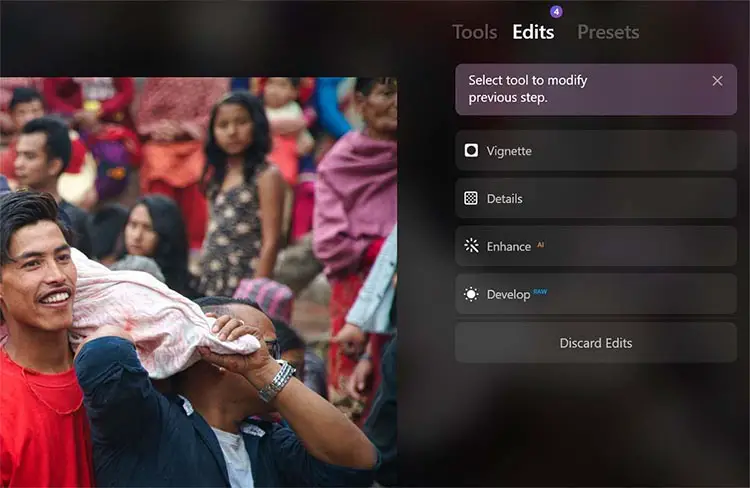
History Management
It is not new for photo editing software to keep a track of all the changes that you make to a photo. But the way Luminar Neo does it is simply brilliant.
You can find all the changes that you make to an image in the Edits tab where they are stored in a sequential manner. And the best part is that, if you want to re-adjust any of the changes that you had made previously, simply head on over to that edit and make the change.
When you do so, the new adjustment will be applied while all the other, later adjustments will remain intact. Life would be much easier if other photo editors adapted this method of history management.
It’s particularly clever that when you make a change to an earlier adjustment, the displayed image temporarily reverts to exclude all later adjustments, enabling you to easily see what the image looked like at an earlier stage in the process. Once you have made your updates, the later changes are then automatically re-applied by Neo.
Use Code TimDaniels10 for $10 off Luminar Neo packages
What Does Luminar AI Do Well?
Based on the fact that Luminar Neo has been built on the exact same base as Luminar AI (although there is a new RAW processing engine), there’s very little that Luminar AI can do better than Luminar Neo. However, one prominent area where we can really appreciate Luminar AI is its ease of use thanks to its template based workflow.
Templates in Luminar AI
The way Skylum has designed the menus in Luminar AI, you can see the Templates tab between the Catalog and the Edit tabs. The intention is to make us get started with the templates first before playing around with the various editing features.
Luminar AI features a vast collection of templates suited for different photography genres such as landscapes, portraits, macro photography and so much more. Based on the type of photo that you’re working with, select one of the suitable templates and you can see how it instantly makes a difference.

And while the only adjustment that you can make to a template is its intensity, we can see why Skylum designed it that way; it makes editing such a breeze. If you still feel that you need to take matters into your hand and fine-tune the image, simply head on over to the Edit tab and make the necessary adjustments there.
This is surely simplicity at its best – something that beginner photographers, and photographers who don’t like to spend too much time editing their photos will appreciate.
Currently, templates from Luminar AI cannot be used in Neo, although Skylum are working on a utility to convert them for Neo use. Luminar Neo itself uses ‘Presets’, which are essentially the same as templates in practice, although there are very few available currently.
Dodge and Burn
Any portrait photographer will tell you how dodging and burning can take your portrait to the next level. It is an important tool that helps to add depth, shape and structure to the face and other parts of the subject’s body.
Although Luminar AI claims to be targeted towards the beginners, it is a good thing to see this feature available here. On the other hand, it is really surprising why Skylum has omitted this feature in the newer and the more advanced Luminar Neo for its launch. Dodge and burn will be available in Neo at a later date, but there is no news on when this is coming yet.
Use Code TimDaniels10 for $10 off Luminar AI
Similarities Between Luminar Neo and Luminar AI
Despite some of the new features that Luminar Neo boasts, you can find a lot of similarities between them. In fact, if we were to do a blind test, we’re pretty sure that most users would find it difficult to distinguish between the two.
Interface
Both Luminar Neo and Luminar AI feature the common and sleek user interface that Skylum is renowned for. If you’re someone who’s used to working with Luminar AI, you’ll basically have to go through no learning curve to get started with Luminar Neo.
Common AI Features
The AI features that got everyone excited to get started with Luminar AI can be found in Luminar Neo as well. Some common AI-based features include Enhance AI, Structure AI, Sky AI, Atmosphere AI, Portrait Bokeh, Skin AI, and Body AI.
These are still incredible feautures in Luminar Neo, with the ability to entirely replace a sky within a couple of clicks. This works better on some images than others, but if you have the right image, as below, you can essentially turn a good image into a stunning image, with no noticeable blending artifacts.
Is Luminar Neo Better Than Luminar AI?
The answer really depends on your acquaintance with photography and the photo-editing process. If you’re someone who wants quick results just to post in social media or personal blogs, and don’t want to be overwhelmed with features, Luminar AI will be good enough.
On the other hand, if you’re a more serious photographer or an editor looking for an image processor that yields results quickly, yet offers granular controls to tweak the results to your personal taste, then Luminar Neo is the one for you.
Moreover, with the difference in pricing between the two products being so minimal and the fact that Luminar Neo is a newer version featuring more options, with support for AI likely to be discontinued in the future, we’d say Luminar Neo is definitely a better deal if you’re looking to try Luminar for the first time.
My Top Pick
Packed with pro-level features
- Offers most of the features of Luminar AI and much more viz. Relight AI, Erase Power Lines, Dust Spot Removal, amazing history management, and the ability to work with layers
- Features the Develop module that bundles up all the basic and essential adjustments
- Fantastic history management
- Ability to work with layers
- Currently lacks dodge and burn tool for serious portrait editing (although this is coming with a later update)
- Layers are limited to other images or effects; no support for layer adjustments or even text layers
- Still lacks proper image management features such as ratings and keyword tagging
More basic photo editing
- Misses out on the latest AI-powered offerings from Skylum, but still packs some amazing bundle of features to help you edit your photos quickly and easily
- Templates make editing photos such a breeze
- The AI feature and editing tools are more than sufficient for the average user
- Does not support layers
- Lacks image management features such as rating and keyword tagging
Use Code TimDaniels10 for $10 off Luminar AI and Luminar Neo packages
Read More:

![Element Roku TV Vertical Lines on Screen? [FIXED]](https://www.lapseoftheshutter.com/wp-content/uploads/2021/10/element-tv-vertical-lines-on-screen-340x226.jpg)


Leave a Reply