2. Time Blending
One of the most pleasurable parts of landscape or cityscape photography must be the standing around, waiting for the light. You set your camera up, put it on a tripod, carefully position and compose, then wait, snapping photos whenever the sky or light looks interesting to you.
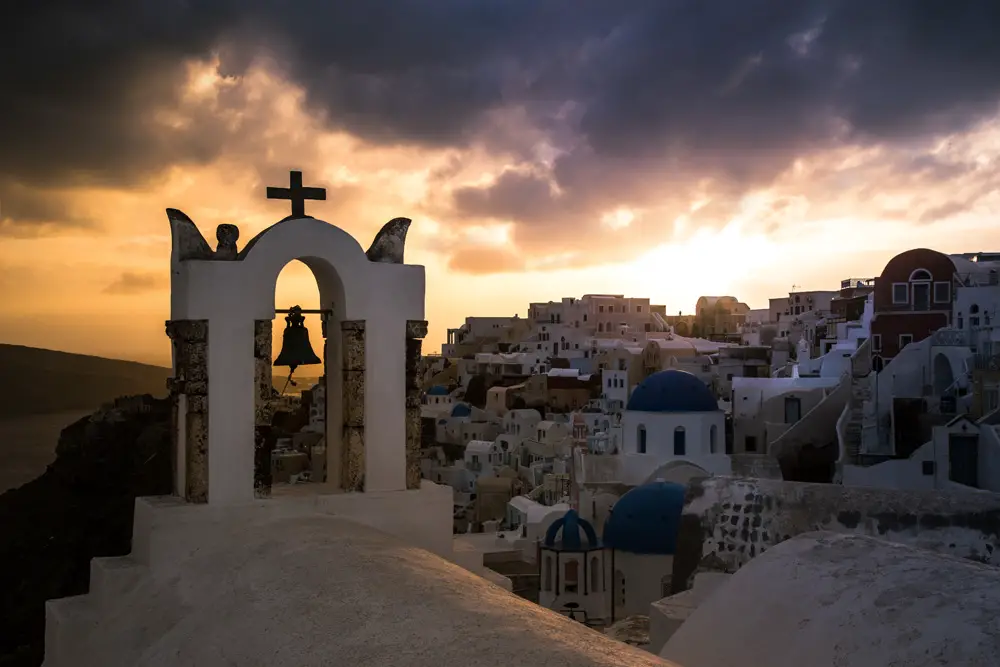
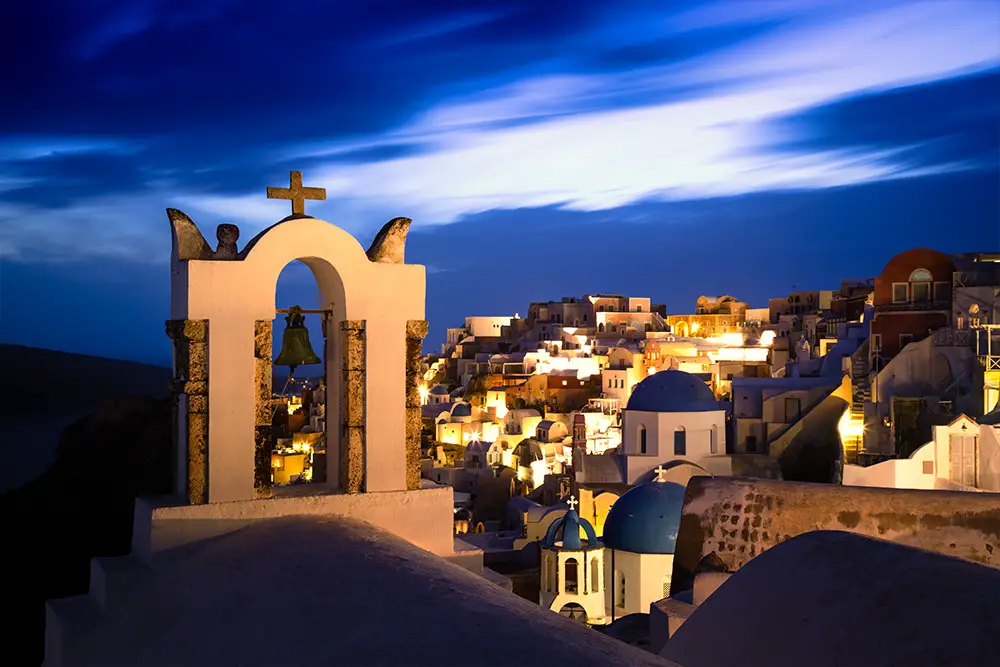
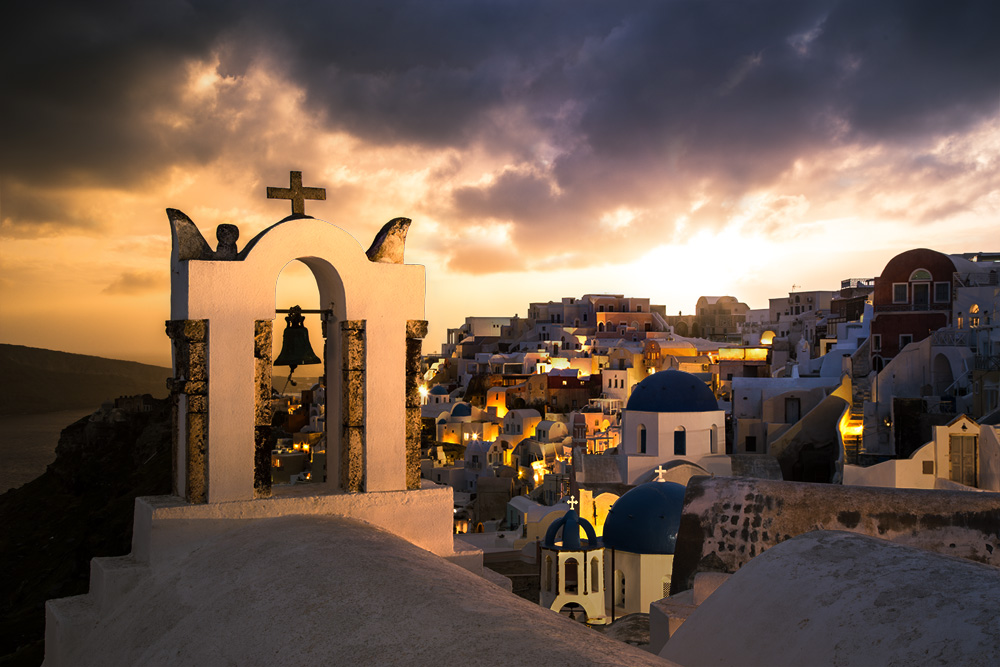
In Santorini, a storm blew over around sunset, with heavy clouds covering the sky. As the sun got lower, the clouds blew over and soon enough it was blue hour, with buildings lit up by streetlights. Two of many photos are shown below, following editing in Lightroom with the Lightroom Develop System.
Both photos are individually pretty good, but what if you wanted to combine them?
Creating & Using Colour Channel Luminosity Masks
Lets see how you would take the parts of the buildings lit with streetlights that are in the blue hour photo and then combine it with the sunset photo.
Just like when you are shooting into the sun, the easiest way to blend these exposures is through luminosity masks, but with a slight twist.
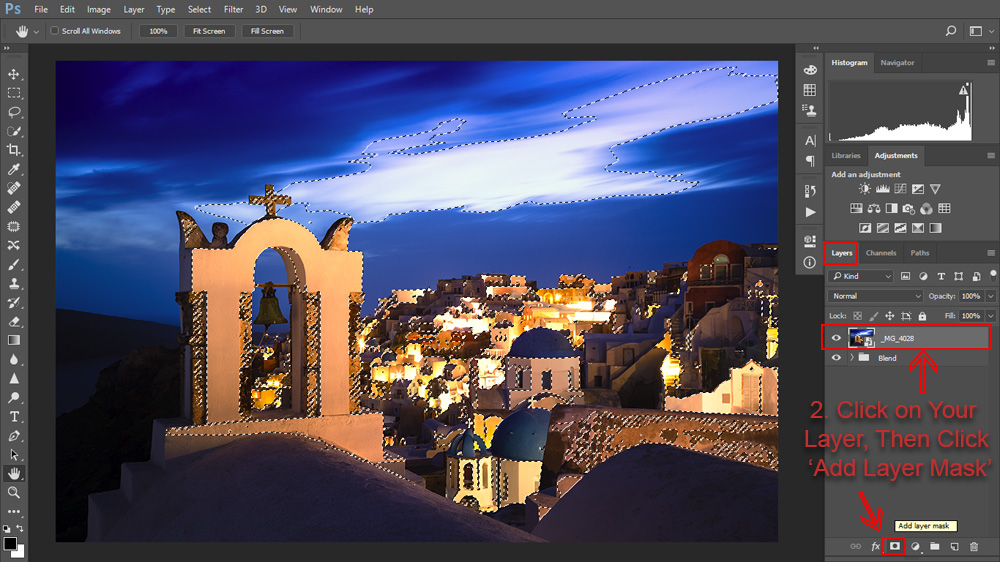
- First, you should open both photos into one workspace in Photoshop, making sure that the blue hour photo is the top layer, and the sunset photo is the bottom layer.
- Then, go to the ‘Channels’ tab, but this time, rather than making a luminosity selection for the RGB channel, instead make this selection for the Red channel, by Ctrl+Clicking (Cmd+Clicking on Mac) on the Red channel thumbnail.
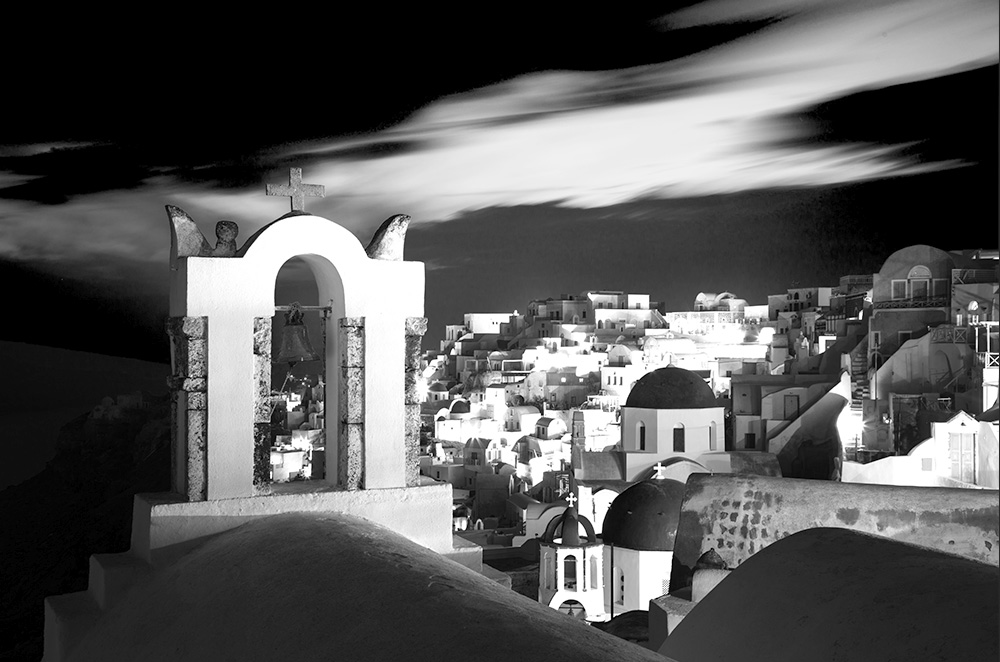
By doing this, you will select only the 50% brightest red pixels in your photo. This is the most effective way to select streetlights in night photos, because streetlights contain large amounts of red and yellow, while areas like the sky and anywhere that is not artificially lit, tend to have a more blue colour cast. Still, this selection method is not perfect, as you can see from the screenshot below.

Next, you want to add the selection you have just made to the blue hour exposure, as a layer mask:
- With the ‘marching ants’ of the selection showing on your photo, move back to the ‘Layers’ tab, making sure the blue hour layer is highlighted to show that it is active (click on it if not active), and then click on the small symbol at the bottom to add a layer mask that will automatically be populated with your selection.
Your result should hopefully look like the one in the screenshot below. Here, all of the areas lit up by streetlights have come through precisely as expected, although you can see obvious problems in the blend of the sky. Luckily, this is easy for you to fix.
Fixing the Colour Channel Luminosity Mask
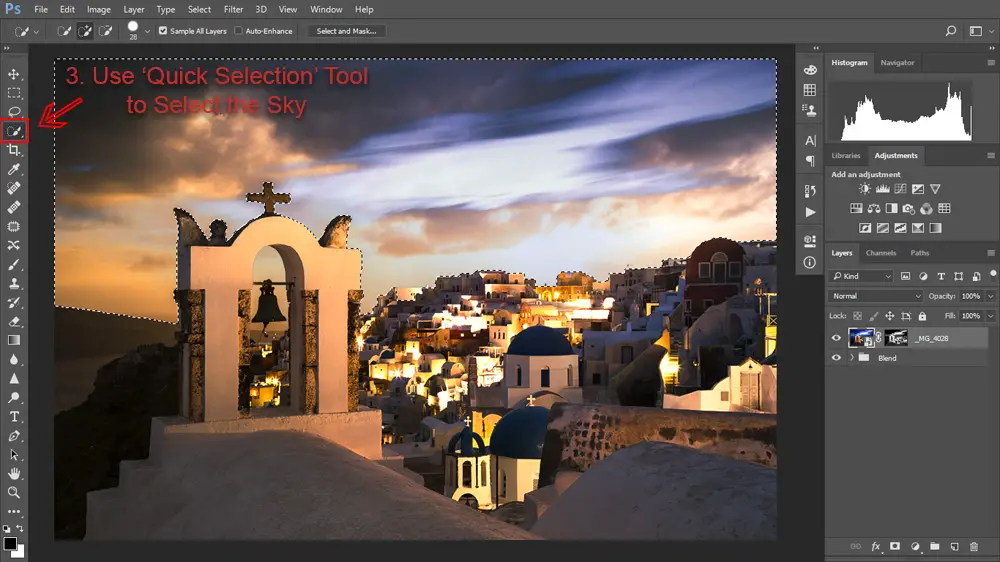
- With the ‘Quick Selection’ tool, you can easily make a selection of the sky. This tool works by automatically finding the boundaries of areas that you want to select as you paint over these areas. So, paint over the sky until your selection looks like the one below. Make sure you have selected the layer before you use this tool, rather than the layer mask. You will know if you have the layer selected as it is highlighted, with a bold border around the layer thumbnail.
- Tip: This tool should automatically snap to the boundaries between your sky and ground. If the tool is having trouble selecting your sky, try turning the ‘Sample All Layers’ checkbox on or off, on the toolbar. And if your sky is more complex, try zooming in and lowering the tools brush size. Also, it is possible to add or subtract areas from the selection as necessary, by holding down Ctrl (adding), or Alt (subtracting), while you paint with the tool.
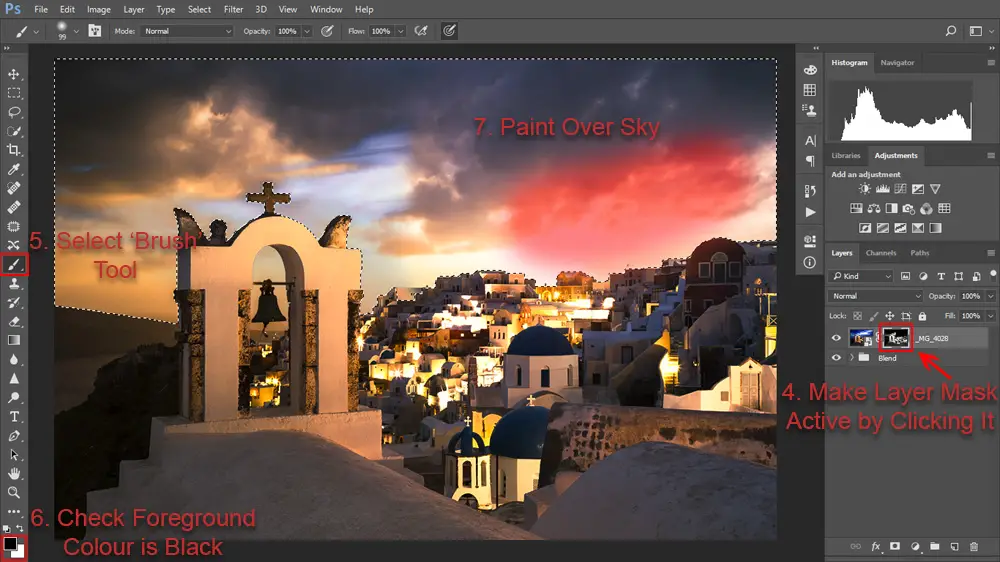
- Then, make sure the layer mask on the blue hour layer is active by clicking on it’s thumbnail. You will know if it is active, because a bold border will appear around the layer mask thumbnail. You can now use the ‘Brush’ tool, making sure that the colour is set to black, to paint over the sky and therefore remove it from your layer mask.
Because the quick selection that you made will constrain the brush to only the area you selection, you don’t have to worry about the accuracy of your painting. Remember that painting black onto a layer mask will prevent that part of the layer from showing through to the final photo, effectively hiding it.
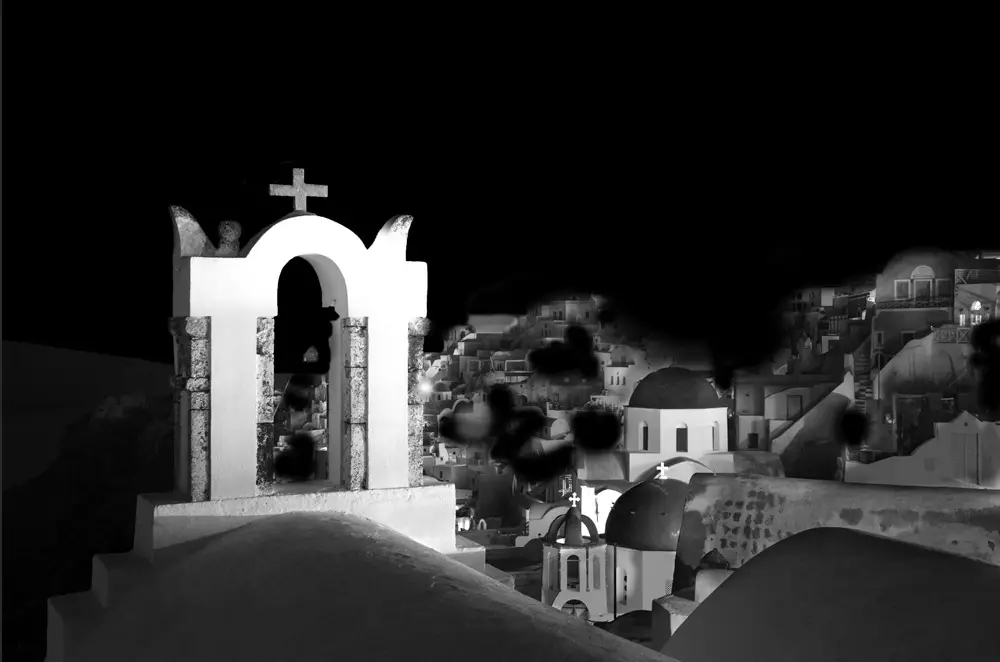
Finally, you may also wish to tidy up the mask and go over any small areas that don’t look quite right, by using a freehand black brush to paint these areas out of the layer mask. Below, you can see the original red channel luminosity mask, and the finalised mask after the sky was painted out.
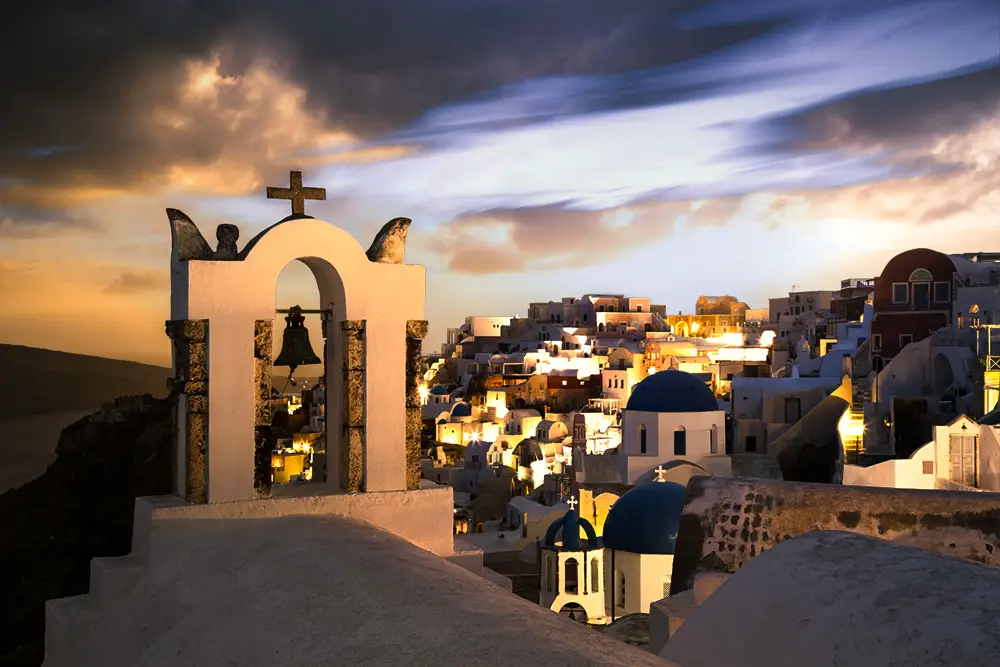
And now you have one finished exposure blend of a stormy sunset in Santorini, with streetlights turned on. In order to more fully bring out the colours and tone, you could now run this photo through the Landscapes Masterclass process.
This is only a basic introduction to using colour channel luminosity masks. If you want to, it’s possible to go even further than this, combining these colour channel luminosity masks with blending modes. For more on this powerful technique, see this video:
In Part 3, we will look at what to do when you want to blend objects together from two separate photos, using birds in Prague as an example.
Get the Photoshop Color Control Action Pack for free!Subscribe to the mailing list and get a free download link right now
Turn to Part 3 for more.
Leave a Reply