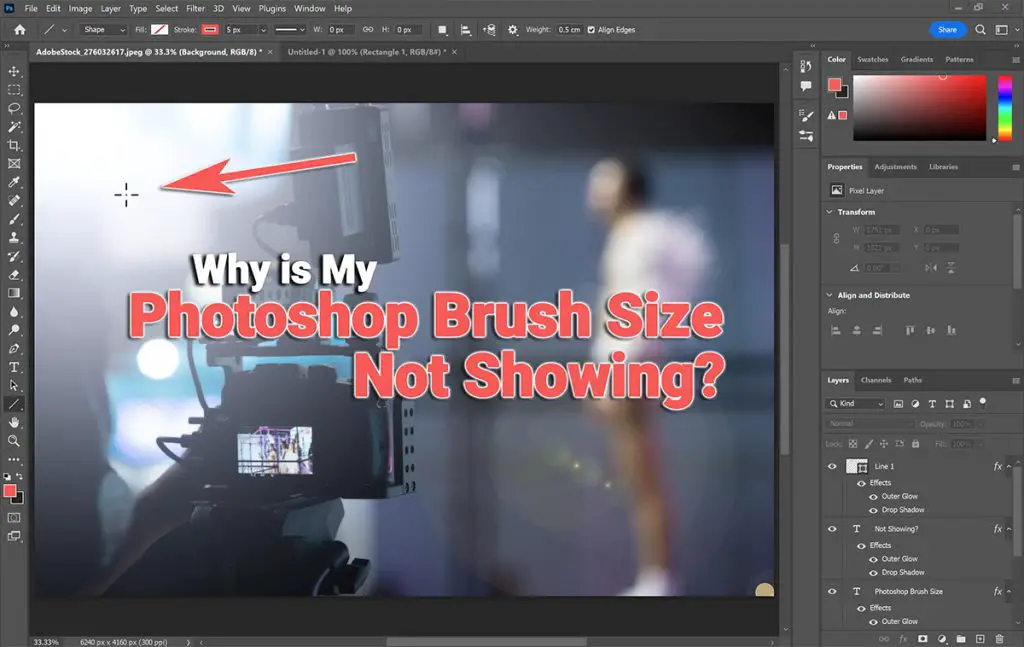
It’s not obvious what to do if your Photoshop Brush Size is not showing, particularly if your brush starts showing a crosshair instead of a circle with outline, or if nothing is happening when you start painting. The crosshair is used for pixel-perfect painting, when you don’t want to rely on the less accurate standard circle cursor. But it’s not obvious how to change it back to show a circular Brush size preview.
How to Fix the Photoshop Brush Size Not Showing
Make the Brush Tool show your brush size circle by pressing your Caps Lock key. This toggles Photoshop between the more accurate crosshair cursor and the less accurate standard Brush cursor, which shows your brush size as you paint.
1. Press the Caps Lock Key
Although the standard Eraser cursor is fine for day-to-day work, the crosshair cursor does have its place, if you are using a very fine brush tip.
The crosshair points to the exact center of your brush, which allows for much finer control of your brush, but it does not show any outline, meaning that you cannot see the size of your brush as you paint.
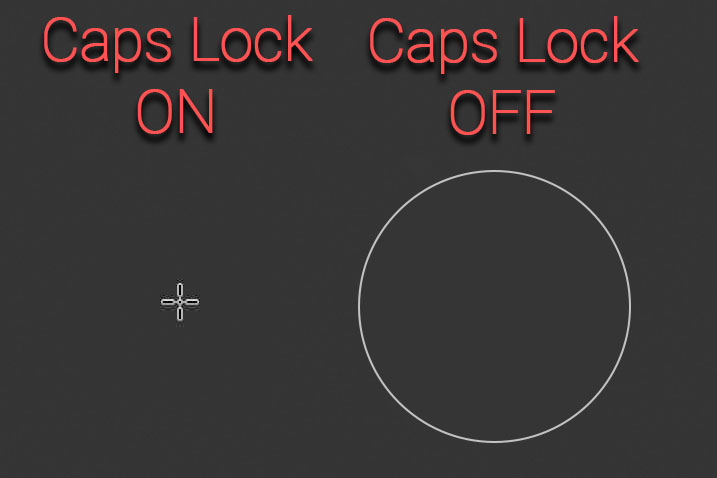
If the Photoshop Brush circle is not shoeing, simply press the Caps Lock key to switch the cursor from a crosshair to your standard circlular Brush cursor, activating the size preview.
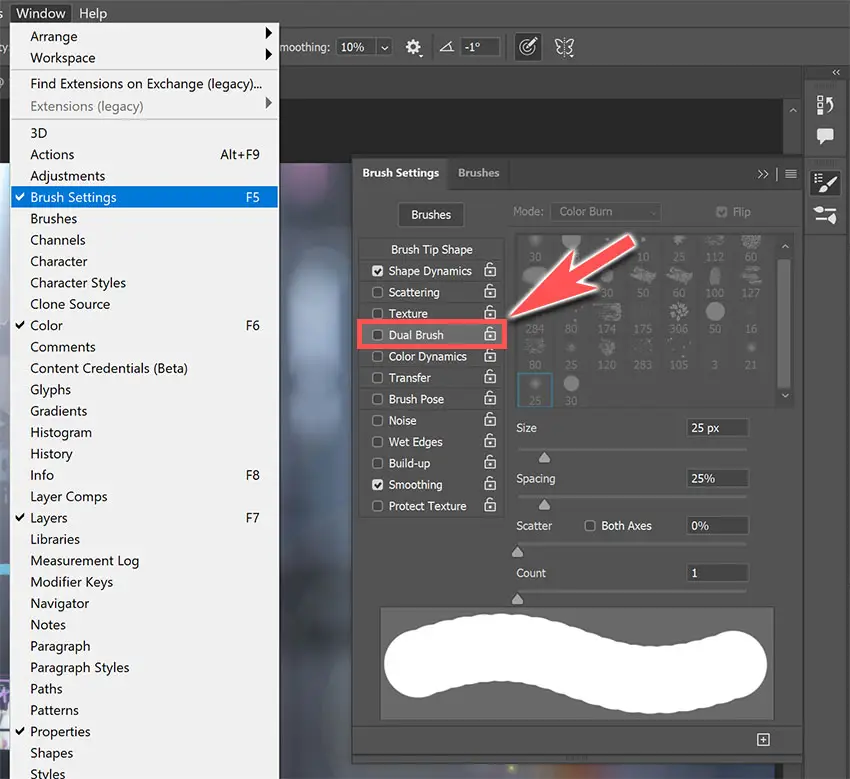
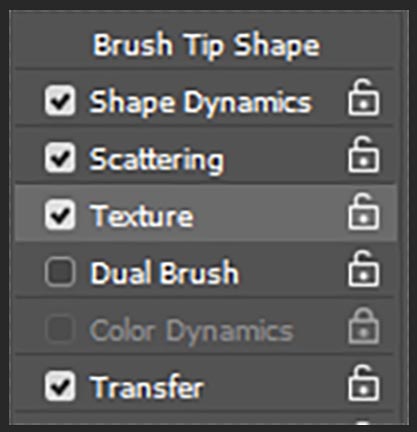
2. Turn Off Dual Brush
A common cause of the Brush circle not showing is that Dual Brush is switched on.
To turn this off, with your Brush Tool selected, open the Brush Settings with F5 or by using the Window -> Brush Settings menu option.
Then, uncheck the box next to Dual Brush.
3. Choose Full Size Brush Tip
If your Brush size preview isn’t working correctly, then changing your brush tip to Full Size can fix the issue.
Go to Preferences -> Cursors in the menu.
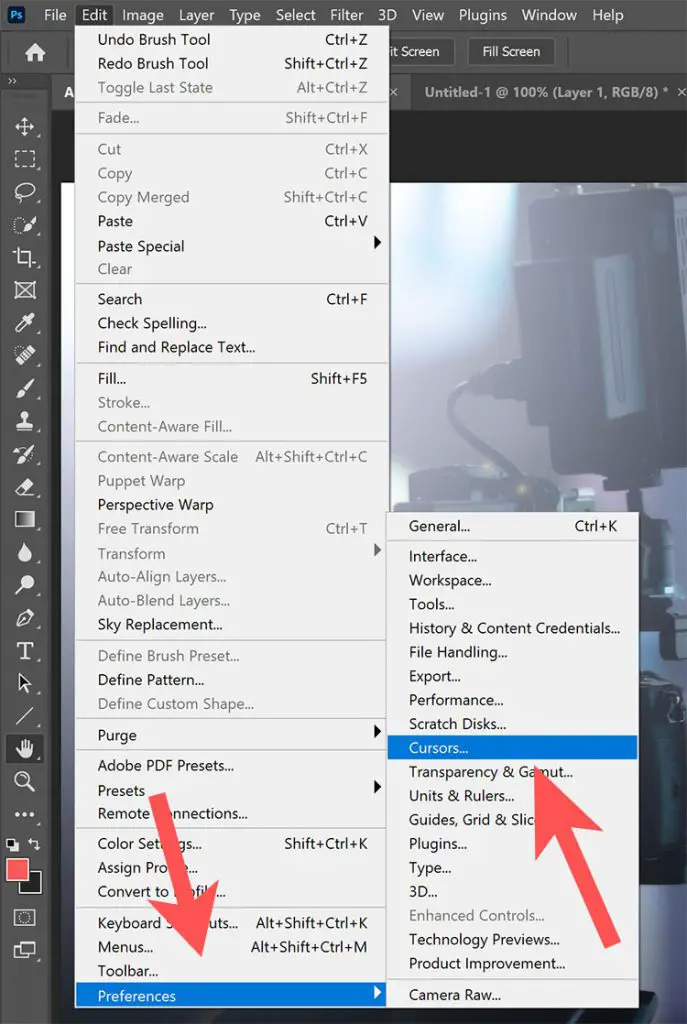
Then select the Full Size Brush Tip in the Painting Cursors options.
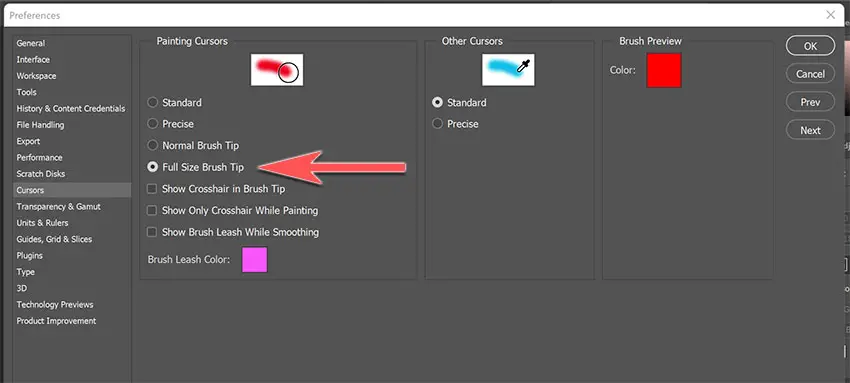
This should enable the Brush to show a preview of it’s size.
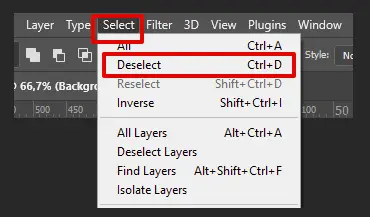
4. Undo Any Selections
It’s possible that you selected a part of the image by mistake with one of the selection tools, like Patch or Lasso, or forgot to deselect it after using one.
Or, if you only selected a single pixel or other small area, then you will not see the Select Border.
By making a selection, the Brush Tool will only work on areas under that selection.
To ensure that you don’t have an active selection, hit Ctrl/Cmd+D, or follow the menu Select -> Deselect.
5. Turn Off Pen Pressure Controls
If you use a tablet, it may cause problems with the Brush Tool. In rare cases, this can happen even if you do not use a tablet.
So, to fix this, you need to check the tablet’s settings first and try to fix it from there, or the alternative is to modify the pen pressure in Photoshop directly.
To fix problems with your tablet pen, try disconnecting or reconnecting the pen tablet, and then make sure that you have the latest drivers downloaded. Check your Wacom drivers, XP-Pen drivers, Huion drivers and Gaomon drivers at the links.
You can turn off pen pressure controls in Photoshop with the following steps:
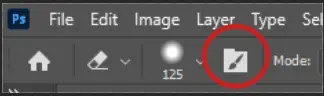
1. Click the Brush Settings Panel in the Options Bar.
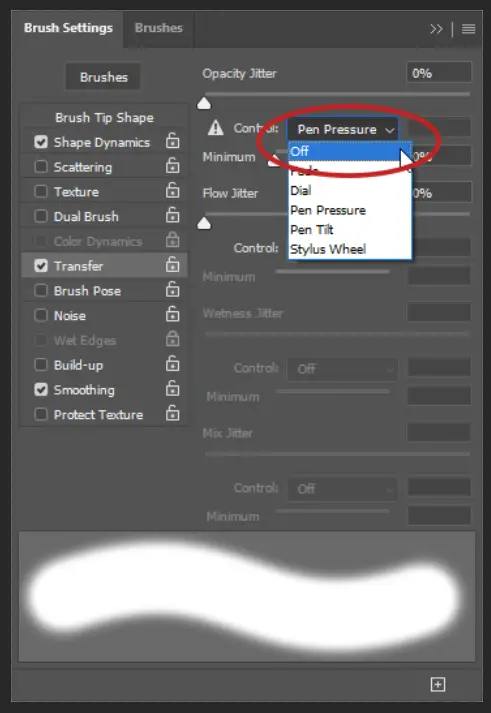
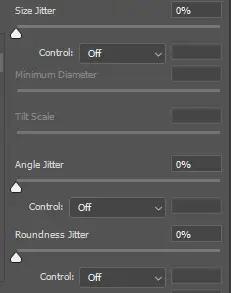
2. The Brush Settings Panel will show up, where you will have a bunch of different settings for the brush. You will have to find every setting that allows the use of pen pressure and turn them OFF.
3. When you first open the Brush Settings panel, by default the last section you had open will be selected. Start with the Transfer section, where you will find several Jitter Controls (Opacity, Flow, Wetness, and Mix). Most of them should be grayed out. But, for each one that is not, in the Drop-Down Menu, set the control to OFF.
4. You will have to repeat the same process for Shape Dynamics, Scattering, and Texture.
In the Shape Dynamic section, there are three Jitter Controls: Size, Angle, and Roundness. Set all of them OFF. Don’t worry if some of them are grayed out. Ignore those.
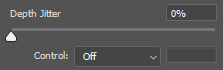
Repeat the process for the Depth Jitter Control for the Texture section. It should be set to OFF as well.
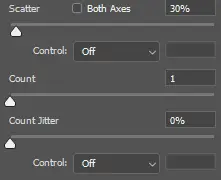
Do the same for the Scattering section by turning OFF the Scatter and Count Jitter controls.
6. Check Your Brush Flow and Opacity
Maybe the brush you are using was created with lower transparency or flow setting?
Unless you have the Flow and Opacity set to 100%, you might think that you have a faulty brush.
With the changing of the opacity and flow, you are smoothening the brush and decreasing its opacity. So if the Brush Tool works semi-transparently, make sure the opacity and flow values are at 100%.
You can find the opacity and flow fields in the Options Bar at the top of the screen.

7. Reset the Brush Tool
If you are still struggling to get your Brush Tool to show a circle, then the final option is to try to reset the tool.
This is not to be undertaken lightly, as it will remove any of your preferences and presets from the Clone Stamp, but should at least get it working again if all else fails.
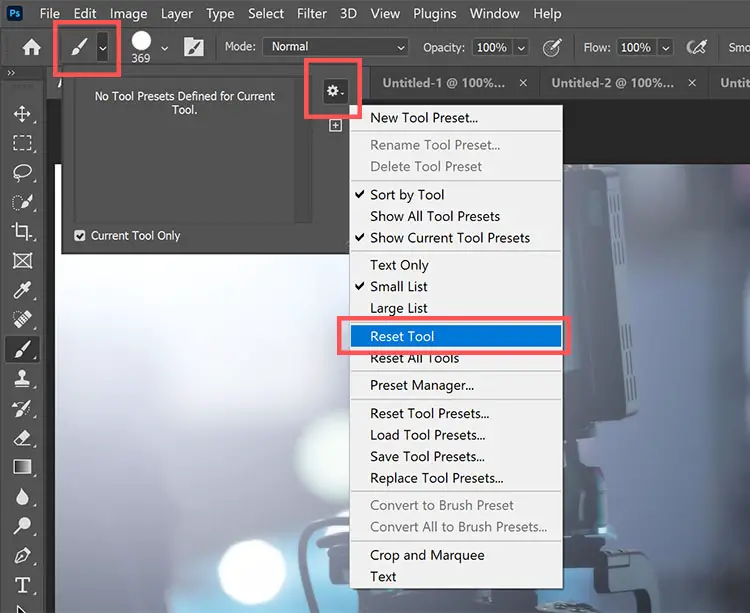
- First, make sure you have the Brush Tool selected, either from the toolbar or by pressing ‘B’.
- From there, go to the Brush Tool Settings in the Options Bar, which is a dropdown menu next to the Brush icon, next to the Home icon.
- Once you click on the Brush Icon, you will be greeted with an Option Menu.
- Then, select the Cog Gear to open a settings menu, and choose the Reset Tool option.
This fully resets the Brush Tool and returns it to its default state from when you first installed Photoshop.
Hopefully, this has fixed your issue, but if not, there is one more step you can take.
8. Photoshop Preferences Files Might Be Corrupt
If none of these tips fix your issue, you might be dealing with a corrupt Preferences File. The Preferences File saves all of your settings and preferences, so resetting/deleting that file will reset all your Photoshop settings to default. In a sense, it will feel like a fresh install of Photoshop.
This is obviously a last resort, as you will lose any custom settings and presets that you have added to your install.
Method 1: Using Shift+Ctrl/Cmd+Alt
- Save all your work and quit Photoshop.
- Wait for a couple of seconds for all of its associated background processes to close.
- Then press and hold Shift+Ctrl+Alt on Windows or Shift+Cmd+Opt on a Mac, and launch Photoshop while holding those keys.
- Before Photoshop launches, a dialog box appears asking you whether you want to delete the Adobe Photoshop Settings File.
- When you choose Yes, Photoshop will launch with the Preference File reset, and everything will be set to the factory settings.
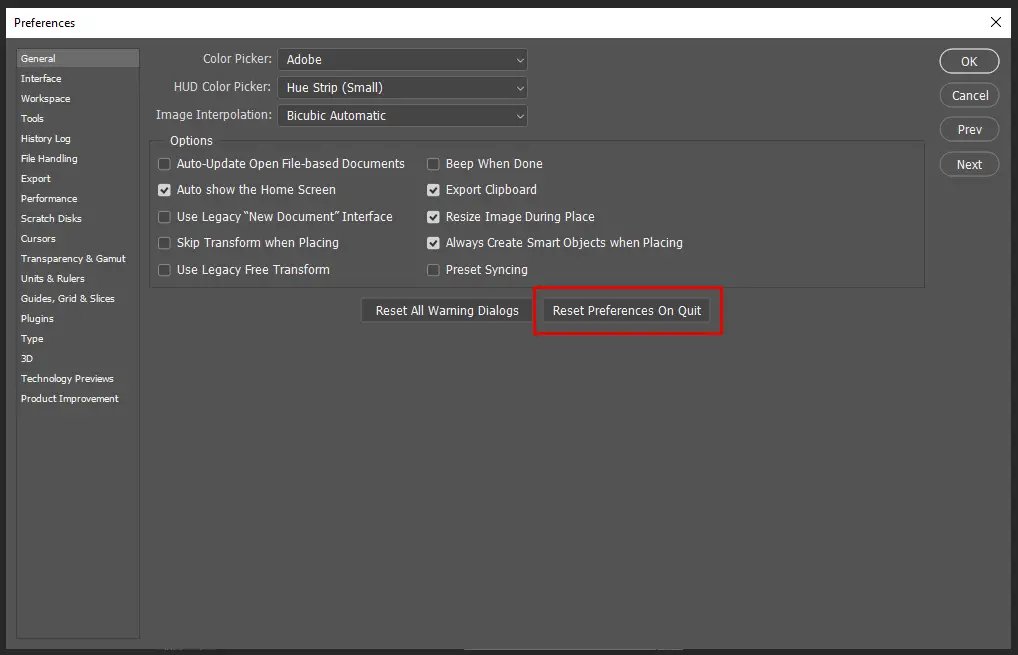
Method 2: Use the Preferences Menu
This method works only with Photoshop CC and newer versions.
- First, go to the Edit Menu.
- From there, go to Preferences and choose General. (You can also do that by using the Ctrl/Cmd+K shortcut).
- There you will find a button named Reset Preferences On Quit.
- If you press that button, when you close Photoshop, the Preferences File will be reset.
Using either of these methods, on the next Photoshop launch, you will notice that everything is reset to the factory settings.
Final Thoughts on the Photoshop Brush Size Not Showing
If your Brush Tool is not showing a circle or is not showing the Brush Size, then you can almost always fix it by resetting the tool, but this is a last resort as it will also delete any presets you have saved.
Before resetting the Brush Tool, you should check:
- The Caps Lock is not on
- Dual Brush is turned off
- Brush Tip is set to Full Size
- Remove any selections in your document
- Pen pressure controls are off
- Brush opacity and flow are at 100%
If none of these steps work, and you have tried to reset the tool and the Photoshop preferences file, then all that is left is to contact Adobe Customer Support and ask them to help you to resolve the issue.
Free Photoshop Tutorials:
How to remove the white background in Photoshop


Leave a Reply