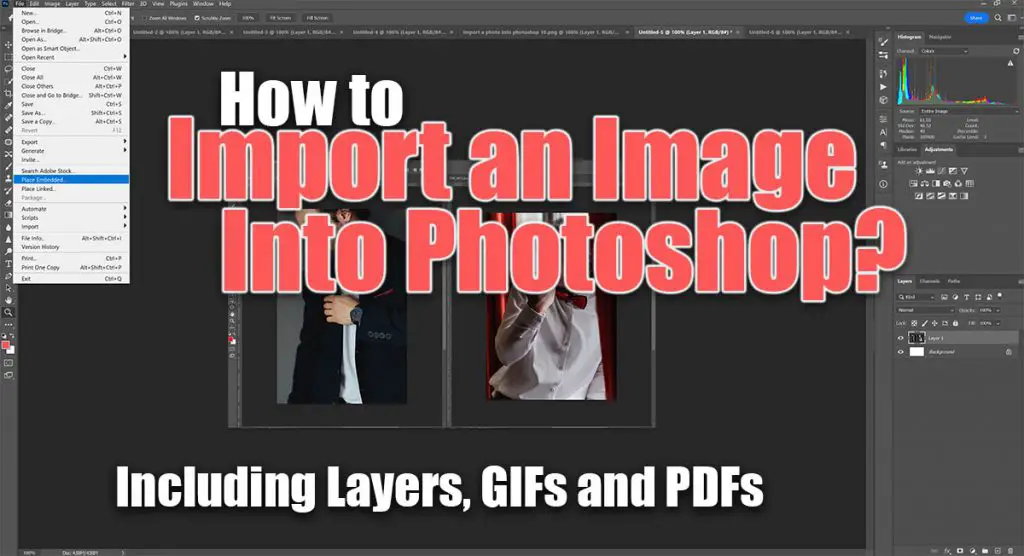
Do you want to import an image into Photoshop, and you do not know how to do it? There are a few ways to import the image into your Photoshop project as a new layer, allowing you to resize, adjust and even blend with other layers.
This article will teach you how to import an existing image into Photoshop.
How to Import a Photo into Photoshop?
There are several ways to import a photo into Photoshop. You can use methods as simple as Drag and Drop or the classic Open Dialog.
Method 1: Import a photo into Photoshop via the Open Dialog
To import an Image via the Open Dialog, you first need to open Adobe Photoshop. Then, click the File Menu. You can find it in the top left corner of the screen. Then select Open, and double click the picture you want to import.
Also, you can do it by using the shortcut:
For Windows:
Ctrl+O
For Mac:
Cmd+O
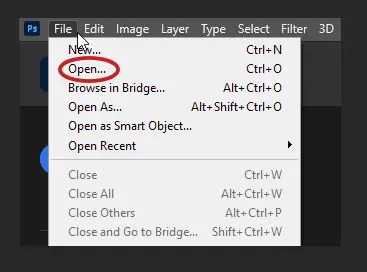
Or you can select the picture and click Open.

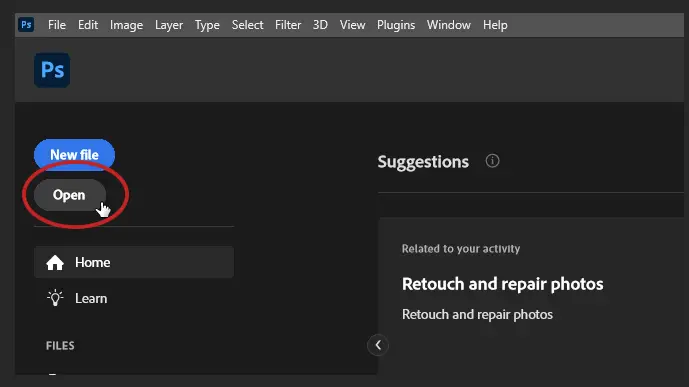
Method 2: By using the Adobe Photoshop Welcome Screen
First, you need to open Adobe Photoshop. Once opened in the top left corner of the Welcome Screen, you will find the New File and Open buttons. Bear in mind that the position of these buttons in the Welcome Screen might change with future updates.
So, this works the same as the Open Dialog works. You click the Open button, then double-click a photo of your choice.
Method 3: Import the Photo into Photoshop with Drag and Drop
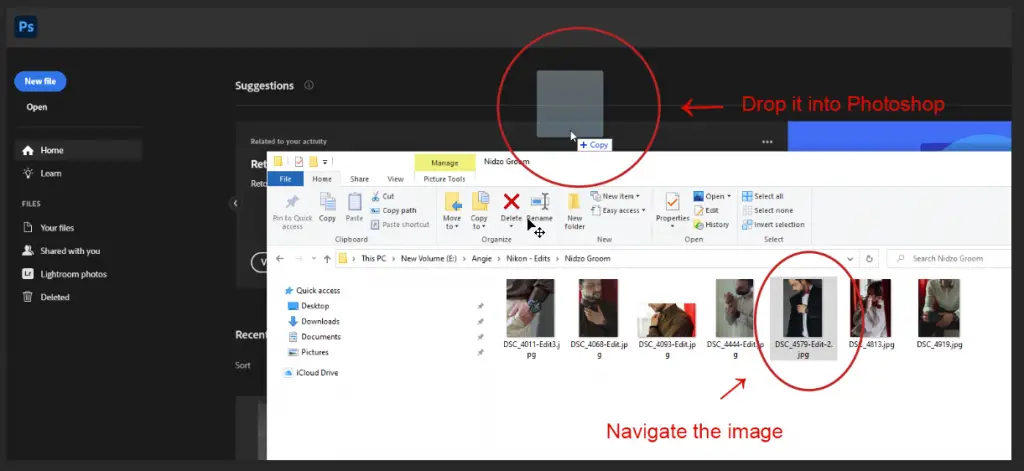
Like everywhere else, Drag and Drop is the easiest way to import an image into Photoshop. First, you need to open Adobe Photoshop. Find the image you want to import, navigate the image, and drop it into Photoshop.
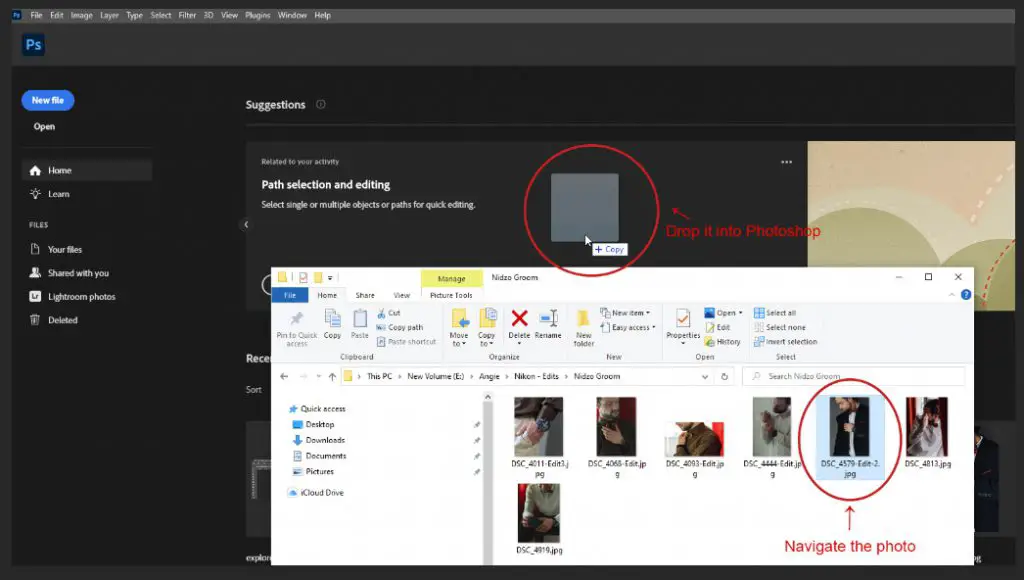
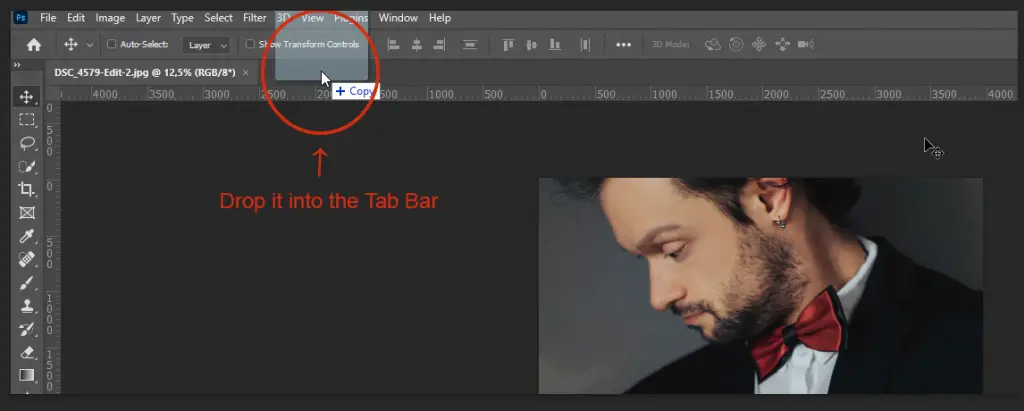
But if you need to import another photo with drag and drop, while you already have an image opened in photoshop, you need to drop the image in the Tab Bar. That way, it will not be placed as a new layer.
How to Import an Image into an Existing Photoshop File
So, there are a few ways to do this. Let’s start with the simplest one.
Method 1: With Drag and Drop
You can do it by dragging and dropping the needed image, as you did when you imported the single image. You choose the image you want to place over, drag, and drop it into the workspace. Once you drop the picture into the workspace, it becomes a layer that is now in transform mode.
You can resize the photo as needed by dragging any transform points of the edges of the image until it fits. By default, the resizing is proportional. But, if you want to stretch the image, hold the Shift key while clicking and dragging the handles on the edges.
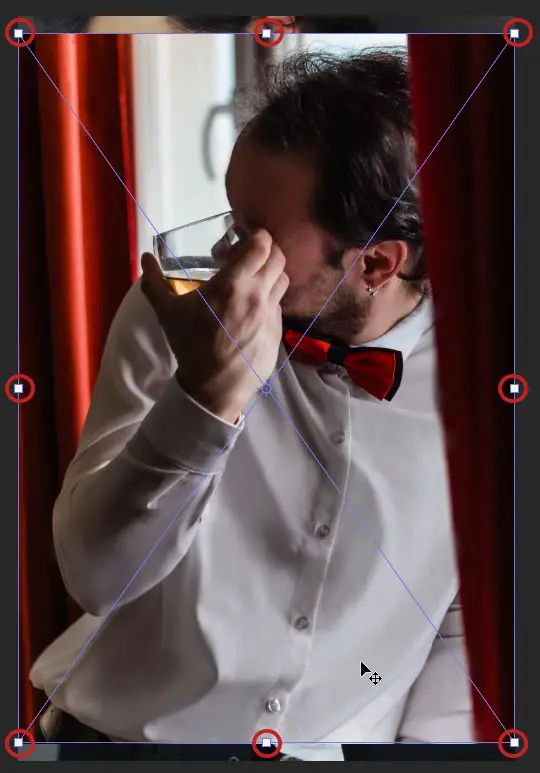
When you have finished, press the Enter button to place it. Or, you can press the Tick button in the tab bar.

Once you have finished, you can save the photo and move on to the next project. You can save the photo by going to the File Menu and selecting the Save a Copy option.
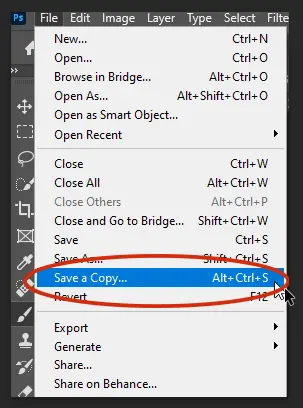
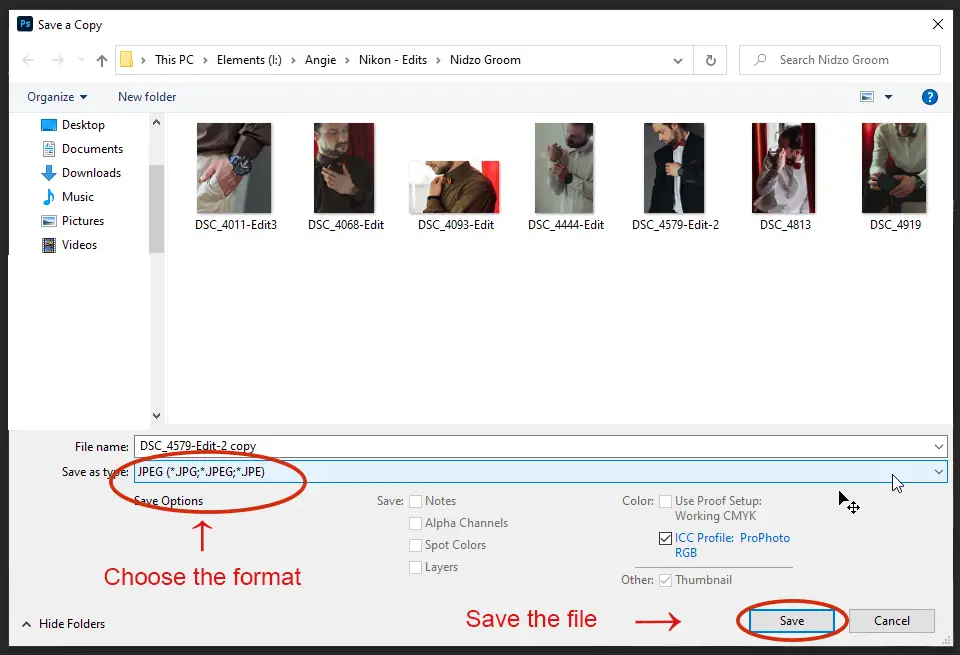
When you click the Save a Copy option, a File Browser will show up, where you choose the format you are saving as and press Save.
You can also use the shortcut to save it faster.
For Windows:
Alt+Ctrl+S
For Mac:
Opt+Cmd+S
Method 2: With Drag and Drop Between Files
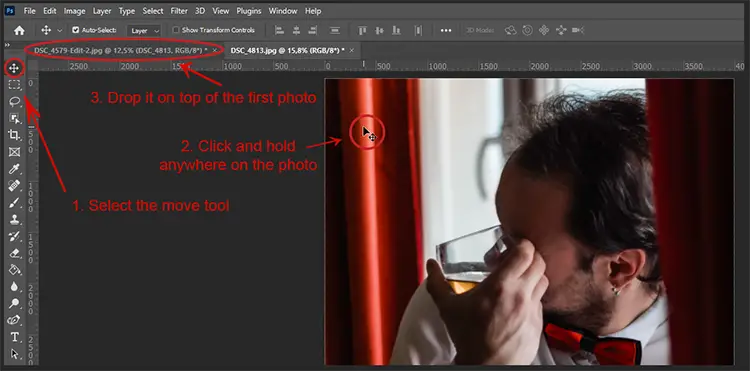
So, you’ve got Photoshop open with an image already imported. There’s another way to import an image into the already existing photo. Go to the File Menu, import the new image you want to place over, or drag and drop it into the Tab Bar, as you did before. Now you’ve got two images opened separately.
To place the other image onto the already existing one, you simply need to select the Move Tool (or press the shortcut button on your keyboard – V), click on the photo you want to move, and drag it onto the first photo. You can continue with the resizing process as previously and save the photo.
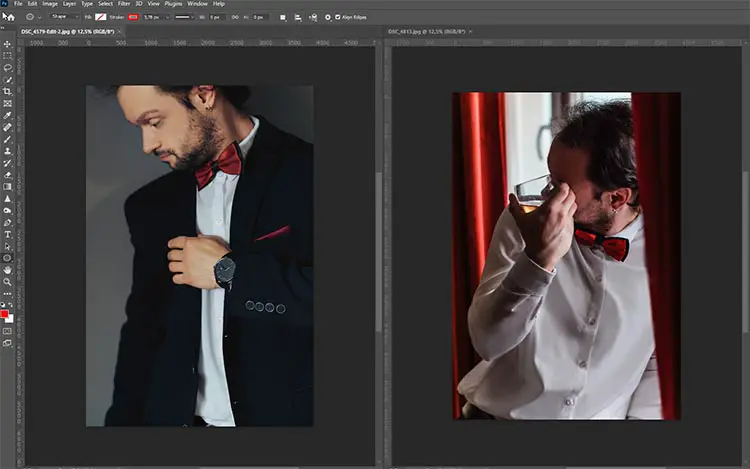
Method 3: Drag and Drop by Using a Multi-Document Layout
So, by now, you have learned how to drag and drop between two tabbed documents. Now, it is time to learn how to drag and drop an image between documents using the Multi-Document Layout.
To use the Multi-Document Layout, you need to go to the Window Menu, then click Arrange, and choose 2-up Vertical layout.

This option will place the two documents side by side in the workspace like so:
Now select the Move Tool from the Toolbar. Click on the image you want to move and drag it over to the photo you want to replace.
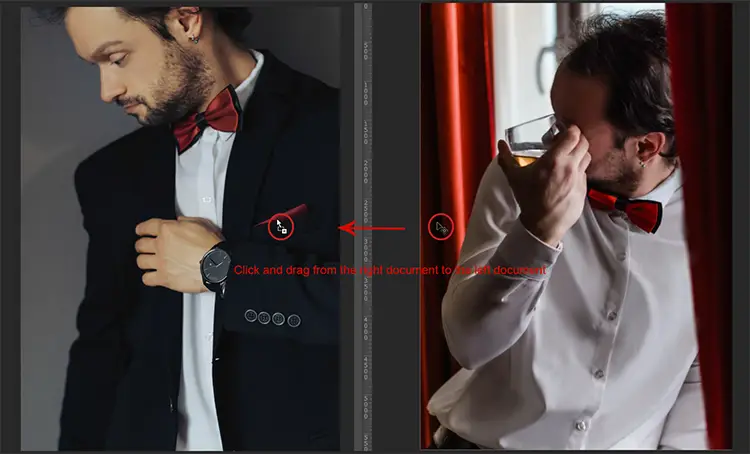
To center the image in the document, first press and hold Shift, then release your mouse button. And, of course, use the Free Transform to position the photo as needed.
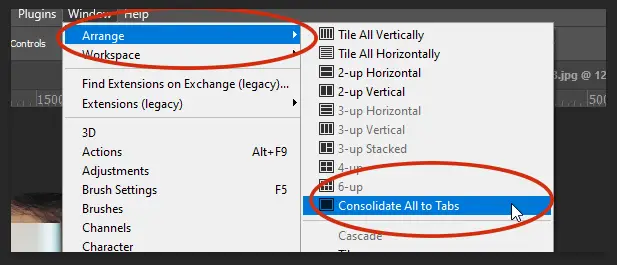
Now you know how to use the Multi-Document Layout. But, if you need to switch back to the tabbed menu like before, all you have to do is go back to the Window Menu, click Arrange and choose Consolidate All To Tabs. Now you are back in the old workspace. You can save the picture and move on to the next project.
Method 4: By Duplicating the Photo
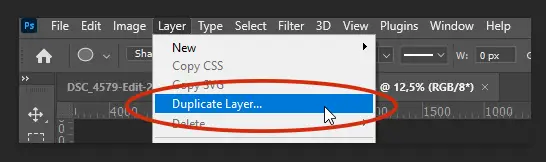
When you already have the two photos opened, another way to place the second picture in the existing Photoshop file is by copying the second picture. First, you go to the Layer Menu and press Duplicate Layer.
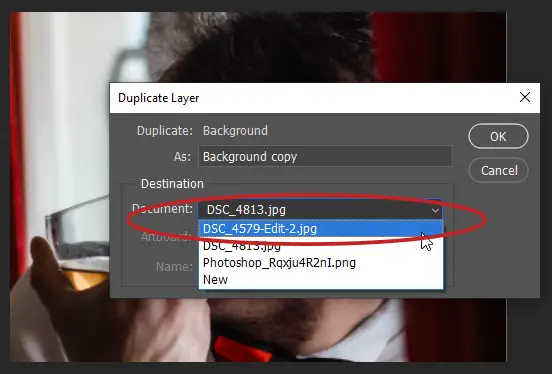
The Duplicate Layer Dialog will show up. From the Document Drop Down Menu in the Duplicate Layer Dialog, you can choose the Destination document for the duplicated layer and press OK.

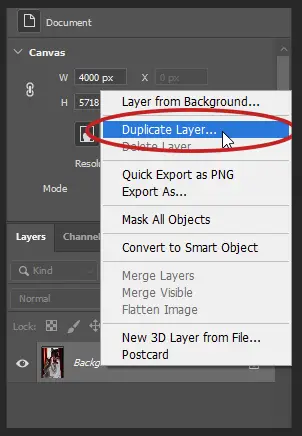
Another easier way to do this is by right-clicking the Background Layer and clicking Duplicate Layer.
Now, you’ll see the Duplicate Layer Dialog again, where you will do the same as before. Choose the Destination from the Drop Down Menu and press OK.
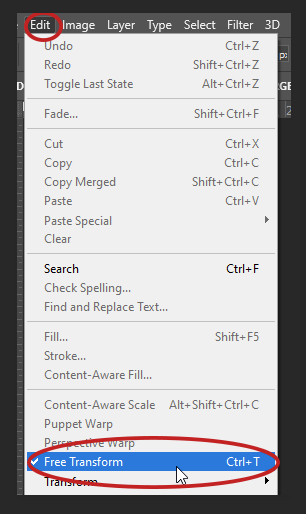
When you get back to the first picture, you’ll see that the new photo has already been placed there. This time the Transform Box is not activated by default, so you’ll have to do it yourself by going to the Edit Menu and clicking Free Transform.
Or you can use the shortcut:
For Windows:
Ctrl+T
For Mac:
Cmd+T
Additionally, you can right-click on the photo and choose Free Transform.
Method 5: With Copy & Paste
As we all know, Copy & Paste is the easiest way to replace something. That also works here in Adobe Photoshop. There are two ways to do this. You can do it step by step, or you can use the already known shortcuts for copy & paste.
First, let’s go with the step-by-step method.
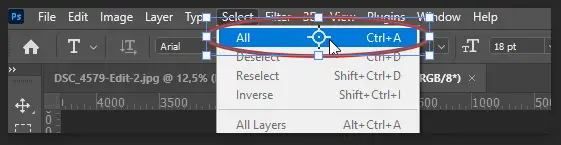
Open or click the tab with the photo you want to place over another photo. To select it, so you can place it in the other tab, go to the Select Menu and press All.
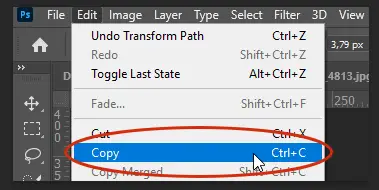
That will select the photo. The next thing to do when the photo is selected is to go to the Edit Menu and press Copy.
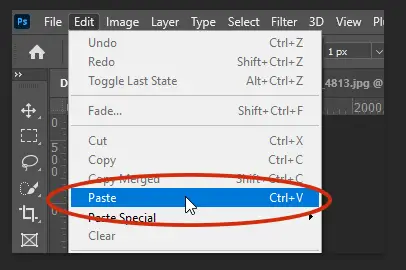
Now that you have copied the photo, you can switch to the first one via the Tab Bar. Here you can paste the copied photo by opening the Edit Menu and pressing Paste.
Now, the easiest way possible to copy & paste is with the already known shortcuts. So basically, you select the photo, copy it, and paste it over the first photo with the following shortcuts:
Copy shortcut for Windows:
Ctrl+C
Paste shortcut for Windows:
Ctrl+V
Select shortcut for Windows:
Ctrl+A
Copy shortcut for Mac:
Cmd+C
Paste shortcut for Mac:
Cmd+V
Select shortcut for Mac:
Cmd+A
How to Import Multiple Photos into Photoshop
If you want to open multiple photos, you can do it by drag and drop or using the Open Dialog.
Unlike importing a single image, to import multiple images into Photoshop, select the photos you want to import from your file explorer and drag and drop them inside Photoshop. Just like dragging and dropping a single photo.
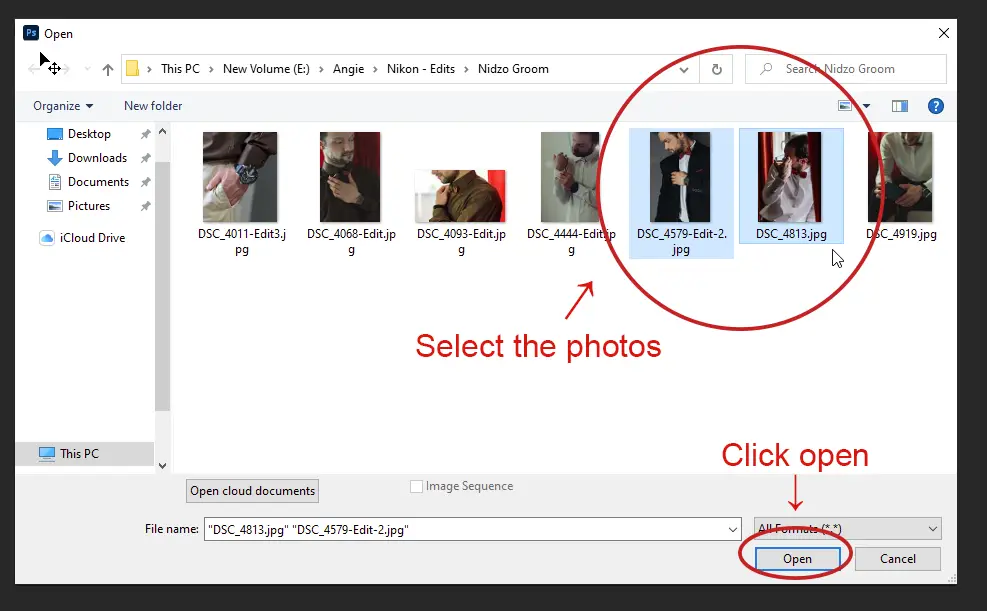
Or, if you want to use the Open Dialog, it works similar to importing a single photo. The difference is, here, you can not double-click the photos to import them. Instead, you select multiple photos by holding the Ctrl/Cmd key and selecting the photos, then clicking Open.
How to Import an Image into Photoshop as a Layer
There are a few ways to import an image into Photoshop as a layer.
You can use all of the three Drag and Drop methods mentioned before. Along with the Copy & Paste and Duplicate the photo methods.
Another way to do it is by creating a New Document.
When you open Adobe Photoshop in the top left corner of the Welcome Screen, you will find the Create New button.
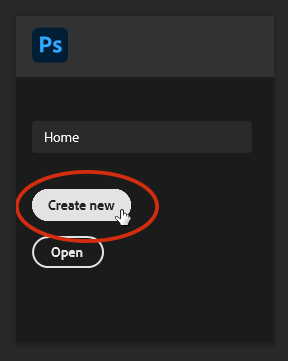
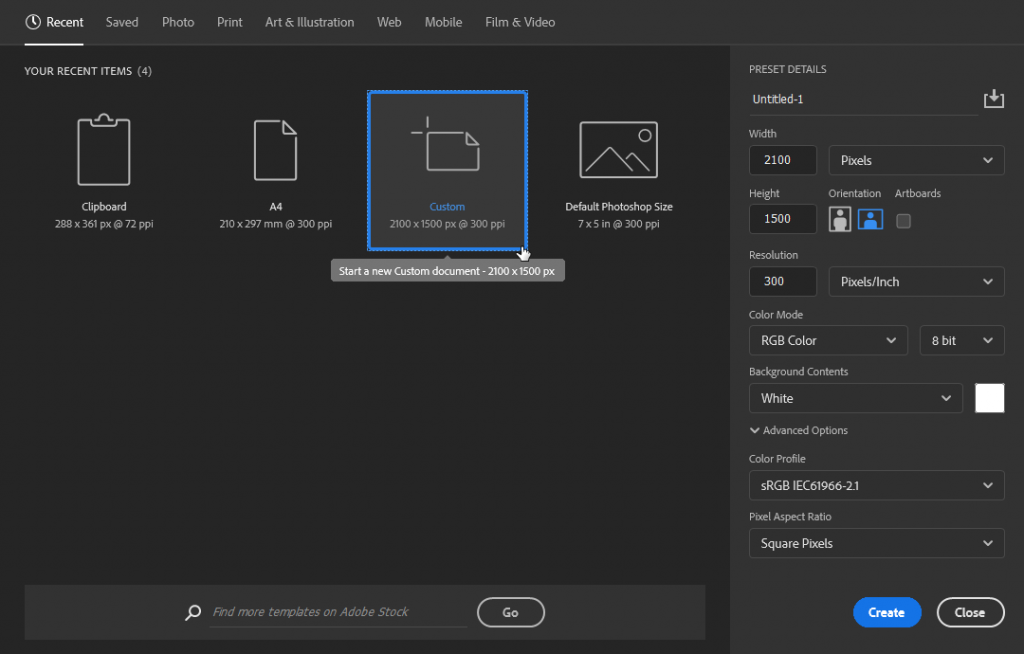
Once you press the Create New button, it will allow you to create a New Document. You can choose a Custom size or use one of the already available presets. Once you have decided on the needed document size, press Create.
You can also create a new document by using the shortcut instead of looking for the Create New button.
For Windows:
Ctrl+N
For Mac:
Cmd+N
Another method of importing an image as a layer is with the Place Embedded option. You can do that by clicking the File Menu, then choosing the Place Embedded option.
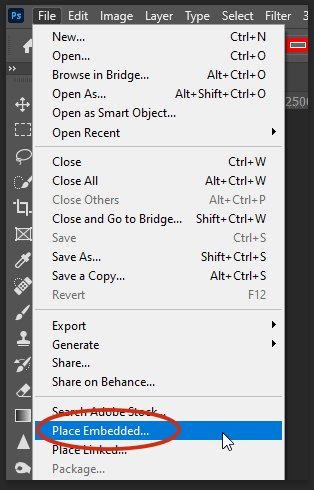
When you select the Place Embedded option, you will see the File Browser from where you can select the needed photo. Select the photo and click Place.
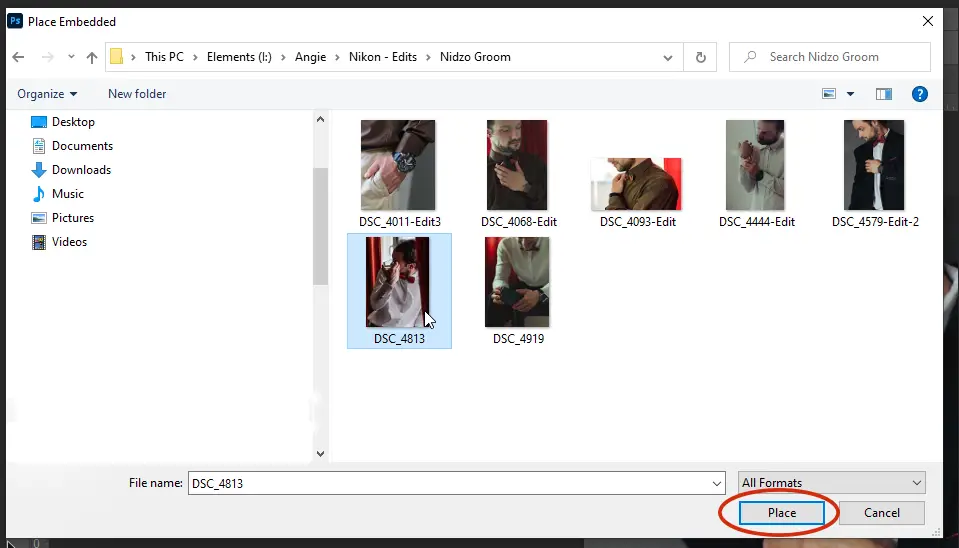
The Place Embedded option transforms your photo into a Smart Object.
It means that you can adjust the photo without those adjustments being permanent. You can always go back and edit them at any time. That applies to resizing as well.
How to Import a GIF in Photoshop
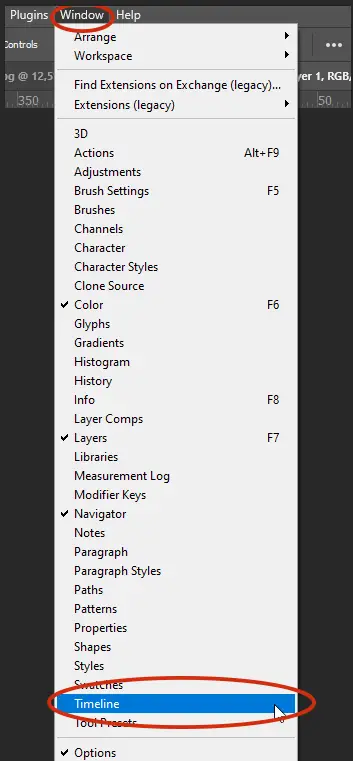
The thing is, you can import a GIF the same as a photo. All you have learned about importing images from this article is usable here too. You can go through the Open Dialog or Drag and Drop it. There is only one thing that is different here. Unlike a photo, a GIF is not a still frame. It’s an animation, and you can play it back in Adobe Photoshop. To do that, you need to open the Timeline first, going to the Window Menu. You will find the Timeline setting at the end of the list. Click it, and you are done.
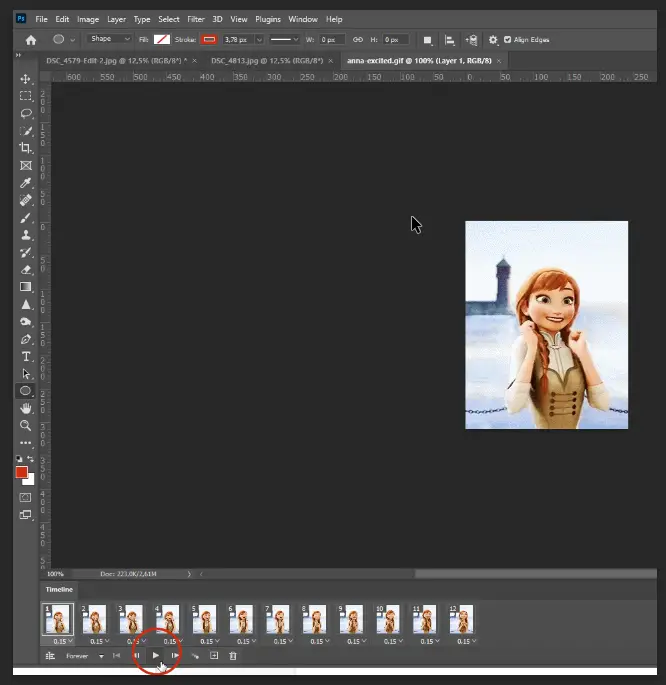
After you turn on the Timeline, it will show up at the bottom of the screen. You can play it by clicking the Play button.
How to Import a PDF in Photoshop
Unlike opening a picture, there are a couple more steps before you can open a PDF in Photoshop. So, you can import a PDF file into Photoshop, the same as you did with the pictures. By using Open Dialog or with the Drag and Drop. After you have done this, an Import PDF Dialog will appear.
This Dialog gives you the option to change the Cropping, Resolution, Size, Mode, Bit Depth, etc.
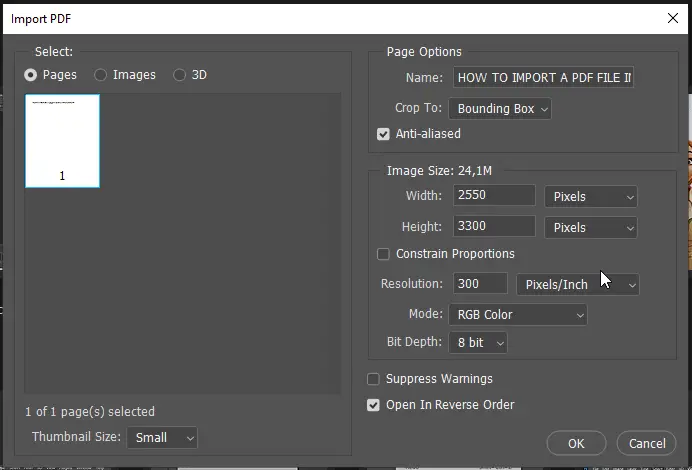
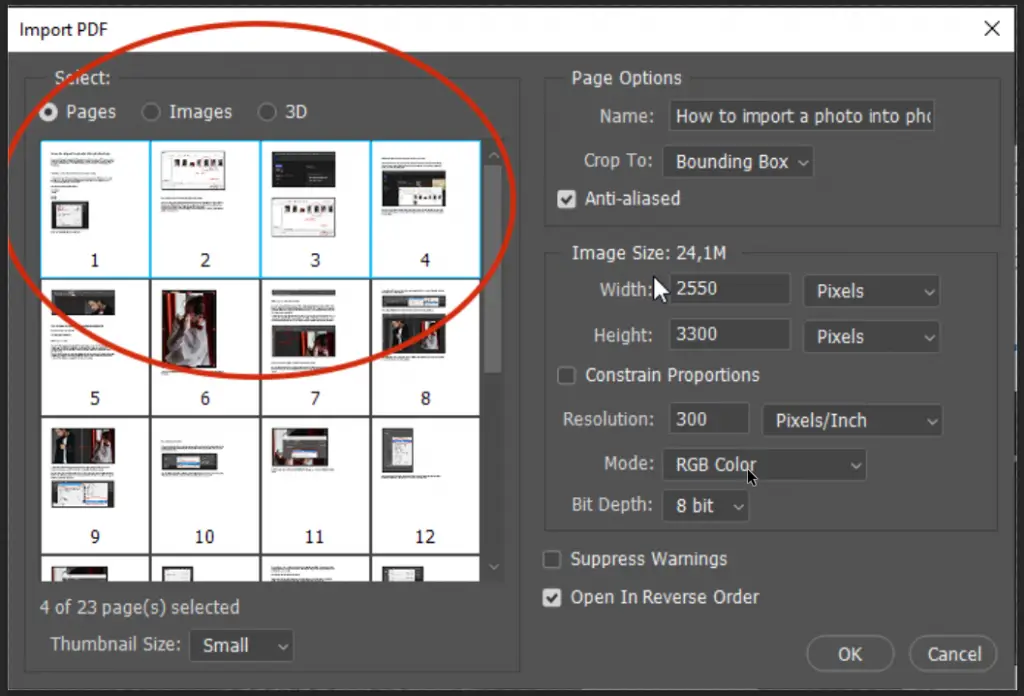
In the Import PDF Dialog, you will have a couple of options in the Select panel. You can choose between Pages, Images, and 3D. For now, all you need to know is how the Pages and Images options work. If you select the Pages option, it will make Photoshop select individual pages for editing. But, if you choose the Images option, Photoshop will extract separate images from the pages for editing.
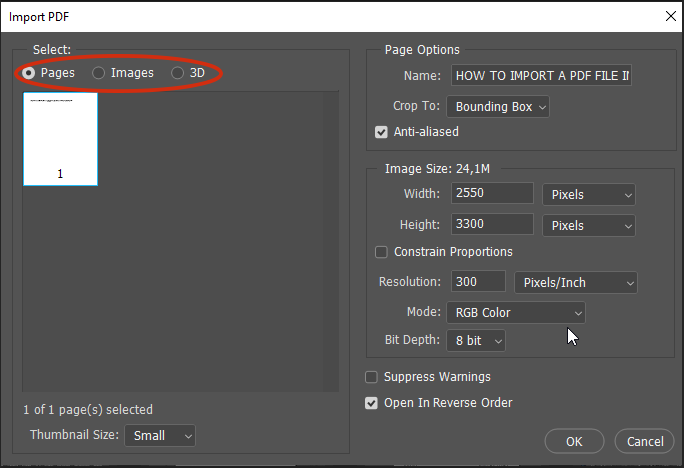
If you choose the Pages option, you can select more than one page to edit. Or, you can select a single page if needed. You can select multiple pages by pressing the Ctrl/Cmd key on your keyboard and selecting the needed pages. The pages you select will have a blue highlight around them. But you should know that if you select multiple pages, Photoshop will open all your pages in individual tabs.
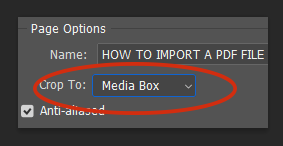
You can leave most of the settings in the Import PDF Dialog as they are. The most important setting here is the Crop To. Here you can choose between a couple of settings:
- Media Box: It defines the dimensions of the final page. Also, it’s the largest box of them all.
- Crop Box: It shows the area that you can print via PDF viewer.
- Trim Box: It shows the final size of the page when it has been printed and corrected.
- Bleed Box: It is similar to the Trim Box, but it has more space. It’s bigger than the Trim Box.
- Art Box: It is the smallest one of the boxes. The Art Box defines the content of the page with some extra margin.
If you are not sure which crop to select, the Media Box is the safe bet.
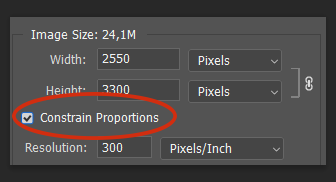
In the Image Size section in the Import PDF Dialogue, you can see the default image size that the PDF you are about to import has. You can change it if you like. If you tick the Constrain Proportions box, the image size will retain the PDF aspect ratio.
The default resolution is 300ppi, and if you want, you can change this too.
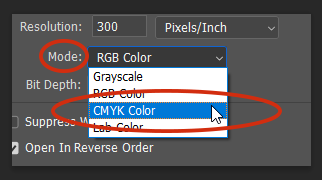
The default color mode is RGB Color, but if you intend to create a file ready for print, you can pick CMYK Color from the Drop-Down menu. There are other color modes there, but they are rarely used.
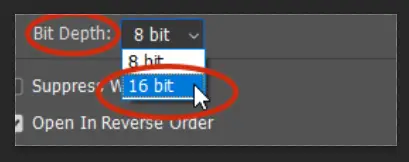
By default, the Bit Depth is set at 8bit, and most of the time, that is okay. If you need a wider color gamut, you can pick 16bit from the Drop-Down menu.
When you have chosen the settings, click OK.

Read More:
How to stretch an image in Photoshop?
How to dodge and burn in Photoshop?
How to create and use saturation masks?
Is your Photoshop Eraser tool not working?


Leave a Reply