You have Photoshop open, you are using your Eraser Tool (E), and everything seems fine. A little while later in the session, you will notice that the eraser stopped working. Why is that?
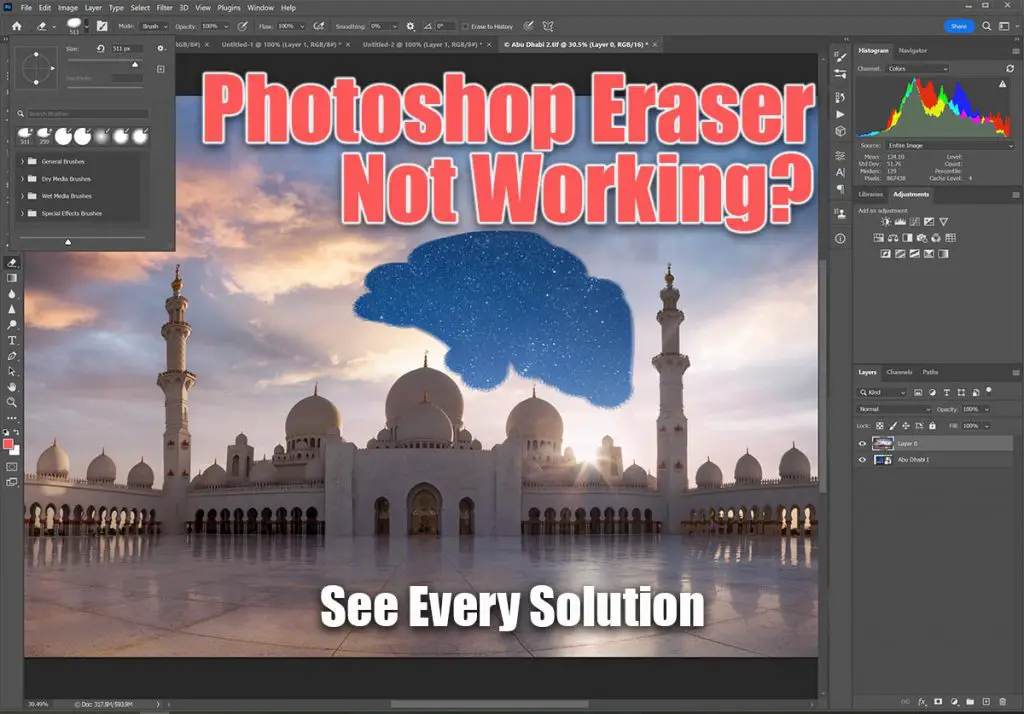
Photoshop Eraser Not Working?
If your Photoshop Eraser is not working, the problem can be fixed by:
- Unlocking your layer
- Remove any selections with Ctrl+D
- Select the layer instead of the layer mask
- Making sure you are not erasing on a duplicate layer
- Finally, by resetting the Eraser tool
Why is My Eraser Not Working in Photoshop?
Well, there are a couple of potential reasons why the eraser can stop working, and with this article, I will help you fix the eraser tool.
If you would prefer to watch this in action, then I have compiled the most common reasons why the Eraser Tool doesn’t work in the video below.
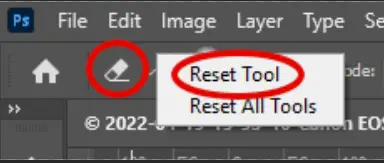
1. Reset the Eraser Tool
The first thing you should try is to reset the Eraser Tool. You can do that by right-clicking the Eraser Tool. You can find it in the left corner up in the Options Bar. When you right-click the tool, you will see the Reset Tool Option, select it, and you are done.
2. The Layer You Selected is Locked
Photoshop locks the background layer by default. Also, sometimes you can lock the layer by mistake. It happens. When your layer is locked, the Eraser cannot work. So, when you try to use it, it shows an Error Message telling you why you can not use the Eraser.
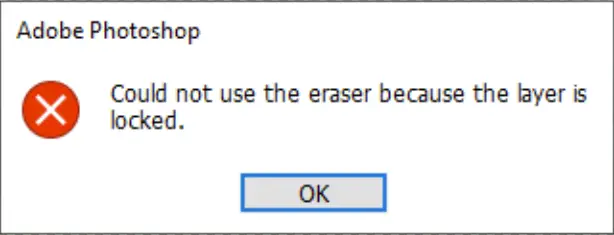
To fix this, all you need to do is to unlock the layer, and you can use the Eraser Tool again.
You can do that by clicking on the Lock Icon above the layers.
3. You Have Made a Selection of a Part of the Image
It is possible that you selected a part of the image by mistake or forgot to deselect it. Or maybe, you have clicked on the image while using another tool, like Patch Tool, Lasso Tool, or something like that, where you have selected only a pixel of the photo, and you do not actually see the Select Border. In that case, the eraser tool will not work. It will not work because only pixels within the chosen region can be edited or erased.
You can fix this if you click somewhere outside the workspace to drop your selection, or, you can simply use the shortcut to deselect the area.
For Windows:
Ctrl+D
For Mac:
Cmd+D
4. You are Working on a Layer Mask
Whenever you have a layer mask active, your eraser works on the mask rather than the image or the normal layer.
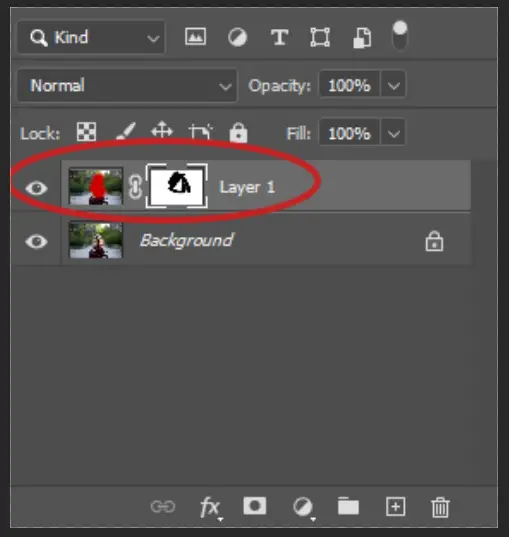
So, if you created a layer mask by mistake or you do not need it anymore, you can delete the mask and continue working on the previous layer. You can do that by right-clicking on the mask layer and choosing the Delete Layer Mask option.
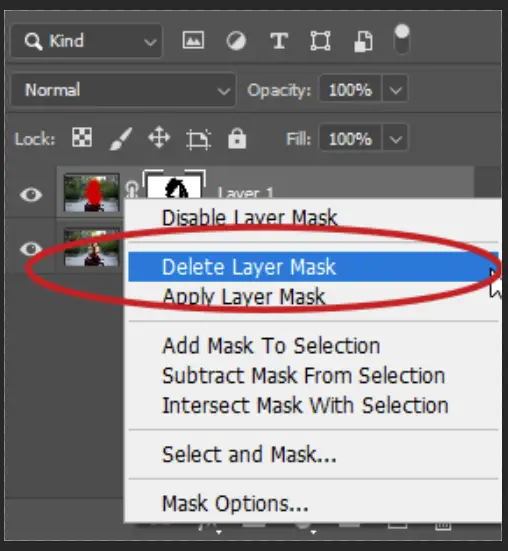
Or you can click on the Trash Icon at the bottom of the screen.
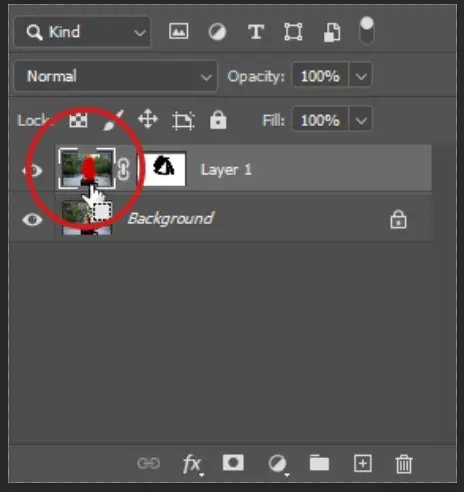
But, if you need the mask and want it active, then you can just click/select the main image layer next to the mask and the eraser will now work on that main image layer.
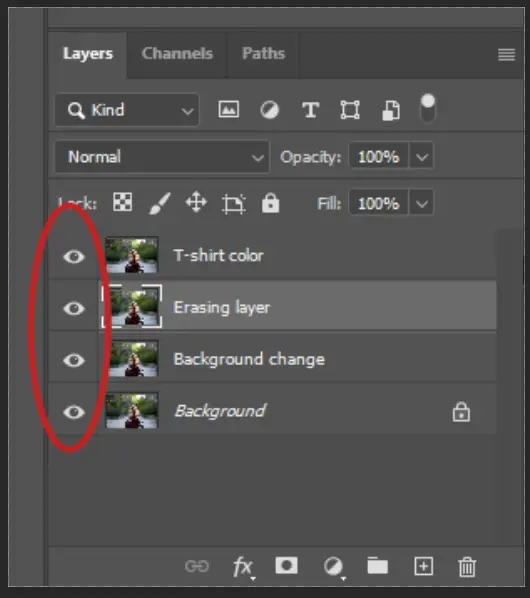
5. You Have a Duplicate Image
The Eraser may not be working if you have a duplicate layer or a background that contains the same colors or pixels as the area you are trying to erase. In other words, you may be erasing your image, but the layer above or below your current layer may appear to be the same as your current layer.

You can fix this by turning off the layer visibility. Or by deleting the duplicate layer. To delete the layer, you can click the Trash Icon at the bottom of the screen or right-click the layer and choose the Delete Layer option.
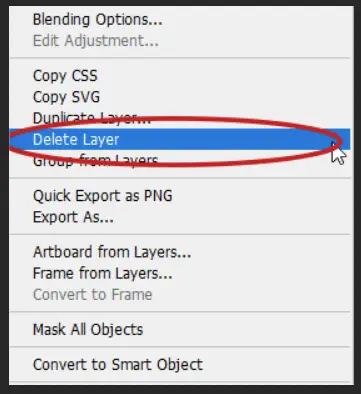
You can also simply select the layer and press the Delete button on your keyboard.
6. Problem with the Pressure-Sensitive Pen Settings
If you use a tablet, it may cause problems with the Eraser Tool. The settings of your pen may affect Photoshop’s erase tools. In rare cases, this can happen even if you do not use a tablet.
So, to fix this, you need to check the tablet’s settings first and try to fix it from there. Or the alternative is to modify the pen pressure in Photoshop directly.
You can do that with the following steps:
1. Click the Brush Settings Panel in the Options Bar.
2. The Brush Settings Panel will show up, where you will have a bunch of different settings for the brush. You will have to find every setting that allows the use of pen pressure and turn them OFF.
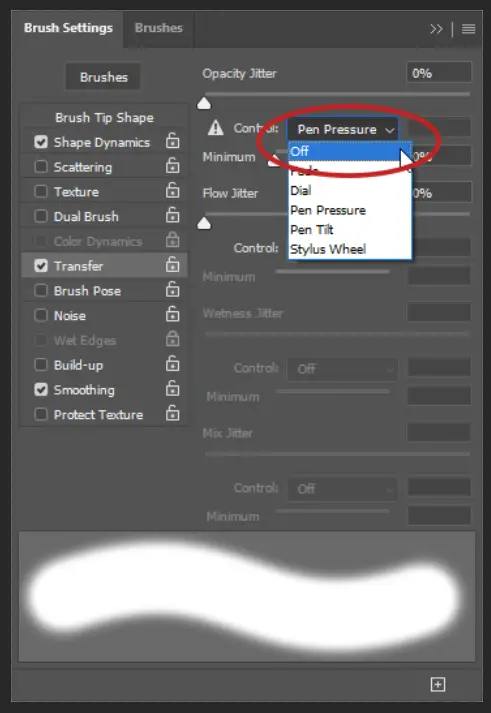
3. When you first open the Brush Settings panel, by default the last section you had open will be selected. Start with the Transfer section, where you will find several Jitter Controls (Opacity, Flow, Wetness, and Mix). Most of them should be grayed out. But, for each one that is not, in the Drop-Down Menu, set the control to OFF.
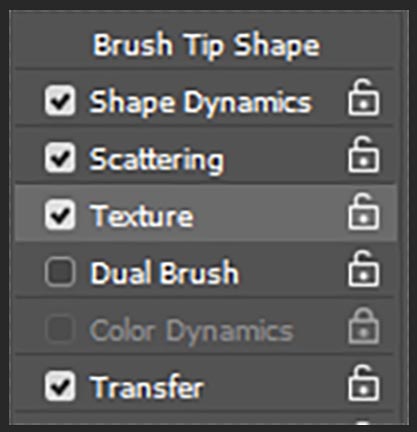
4. You will have to repeat the same process for Shape Dynamics, Scattering, and Texture.
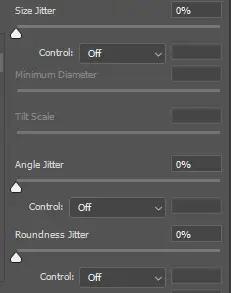
In the Shape Dynamic section, there are three Jitter Controls: Size, Angle, and Roundness. Set all of them OFF. Don’t worry if some of them are grayed out. Ignore those.
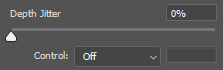
Repeat the process for the Depth Jitter Control for the Texture section. It should be set to OFF as well.
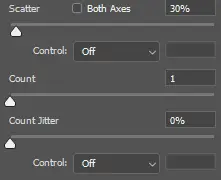
Do the same for the Scattering section by turning OFF the Scatter and Count Jitter controls.
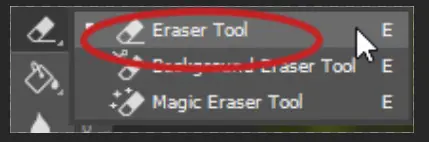
7. Is the right eraser tool selected?
Sometimes, you might not be using the Eraser Tool at all. So, before you do anything else, first check if you have selected the right Eraser Tool, because there are a couple of them, including the background eraser and magic eraser.
In order to see if you are using the right Eraser Tool, go to the Toolbar where the Erase Tool is, right-click on the icon, and make sure you are using the one you need.
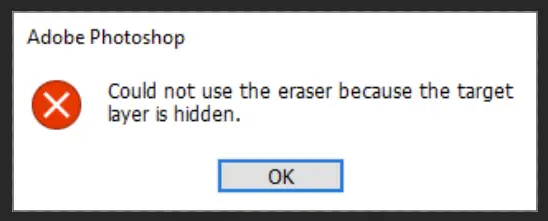
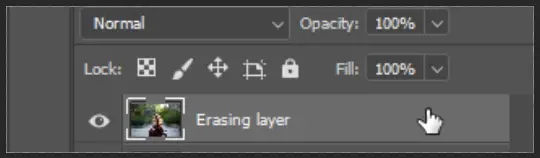
8. Is the Layer Visibility Turned Off?
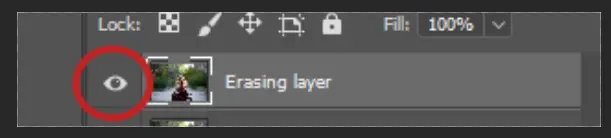
You need to be sure that the layer’s visibility is turned ON. If the layer visibility is turned OFF, an Error Message will show up when you try to use the Eraser Tool on it, telling you why the Eraser Tool is not working.
You can turn ON and OFF the layer visibility by clicking the little Eye Icon in the left corner of the layer.
Or you can use the shortcut:
For Windows:
Ctrl+0
For Mac:
Cmd+0
It can happen that you can turn off the layer visibility by mistake, but don’t see the Error Message showing up when you try to erase something. This is because the layer you intend to erase from has the visibility turned OFF, but you have another layer selected where the visibility is ON, and are actually erasing from that layer, rather than the one you intend to.
So, make sure the visibility on the layer you are working on is always ON, and check what layer you are working on before you even begin to erase something.
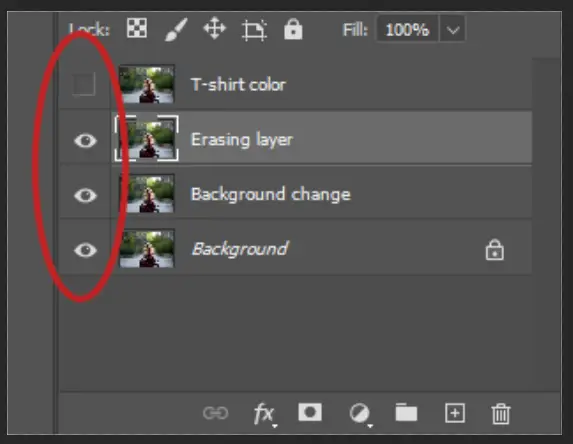
9. Are All of the Layers are Turned On?
When you work in Photoshop, it is very common to have all of the layers you are working on turned on, but this might cause issues if you only intend to erase a very specific part of your image, particularly if it is only on one layer.
If all of the layers are the same, make sure the layer where you want to use the eraser stays turned on while you have to turn the visibility off on the other layers.
Otherwise, you might be using the erase tool on every layer, and delete different parts of the picture on different layers. Also, if all the layers are turned on, you might not even see the erased area unless it is the top layer.
10. You Have Selected the Wrong Layer
It is very common to use the tools on other layers by mistake. It happens to everyone. So, make sure that you are using the Erase Tool on the layer you need to erase on.
For example, if you are erasing something on the second layer and the top layer is turned on, you will not be able to see the erased area. In this case, if there are layers you have worked on already and are different, you do not have to turn off all of the layers. You should only turn off the visibility of the layers above the one you are working on.
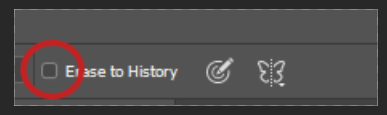
11. Is the Erase to History turned off?
The Erase to History option is a bit tricky. It is a helpful option in some circumstances, but isn’t something you always want selected.
The Erase to History tool is used to recover the erased area. So if the Erase to History box is checked, then the Eraser Tool will not work because when you use it with the erase to history option ‘on’, it actually brings back what you erased before.
So, make sure the erase to history option is not selected.
Photoshop Eraser Not Erasing 100%
If your Photoshop Eraser is not erasing 100%, then you are most likely not using the default black and white foreground and background colors within the tool. Press D to set your colors to default and to fix the problem.
If that doesn’t work, then let’s go through each of the Eraser Tool Settings to help you get your tool setup correctly.
Brush Settings
Whenever you start using the Eraser Tool, the first thing to do is check that its settings are correct, according on your needs.
1. Flow and Opacity
Maybe the brush you are using was created with lower transparency or flow setting?
Unless you have this set to 100% opacity, you might think that you have a faulty brush.
The erase tool will not erase 100% if you have changed the flow and opacity values.
With the changing of the opacity and flow, you are smoothening the brush and decreasing its opacity. So if you need the eraser tool to erase 100%, make sure the opacity and flow values are at 100%.
You can find the opacity and flow fields in the Options Bar at the top of the screen.

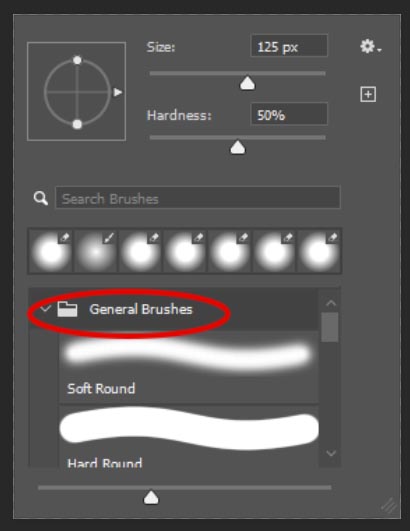
2. Hardness and Size
If you have changed the the size or the hardness, it may appear that the eraser is not working. The thing is, the eraser tool is working, but you can not see it because it is too small, or too soft.
You can check the brushes’ settings in the Options Bar, by clicking the Brush Icon.
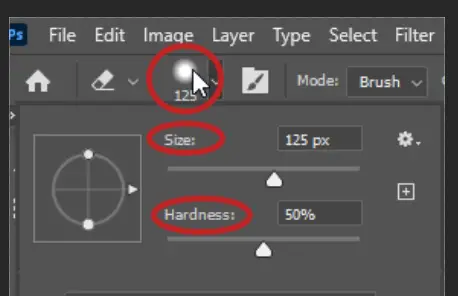
Or you can right-click anywhere on the screen, while your tool is selected, and the same window will pop up.
If in doubt, increase both the size and hardness, until you can clearly see the eraser working.
3. The Default Colors for the Brush Tool are Changed
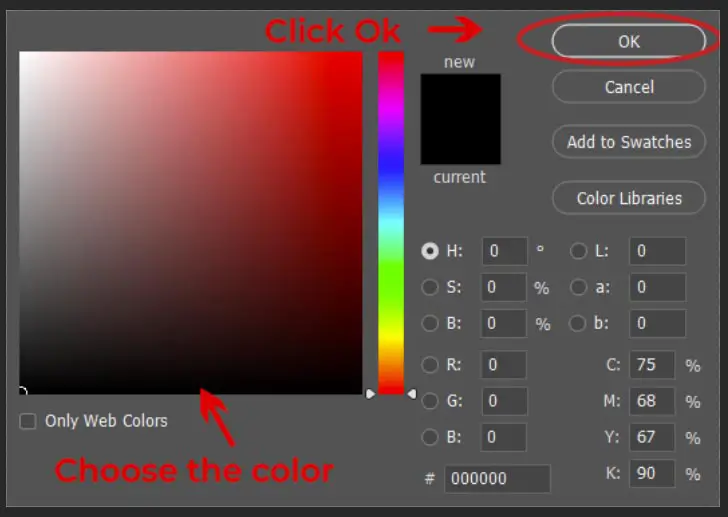
There is one more thing that causes the Eraser not to work at 100%. The problem is likely your foreground and background colors of the brush are not set to the Default Colors. If you intend to erase directly on your mask layer with the eraser tool, the colors must be set to its default, which is Black and White.
You can change them by double-clicking on the colors by clicking the Foreground and Background Icons in the Toolbar.
When you double-click the icons, the Color Picker Menu will show up, choose Black for Foreground, and White for Background Color, select OK and you are good to go.
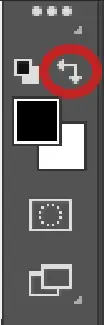
Or, you can do that by pressing the D button on your keyboard. And it will automatically change them to black and white. You can choose between the two colors to erase on your mask by clicking on the Double Arrow Icon in the Toolbar, or by clicking X on your keyboard.
Photoshop Eraser Tool Not Showing a Circle?
1. Press your Caps Lock Key
It often happens when you work, or write text that you use the Caps Lock. But you might also happen to forget to turn it OFF.
If you have the Caps Lock turned On, then you will not see the Circle of the Eraser Tool Brush, but you will see a Crosshair Cursor.
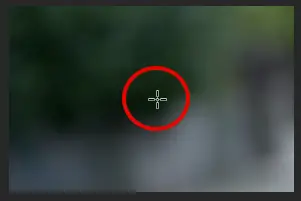
It is a feature people use when they need to see the precise center of the brush.
2. Have you selected the right Brush Type?
You might be using a non-standard brush type, with incorrect size, hardness or dynamics. An easy way to fix this is to go into the eraser brush options and choose one of the General Brushes from the presets.
Final Thoughts on How to Fix the Eraser Tool in Photoshop
There can be a number of possible reasons why the Eraser Tool doesn’t work in Photoshop, but you can ultimately fix it by resetting the Eraser by selecting it with E, then going to the Eraser icon in the toolbar and clicking the dropdown and using the cog wheel icon to access a menu with ‘Reset Tool’ as an option.
If you still have issues after trying all of these solutions, then I would recommend that you contact Adobe Customer Support, who should be able to guide you to a solution.
Read More:
How to remove white background in Photoshop
How to dodge and burn in Photoshop


Leave a Reply