From studio portraits to product photos to graphics and logos, white backgrounds are very common but can be a headache to remove.
But thanks to recent updates in Adobe Photoshop, this is now a simpler process that can be automated in many cases, although you will still need to know how to do this manually for situations where the technology fails.
This article covers every single method to help you learn how to remove the White Background in Photoshop, so that you will never be stuck again.
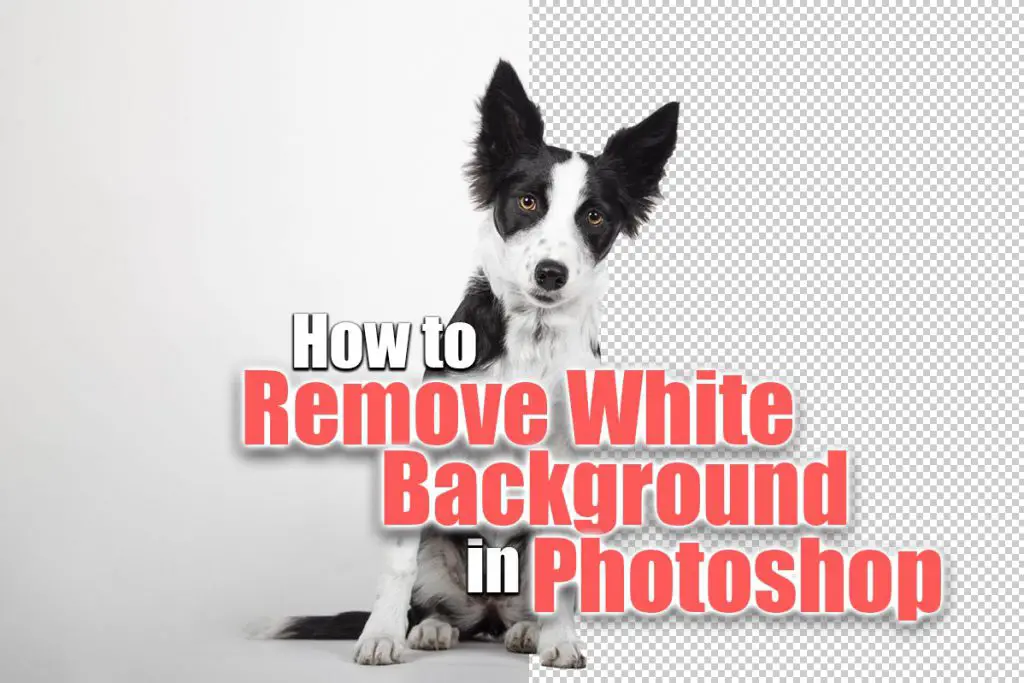
How to Remove White Background in Photoshop
You can remove the white background in Photoshop by clicking the Remove Background Button in the toolbar, or if this does not give a good result, by using the Magic Wand or Quick Selection tools (shortcut: W) to select the background before deleting it.
Method 1: Use the Remove Background Button
The button is located in the layer properties panel. It automatically creates and applies a selection to a layer mask, and by using this method, you can make the white backgrounds transparent and cut out any image. This means that you don’t need to make any tricky selections yourself.
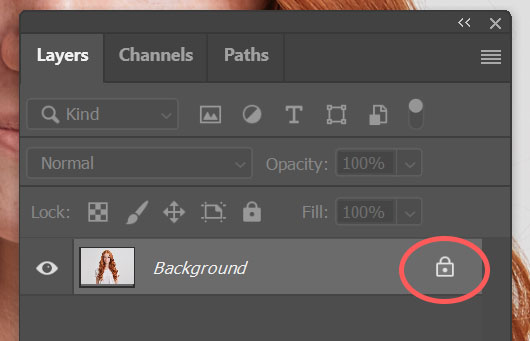
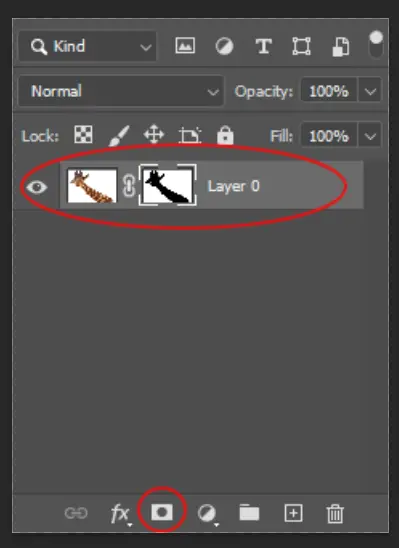
Step 1: Open and Unlock Your Image
Open your image in Photoshop and make sure the Background Layer is Unlocked by clicking on the padlock icon. Once you unlock it, it will change its name to Layer 0, and there will no longer be a padlock next to the layer name in the palette.
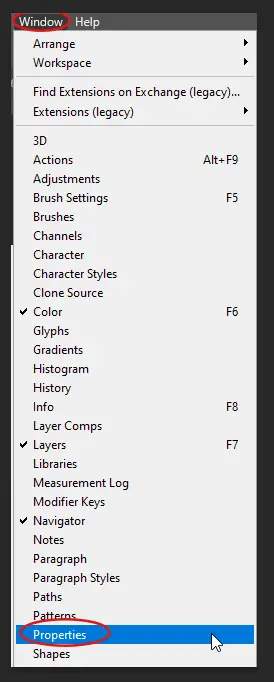
Step 2: Open the Properties Panel
You can find the Properties Panel in the Panel Bar.
Or, if you don’t see it there, go to the Window Menu at the top of the screen and choose the Properties Option.
Step 3: Click the Remove Background Button
Once you open the Properties Panel, the Properties Window will show up where you can find the Remove Background Button in the Quick Actions.
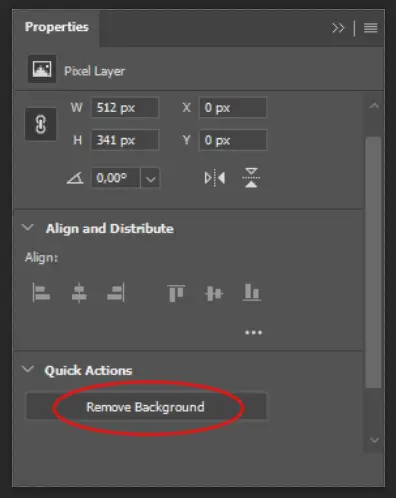
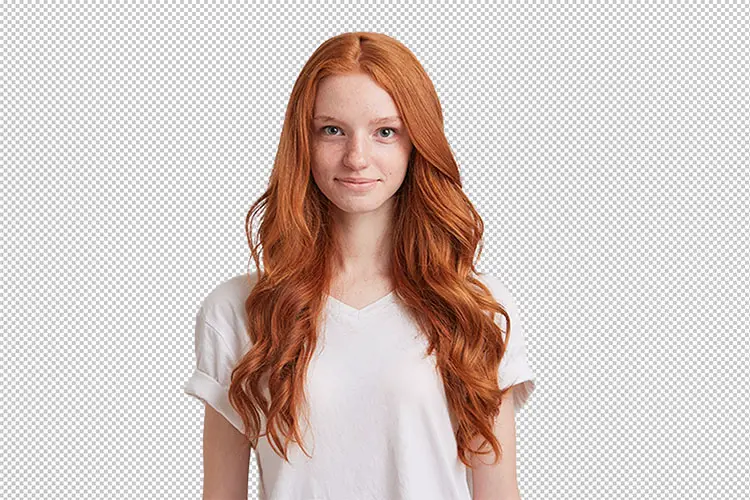
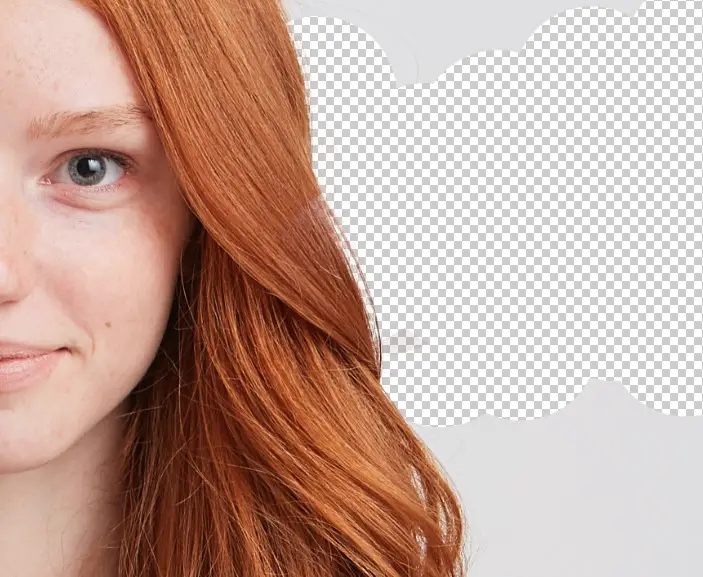
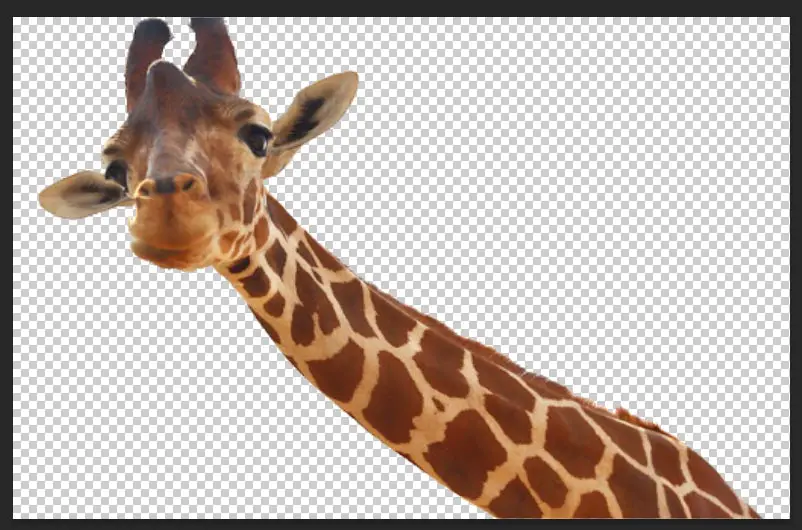
A selection will be made around your subject and applied to a layer mask when you click the Remove Background button.
In one click, you will have a transparent background and a cut-out image.

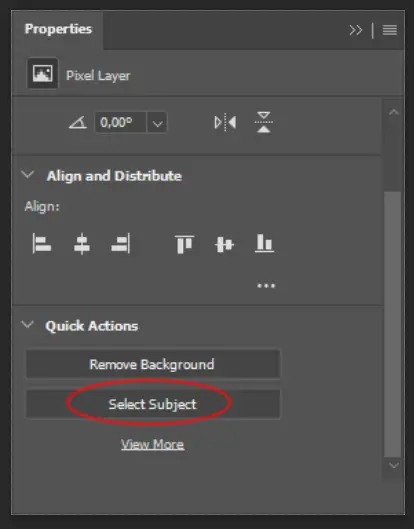
Step 4: Select Subject for Manual Background Removal
Sometimes, Photoshop happens to make an error and removes part of your image that you wish to keep. But with layer masks, you can easily correct this error.
This is particularly common with hair, where Photoshop might not quite get the edges quite right, missing out some hair strands.
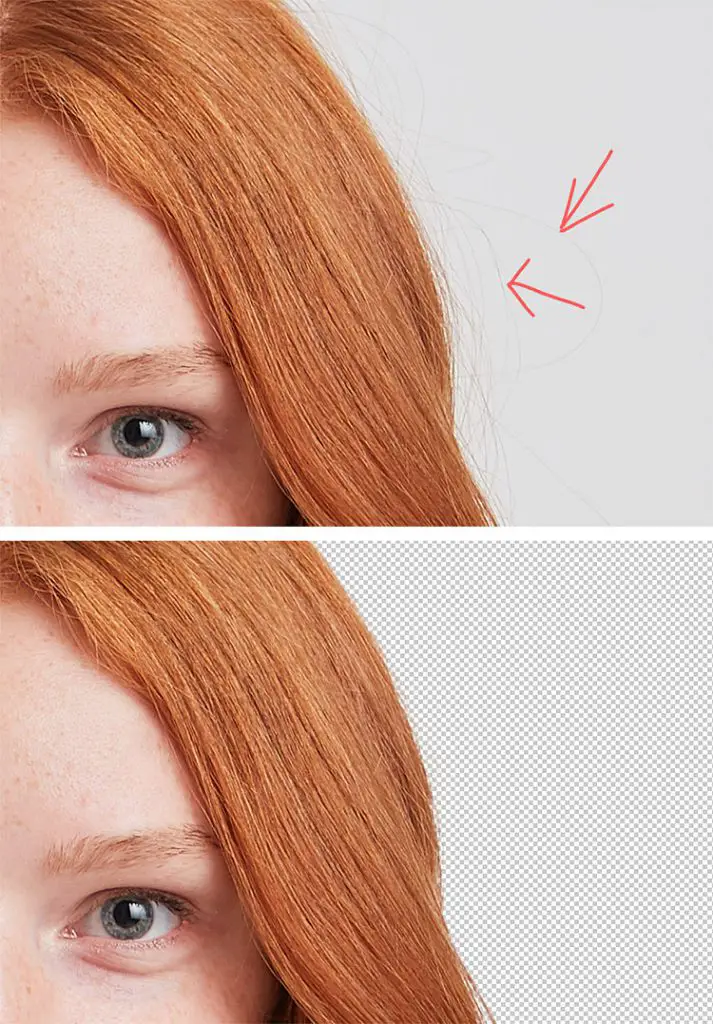
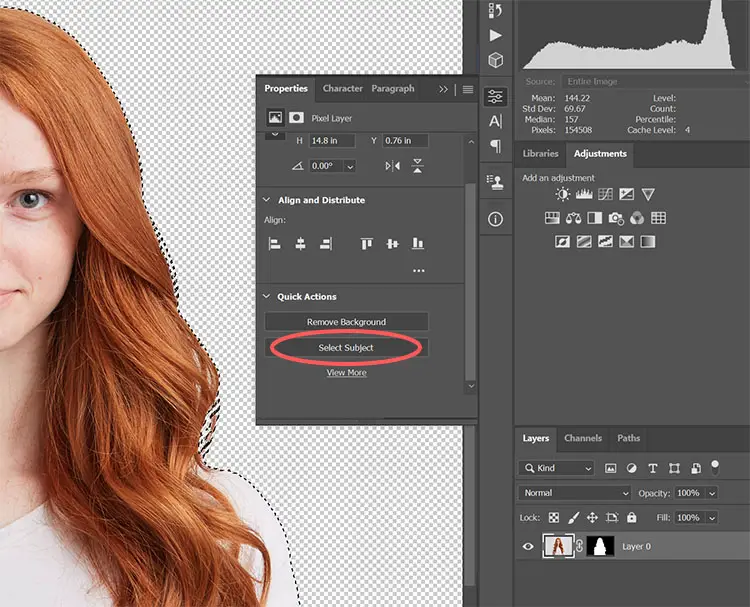
Beneath the ‘Remove Background’ button, there is a ‘Select Subject’ button. Using the button to select the subject, Photoshop will automatically create a selection, but without removing the background. You can then use this selection to either create a new layer mask and manually remove the background, or perfect your existing mask.
Step 5: Refine the Layer Mask
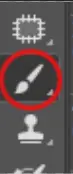
If needed, you can refine the layer mask. Once you have selected the layer mask by clicking on it, click on the Brush Tool in the Toolbar Menu or press B on your keyboard, and set the colors of the brush to default: Black and White.
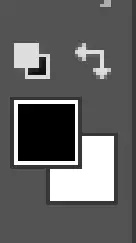
The white color adds to the mask, and the black color removes additional areas from the mask.
You can now quickly refine your layer mask by painting over it and adding back any important details that Photoshop may have accidentally removed.
Method 2: Remove White Background Using the Magic Eraser Tool
The second simple option for removing background is with the Magic Eraser Tool.
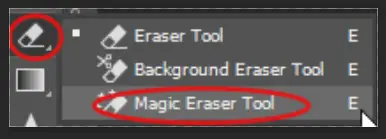
Step 1: Open the Magic Eraser Tool
You can find the Magic Eraser Tool in the Toolbar Menu by right-clicking on the Eraser Tool.
Step 2: Decrease the Tolerance for Complex Images
For the Magic Eraser Tool to remove the white background completely, you might need to change the Tolerance. Bear in mind that sometimes you might need to click multiple times for the tool to remove the whole area.
You can find the Tolerance control in the Options Bar at the top of the screen.

The default value of the Tolerance option is 32. Increasing this value will reduce the sensitivity of the Magic Eraser Tool. That means it will delete more hues and variations of the white background. Decreasing the value makes it more sensitive.
Step 3: Check Anti-Alias
Make sure that the Anti-alias checkbox is ticked, as it improves the edges of the selection. They are smoother with less jagged edges.

Step 4: Set Contiguous Option
There is one more option you can use while removing the white background with the Magic Eraser Tool. It is the Contiguous option. You can find it next to the Anti-alias checkbox.

The Contiguous option is turned on by default. That means the Magic Eraser Tool will delete pixels only directly connected to the one you click within the Tolerance. If deselected, it will delete all the pixels from the image within the Tolerance.
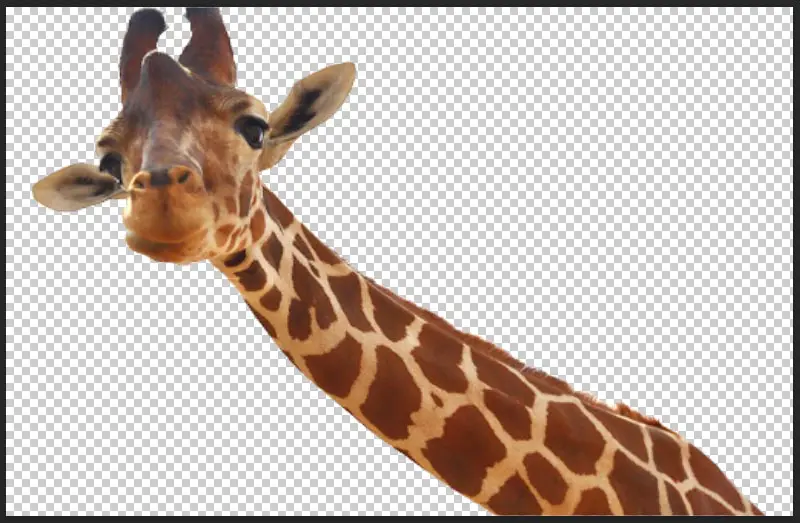
Step 5: Click on the Background
Once you have selected the Magic Eraser Tool, click on the area you want to be removed. Once you are done, the result should look like this.
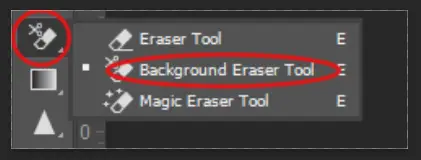
Method 3: Background Removal Using the Background Eraser Tool
The last simple method to remove a white background is the Background Eraser Tool.
The Background Eraser Tool transforms your cursor into a circle brush with a crosshair in the center when you select it.
The crosshair is where the Background Eraser Tool samples the color that is going to be deleted. The circle is the area where the sampled color will be deleted.
Step 1: Select the Background Eraser Tool
Right-click on the Eraser Tool and choose the Background Eraser Tool.
Step 2: Set Brush Size and Hardness
If the tool initially doesn’t work as well as you’d hoped with the default settings, there are plenty of options you can change to improve its performance.
When you want to make the brush size smaller, hold down the [ (left bracket key), or hold the ] (right bracket key) if you want the brush bigger.
If you want to control the hardness of the edges, press Shift. By pressing Shift+Left bracket, you will make the brush edges softer, and by pressing Shift+Right bracket, you will make the brush edges harder.
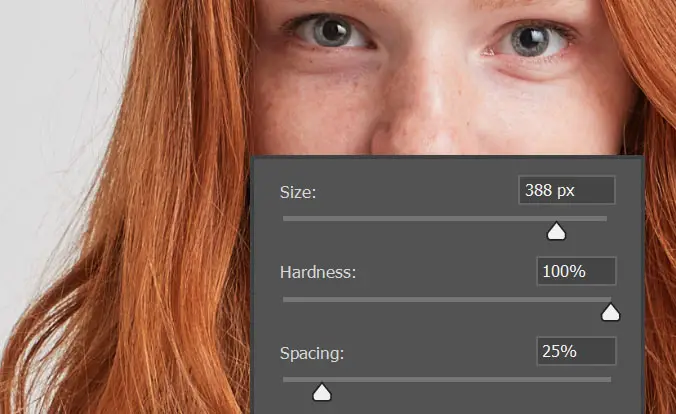
It is better to use the brush with harder edges because the soft edges may create background artifacts.
When using the tool, adjust the brush size as necessary and keep the spacing low (50%) so that it produces a smooth line when erasing.
Step 3: Set the Sampling Options
To have more control over the Background Eraser Tool, you can use the Options the tools provide.
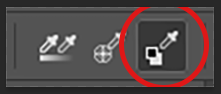
There are three possible Sampling Options from which you can choose, depending on the needs. You can find them in the Options Bar Menu as Eyedroppers.

- Sampling: Continuous – The Background Eraser Tool constantly samples the color as you erase. That makes this sampling option suitable for backgrounds that have variations in the color. Additionally, it is the most suitable option for quick and rough background removal. However, if you accidentally move your brush center over a color you don’t want to erase, it will remove that too. So, be careful when you brush the background away.
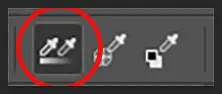
- Sampling: Once – The Background Eraser Tool samples once while you erase. In other words when you click and hold to erase, it will sample once at the beginning, and it will erase that sampled color until you let go of the click. That makes this option suitable for more uniform backgrounds with less variation.
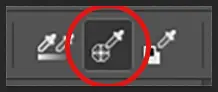
- Sampling: Background Swatch – if you know that the background is the same hue throughout the image, you can set that hue as a background swatch, and with this option, the Background Eraser Tool will erase only that color. Suitable for quick white background removal on a clipped (100% white) background.
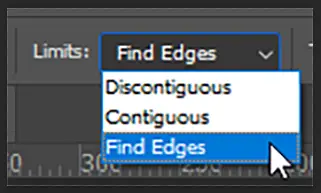
Step 4: Set the Limits
Limits determine the behavior of the Background Eraser Tool regarding what gets erased and what does not. There are three possible Limits, which you can find in the Options Bar Menu.

- Discontiguous – erases pixels within a tolerance of the sampled color whether they are connected or not.
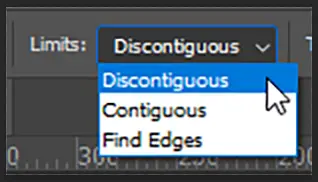
- Contiguous – erases pixels within a tolerance of the sampled color only if they are connected. In other words, if the pixels are separated by pixels with another color, they won’t be affected even though they are within tolerance.
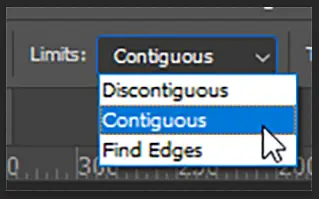
- Find Edges – it works like Contiguous, but it takes care of edges better. It is more precise than Contiguous around edges, retaining more details and sharpness. Use this if Contiguous doesn’t do a good job with edges.
Step 5: Reduce the Tolerance for More Complex Images
Two more options affect the behavior of the Background Eraser tool. Both of them help with refining the way the Background Eraser Tool erases the white background.

Tolerance works the same as it previously did with other tools. The only difference is that here it is represented as a percentage instead of a value between 1 and 255.
Again, a higher percentage value means that more color hues that are similar to the sampled color will be erased. A lower value means that fewer color hues that are similar to the sampled color will be erased.
Step 6: Protect Foreground Color
If the Background Eraser Tool erases your subject because the color hues are too similar, but tolerance does not help, you can use the Protect Foreground Color option to limit the hues that are erased.
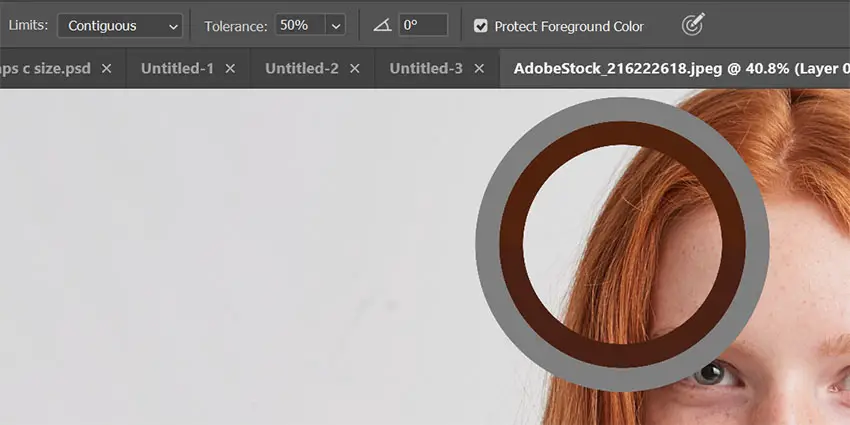
If you set the foreground color to be the color of your subject and erase the background color, your subject will be protected. That way, the tool will not erase anything that has the foreground color, but it will erase the sampled color. You can turn this option ON by checking the checkbox in the Options Bar.
Step 7: Remove the Background by Brushing
Now, you will have to manually remove the background by brushing it away.
Once you have chosen the options, start brushing over the photo in the areas you need to be removed. Once you are finished, you should have this result:

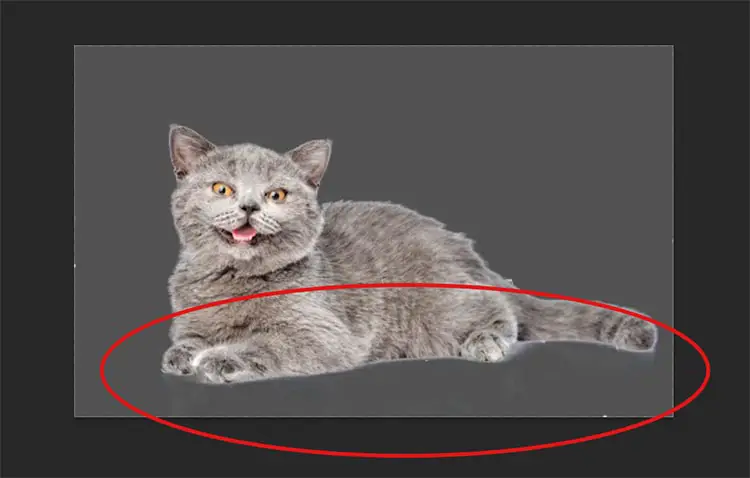
Note that this method is not pixel-perfect, and often it will leave some residue that can be visible when a new background with a different color is used. Here is an example of how that will look:
So, because of that, you might need to use other tools to clean the background further.
Method 4: Remove White Background Using the Magic Wand Tool
As you can use the Magic Wand tool for removing color from a photo, you can also use it to remove a background.
Step 1: Select the Magive Wand
Select the magic wand tool from the toolbar menu or press W on your keyboard.

Step 2: Use Point Sample for Most White Backgrounds
Once you have selected the tool, set the sample size to Point Sample or 5 by 5 Average. You can find the option in the Options Bar. Using these options, you can select how much of your sampled color will be considered.
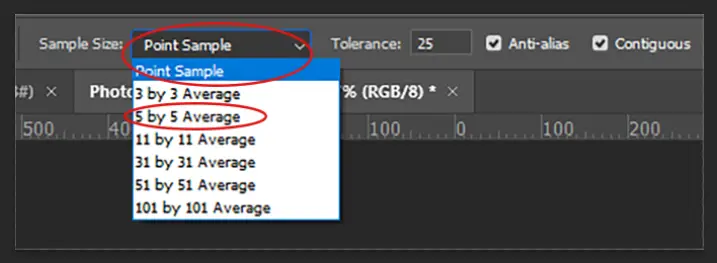
Using Point Sample on graphics with solid white backgrounds will work well. If the white background was taken in a studio with different shades of white, a 5 by 5 Average would be more appropriate.
Step 3: Choose a High Tolerance
The next step is to set the tolerance.

It may be worth pushing this higher if you have a lot of white in your background to get a better selection first time.
Step 4: Make Sure Anti-Alias is on
Ensure that Anti-alias is on to prevent jagged edges in your selection. You do not want a contiguous selection or to sample all layers.

Step 5: Create a Selection
Once all your settings are in order, click on the white background to create a selection.
As you click, Photoshop samples the colors around where you clicked and finds similar colors in your image to include in your selection.
Because the white of your background should be pretty uniform, Photoshop should make an accurate selection. Feel free to add to the selection with Shift+Click, or subtract with Alt+Click if Photoshop did not do a good job.
You should get a similar result to this:

Step 6: Add a Layer Mask
Once you have made the selection, it is time to create a mask. Click on the Mask Icon at the bottom of the Layers Panel. When you make the mask, a new layer will be added next to the photo, which you will have to Invert.
You can invert the mask by selecting it and clicking Ctrl/Cmd+I. Once you invert the mask, you will see that the white background is gone.
Or you can also easily do this by only clicking the Delete button on your keyboard right after you make the selection, but make sure you have unlocked the layer before.
You can also use the Select and Mask option for refinement if needed.
Method 5: Use Select Subject to Quickly Remove the Background
The Select Subject option is one of the quickest and simplest options to remove the white background, after the Remove Background tool.
Step 1a: Find Subject Selection in the Menu
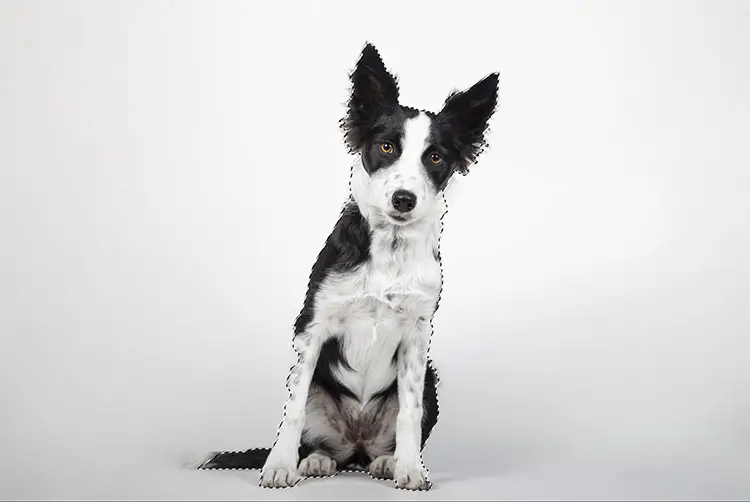
Once you have opened your image in Photoshop and have the layer active where you want to make the selection, in the Select Menu, find the Subject option and click it.

Once you click it, Photoshop will automatically select the subject.
Step 1b: Alternatively Use the Properties Menu
Or you can do that in the Properties Menu. The first thing you need to do is to Unlock the Layer. Once you unlock it, go to the properties menu and choose the Select Subject option in the Quick Actions Menu.
This is how the selection should look:
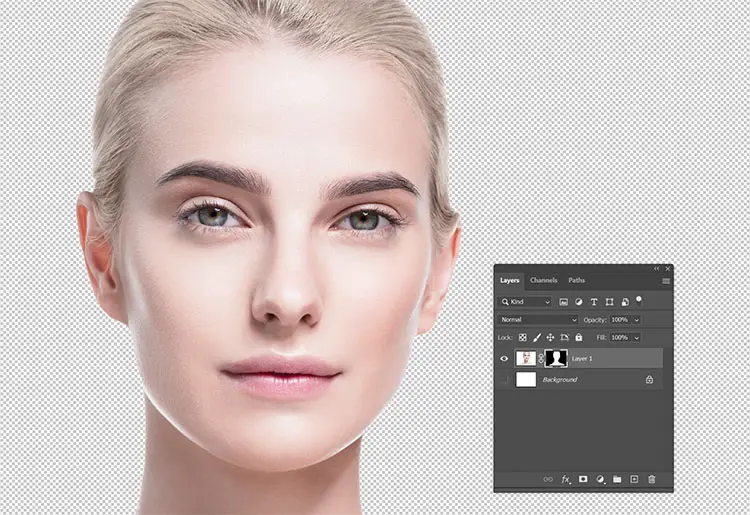
Step 2: Create a Mask
Then simply click on the Layer Mask button in the layers palette to create a layer mask. Unlike with the Quick Selection Tool, this one does not need to be inverted.

If you don’t need a mask, just click the Delete button right after making the selection.
And you should be left with an image with the white background removed, as simple as that!

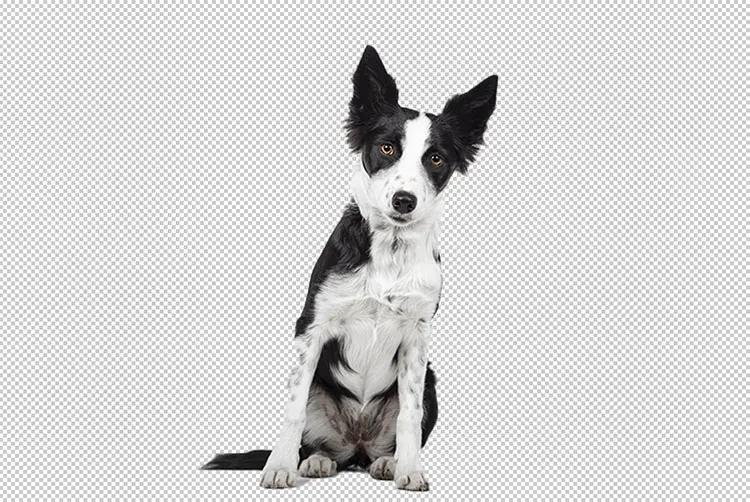
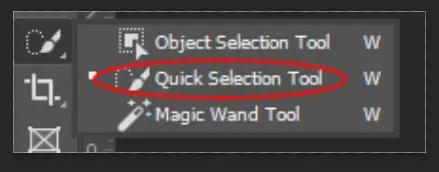
Method 6: Remove White Background Using Quick Select Tool
Among the selection tools, there is no simpler and easier tool to use than the Quick Select Tool. The process of making selections that don’t look as if they have been cut and pasted has never been simpler. There are only a couple of steps for this. Keep reading!
Step 1: Find the Quick Select Tool
Once you open the image you need to edit, choose the Quick Select Tool from the Toolbar menu.
It works like a brush, so here you can also change the size of the brush with the left and right bracket keys: [ and ].
Step 2: Make a Quick Selection
The next thing to do is paint with the tool over the subject or white background, whichever is easiest for you, and stop when the selection reaches the edge.
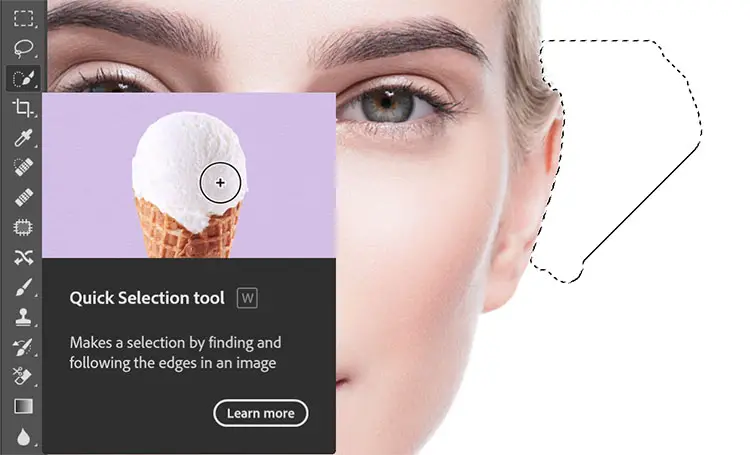
In most cases, the tool will stop on the edge correctly when it detects the change in pixels.
It is easy to deselect in case it selects something you do not want to be selected. Click the Alt key to switch to deselect mode, and drag the selection back where you want it to be.
Step 3: Invert the Selection if You Selected the Background
If you have made a selection of the background then you need to invert the selection. If not, you can skip this step.
You can invert by right-clicking on the selected subject, and choosing the Select Inverse option.

Or you can use the shortcut:
For Windows:
Ctrl+Shift+I
For Mac:
Cmd+Shift+I
Step 4: Mask or Delete the Background
Once you have inverted the selection if appropriate, click the Delete button on your keyboard, or you can go with the new mask layer like you did before, and the background will be gone.
Method 7: Use Color Range to Remove the White Background
You can also remove a white background with the Color Range option, except this time, you will remove the white color only instead of any other specific color.
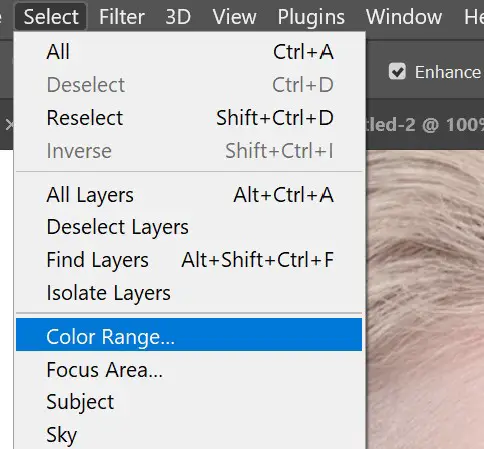
Step 1: Select Color Range
Go to the Select Menu, then choose Color Range to open the Color Range popup.
Step 2: Use the Eyedropper to Select White
Select the Eyedropper Tool, then click anywhere on the white part of your image to select only the white color.
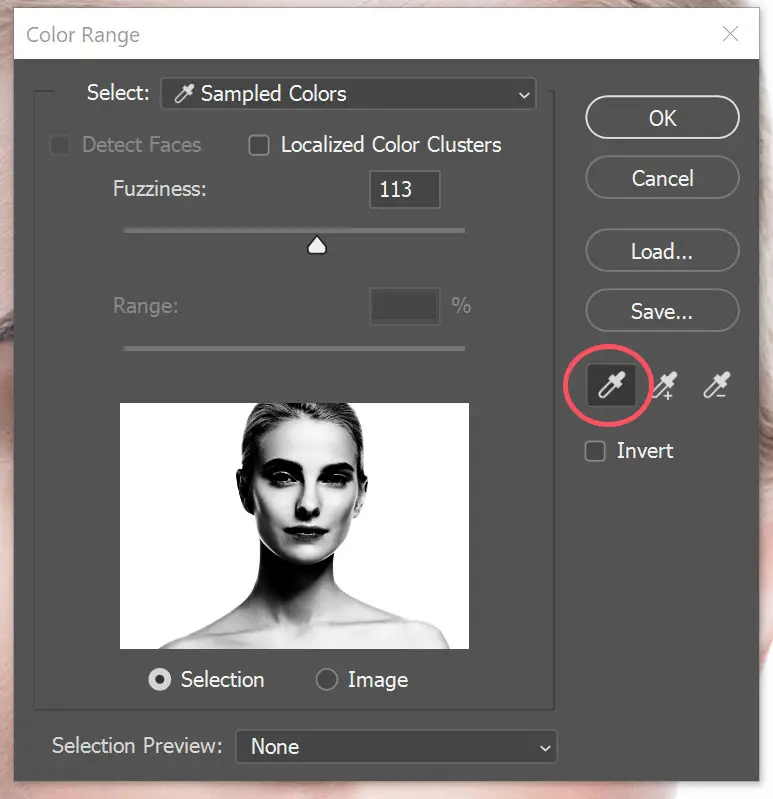
You can see in the screen shot above that a lot of the model has also been selected, so we need to tidy this up.
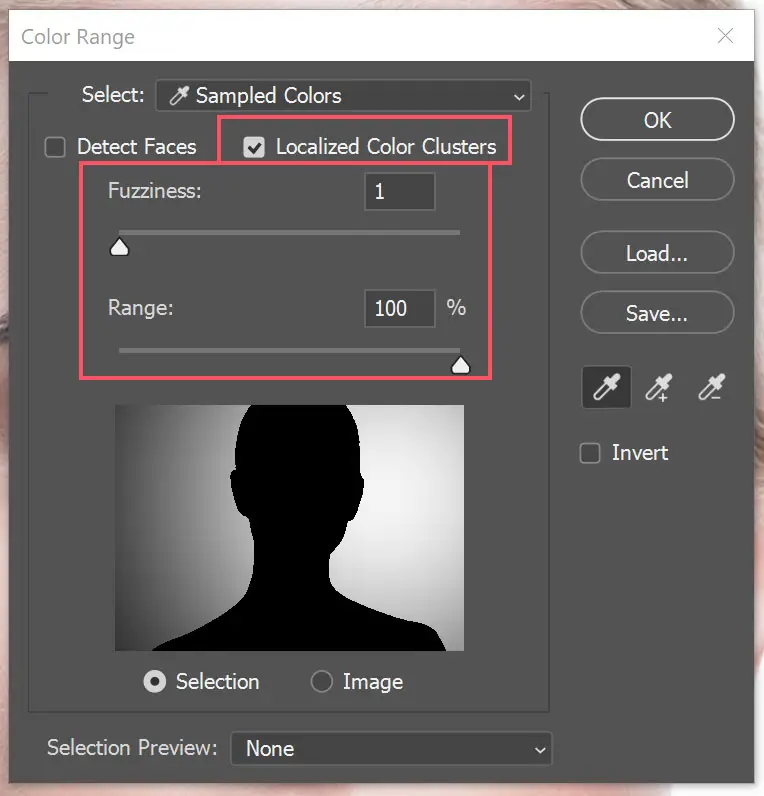
Step 3: Use Localized Color Cluster and Low Fuzziness
To make the selection more precise, check the Localized Color Cluster and adjust the fuzziness and range until you get the needed result. Generally, reducing the fuzziness will result in a better selection.
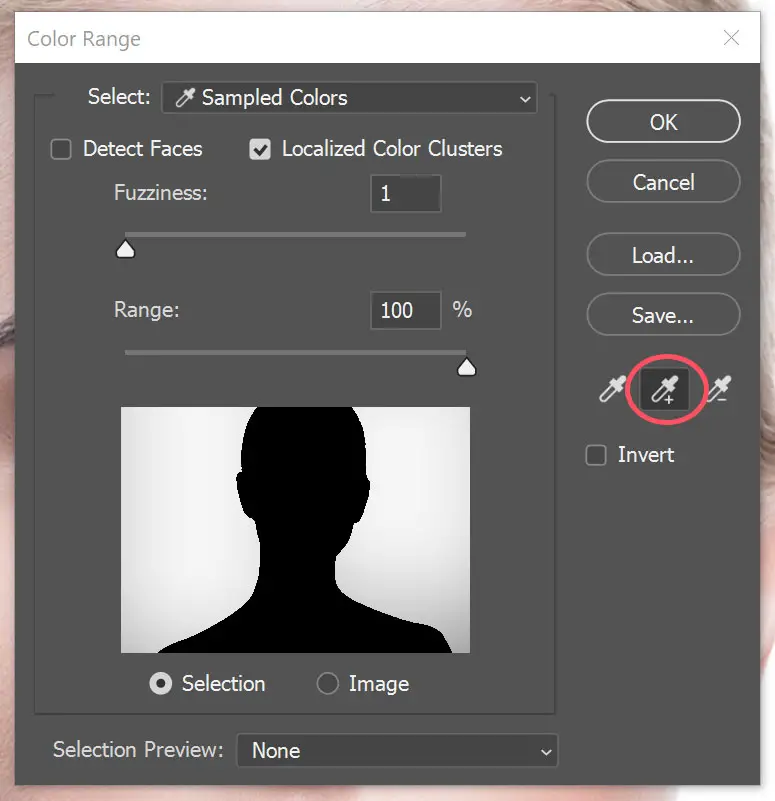
Step 4: Add to the Selection if Needed
The above selection is missing areas of the white background towards the left, as you can see in the preview. To fix this, use the Eyedropper with a plus or minus to add or subtract those colors from the selection.
Step 5: Add the Selection as a Mask or Delete It
Once you are done, click OK, and while the selection is active, invert it with Ctrl+Alt+I and press the Delete button on your keyboard to remove the background, or use the Layer Mask button to mask it out.


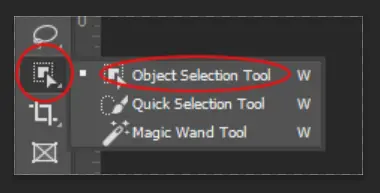
Method 8: Object Selection for Quickly Removing the Background
From Adobe Photoshop 2020 and onwards, Adobe Photoshop comes with the Object Selection Tool, which is designed to simplify the selection process. The tool is simple enough for even beginners to use.
Step 1: Find the Object Selection Tool
You can find it in the same selection options as Quick Selection in the Toolbar menu, with a keyboard shortcut of ‘W’.
Step 2: Select Rectangle Mode

With this improved selection tool you can use Rectangle and Lasso selection modes. You can find them in the Options Bar at the top of the screen. I usually use the Rectangle mode because it is simpler.
The Lasso Mode works the same as the rectangle selection wise, but it allows you to do more complex selection shapes.
The Object Selection Tool will still look for objects within the initial selection, it doesn’t matter if it is made with Rectangle or Lasso Mode. The important thing is that the subject/object that you want to cut out from the white background to be within the selection.
Step 3: Draw the Tool Over the Area to Be Selected
Cover the object that you want to be selected by drawing around it with the tool.
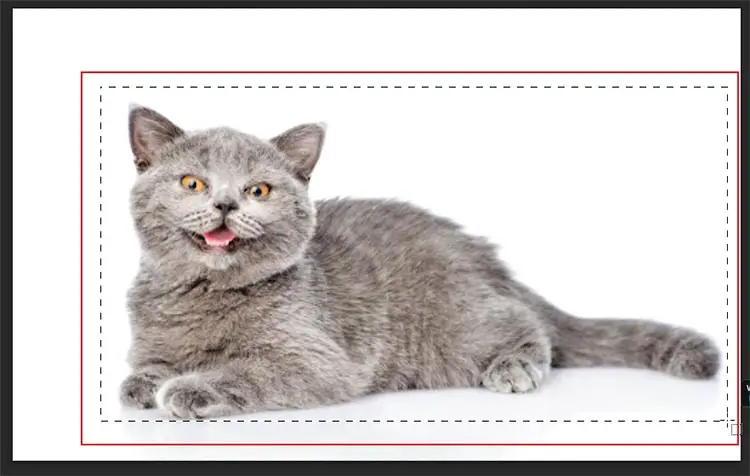
Once you have the initial selection, the Photoshop algorithm will make the object selection itself.
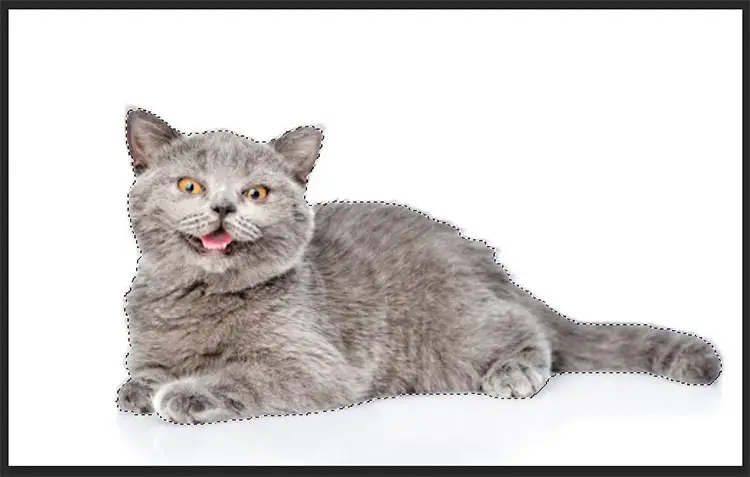
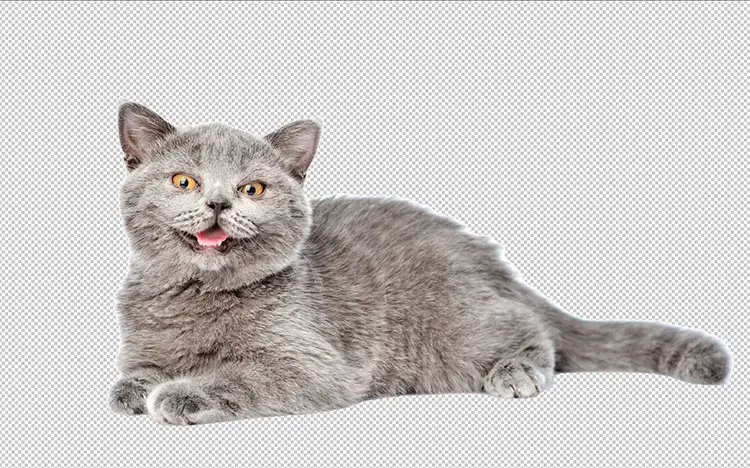
Now unlock the layer and press Delete to remove the background, or if you want it to be more precise, go with the layer mask option.
Step 4: Enjoy Your Background-Free Image!
How to Remove the White Background from a Logo?
Just like with the other images, you can remove a background from a logo with Magic Tool, Quick Selection Tool, Pen Tool, Channels, and Color Range.
You can do that by making the selection with one of the selection tools and creating a new layer mask or pressing the Delete button.
Bear in mind that the Pen Tool does not work perfectly with complex photographs and logos. It works the best with straight lines. These next steps will help you learn how to use the Pen Tool and the Channels option to remove a background from a logo.
Method 9: Use Pen Tool to Trace Out Simpler Logos and Remove White Background
The Pen Tool is a useful tool when it comes to removing a background and selecting subjects.
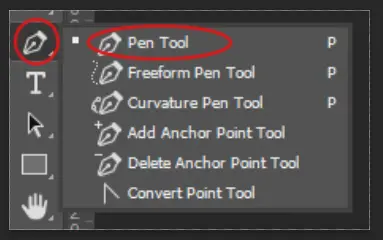
Step 1: Find the Standard Pen Tool
There are 6 Pen options, but for now we are going to focus on the classic Pen Tool option. You can find it in the Toolbar menu. The other pen tool options allow for more complex selections, where you are not necessarily dealing with straight lines.
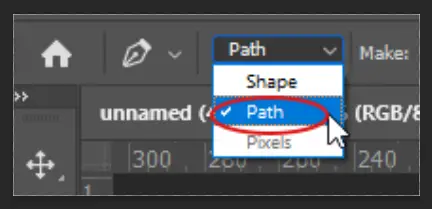
Step 2: Make Sure You Are Drawing a Path
Before you use the pen tool, be sure you are drawing a path, not a shape. You can set that in the Options Bar.
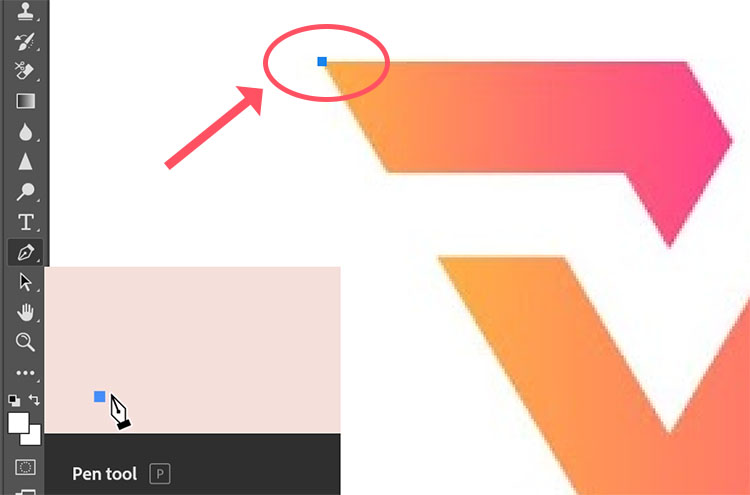
Step 3: Create the First Anchor Point
Zoom into the image enough so that you can clearly see the boundaries between the edge of your logo and the white space.
Create an anchor point at one corner of your logo. The anchor point is used to fix the pen path to your image. You can do this with a single click.
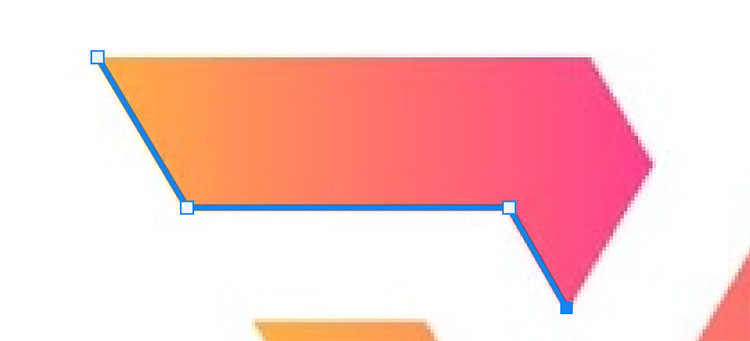
Step 4: Complete the Path
Click between each corner of your logo to create lines between anchor points. You can hold down your mouse button and move the anchor points to create curved lines, which does take some practice, but is a really useful skill to master.
Step 5: Edit the Path if Necessary
Once you have drawn the path, you can also edit it. Pressing the Alt key will let you break the handles for editing.
To bend the anchor point, click and drag it. Or, if you need to move the whole selection, first click Ctrl/Cmd, then drag it.
You will need to draw the path all the way round the logo.
And, do remember – It is best to create as few anchor points as possible – your selection will only be as accurate as the path you create.
Step 6: Add to the Selection with Multiple Pen Paths
If you have to create multiple separate paths, as for this logo, you can connect them all together by using the Path Selection Tool.
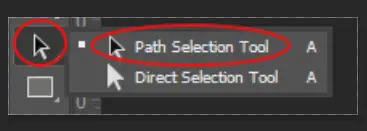
Once you have selected the Tool, drag over the whole image to select everything under the selection.
Step 7: Create a Selection with a Feather of 0.5 Pixels
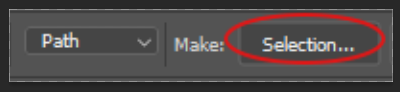
Now that you have created the entire path, select the Pen Tool again. From there, go to the Options Bar and choose the Select option from there.
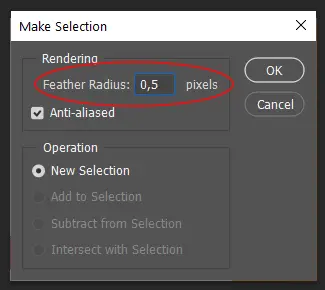
A Paths Tab will appear, where you need to set the Feather Radius to 0.5 pixels. And press OK.
You might need to try different Feather Radius values depending on your needs. 0.5 pixels will remove jagged edges, but it might not work well on an image with low resolution.
Step 8: Review Your Selection and Remove the Background
You should get this:
Once you have completed the selection, press Ctrl/Cmd+J to create a new layer of the path. It will create a new layer for the selected path. Once it creates it, turn OFF the Background Layer.
And you are good to go – the background is gone.
Method 10: Remove White Background from Logos Using Channels for Precise Selection
One of the most complicated ways to remove a white background, but also one of the most comprehensive, you can use Channels in Photoshop to easily remove white backgrounds from logos.
It is easy to select logos with channels as the background is white, resulting in a well-defined edge.
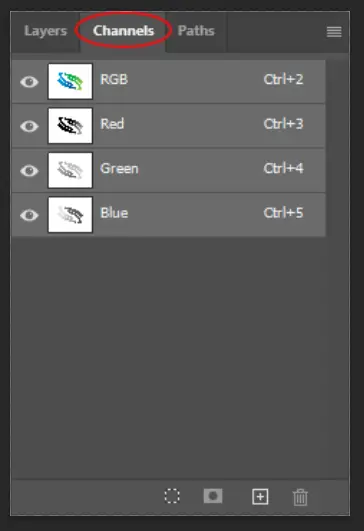
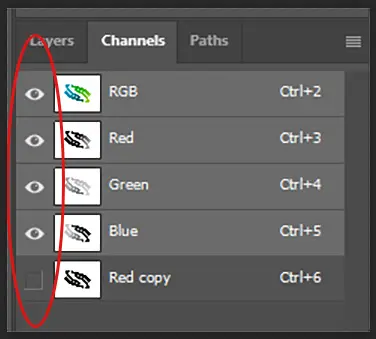
Step 1: Go to the Channels Tab
Analyze your logo by going to the Channels Panel. You can find it next to the Layers Panel.
Step 2: Choose a Channel with High Contrast
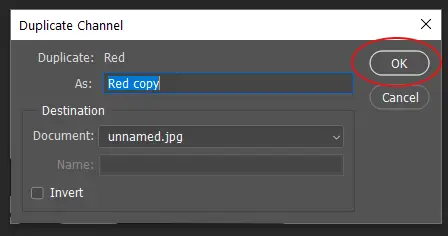
Choose a channel with the most contrast between the background and logo. When you identify which channel has the most contrast, drag it into the New Channel icon and duplicate it.
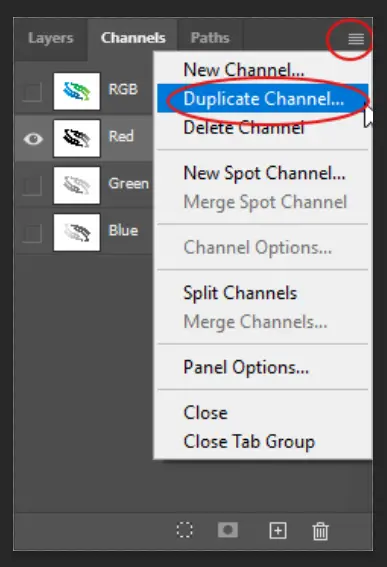
When you select the Duplicate Layer option, a Pop-Up Window will show up, where you need to click OK.
If there is no channel with better contrast than the others, then duplicate the best channel.
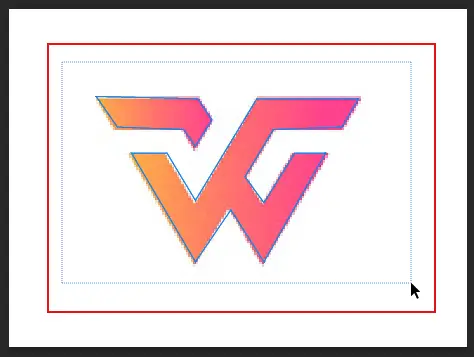
As shown in this example, I duplicated the Red Channel mostly because the logo is highly contrasted against the white background.
Step 3: Use Other Channels to Fill in the Gaps
Now, find a channel that consists of the missing pieces from your chosen channel. In this instance, the Blue Channel contains a lot of contrast.
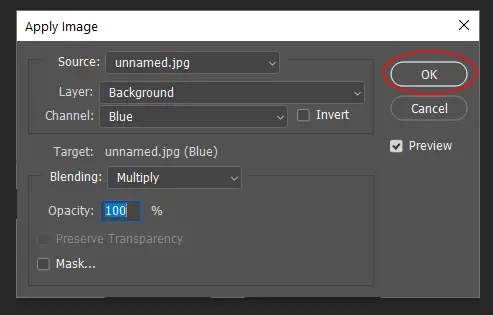
To merge these channels together, select the Red Channel copy and go to the Image Menu at the top of the screen and choose the Apply Image option.
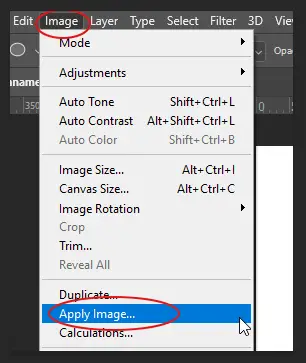
A Pop-Up Window will show up again. Leave the blending mode on Multiply and just press OK.
Once you do that, you will see that the logo for the duplicate channel is now almost black.

Step 4: Open a Levels Layer for Fine-Tuning
In order to fine-tune the channels selection, go to the Image Menu and choose the Adjustments and then Levels.
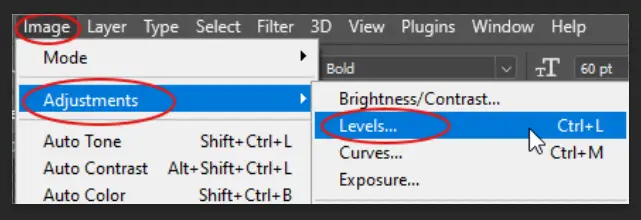
Or you can use the shortcut.
For Windows:
Ctrl+L
For Mac:
Cmd+L
Step 5: Use Levels to Create Sharp Edges
Once the Levels Pop-Up Menu shows up, the black point slider should be moved to the right to make the dark pixels black, and the white point slider should be moved to the left to make the bright pixels white.
Once you are done, press OK.
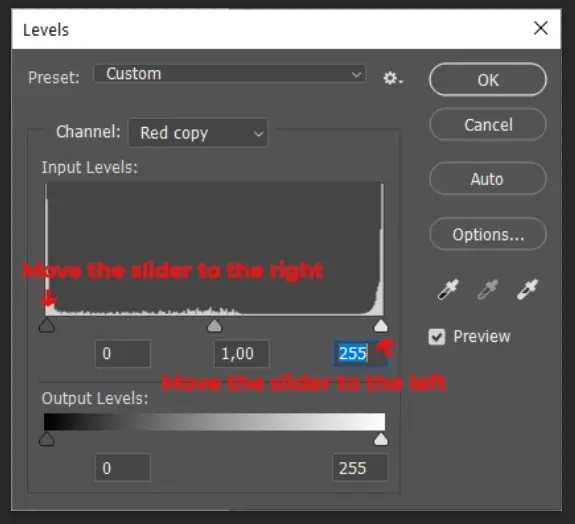
By doing so, you can create sharper edges while also removing and artifacts that might in your image.
You should be left with this, as a duplicate channel in the Channels tab:

Step 6: Create a Selection from the New Channel
You haven’t created a selection just yet, but instead have a new channel that you can use for a selection. The advantage of this method is that your selection will essentially be always available to you, as long as you don’t delete your new channel.
To load the duplicate channel as a selection, hold down the Ctrl/Cmd key and click on the channel.
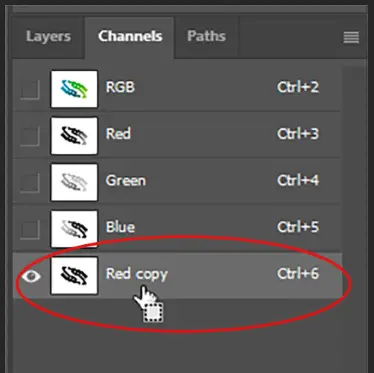
Once you click on the channel, a selection will be made automatically of the whole logo.
Step 7: Switch the Other Channels Back On
The red, green and blue channels will have been automatically switched off, so when the selection is active, go back to the Channel Layer Panel, and from there, turn the other channels back ON by clicking in the space to the left of them.
Make sure to turn OFF the copied channel where you have worked.
Step 8: Review the Selection and Mask It
Once you are done, you will see that the selection will stay as before, and the color of the logo will be back along with the selection.
Now, you do the same as before. Press the Delete button, or make a new layer mask, and the background will be gone.
How to Keep the White Background Transparent in Your Saved Files?
In order to keep the transparent background, you cannot save your file as a JPEG, but must save as PNG.
Step 1: Save the photo with no layers under the main layer
If you have any other layers under the photo you want to be transparent, you should turn them OFF and then save the photo as PNG.
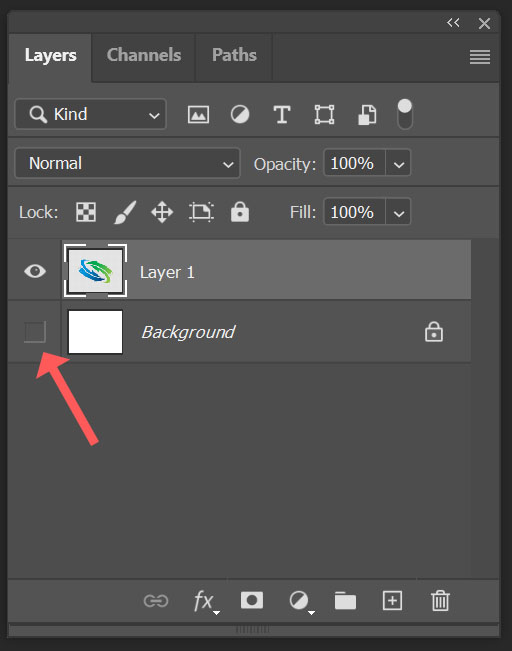
Or, if there are not any other layers, you can just save the photo as a PNG file. Once you do that, you will have a photo with a Transparent Background.
Step 2: Save as PNG
To save the photo as a PNG file, you need to go to the File Menu at the top of the screen and choose the Save a Copy option.
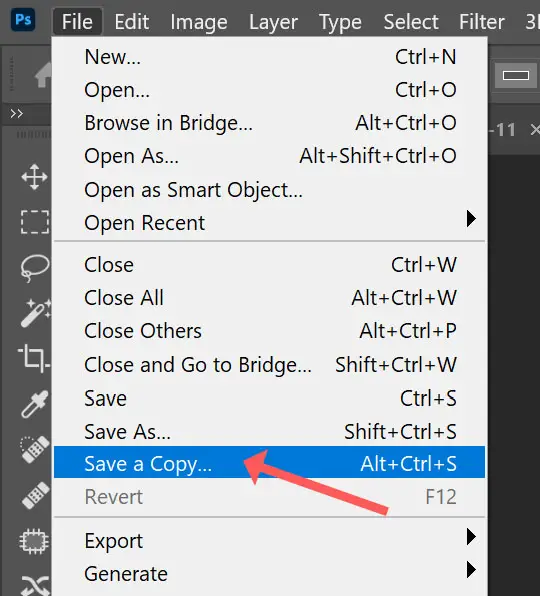
Or use the shortcut:
For Windows:
Alt+Ctrl+S
For Mac:
Opt+Cmd+S
When the Explore Window shows up, choose the PNG file type from the Drop-Down menu and click Save.
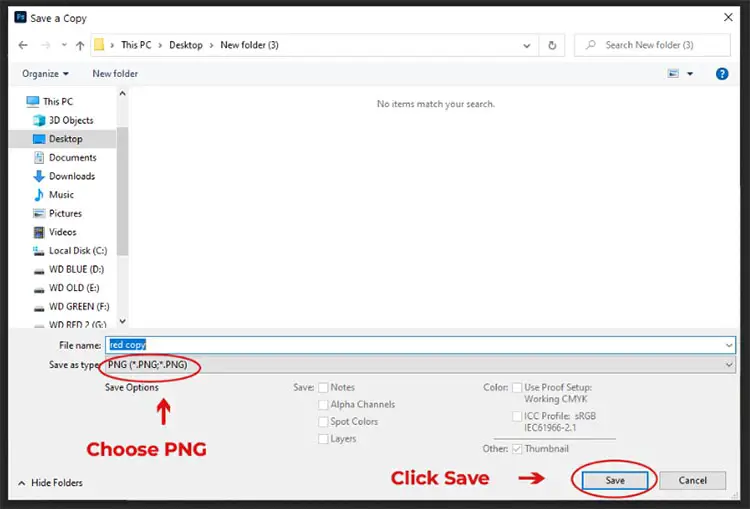
Once you click save, you will be greeted with a small dialog.
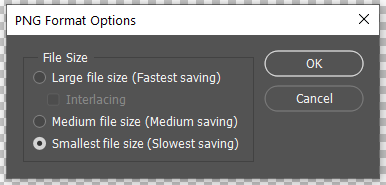
Here, you can choose whether you want a faster save time, but a larger file, or vice versa.
For Resolutions up to around 1500px on the longer edge, the saving process is instant. So, the smallest file size should be okay.
Now, you will have a photo with a Transparent Background to use however you wish.
Read More:
How to remove a color in Photoshop


Leave a Reply