You should start by trying to localize the problem to either your TV or your router and then you can follow the appropriate troubleshooting steps for each, which are detailed below.
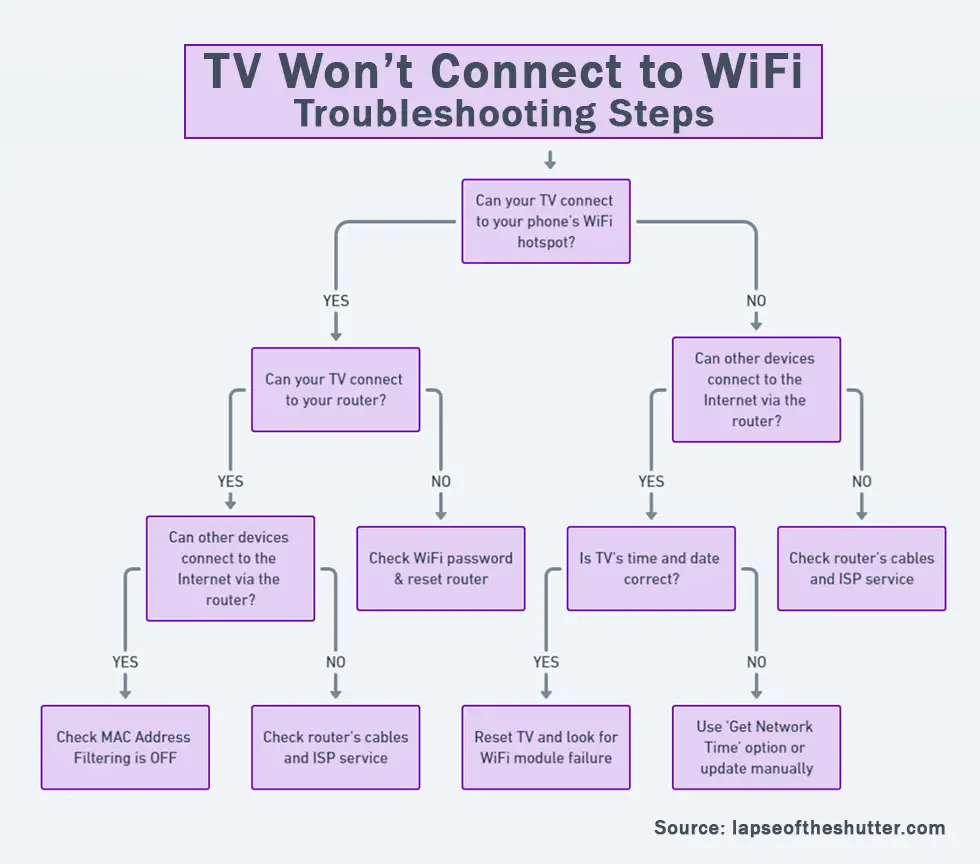
You can jump to the relevant steps in this guide, but I would recommend running through the steps in order to cover every base.
Is The Problem With Your TV or Router?
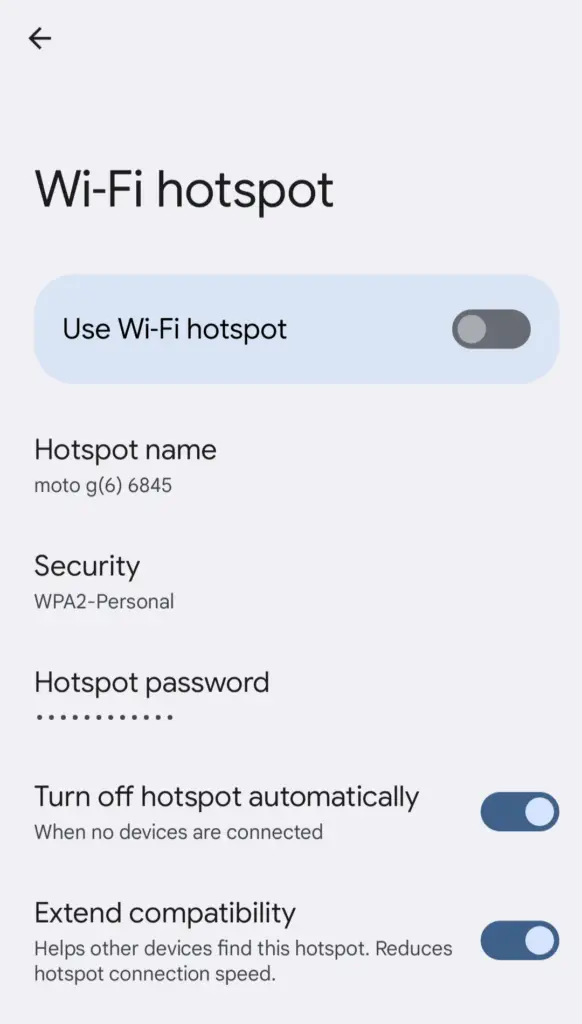
To help localize the problem to either your TV or your router, try setting up a hotspot on your phone and then connecting your TV to it.
Hotspots can be set up on iPhones from Personal Hotspot, and on Android from Settings -> Network and Internet -> Hotspot and Tethering.
- If your TV connects to your phone hotspot and can access the Internet through your phone, then you can assume that you have a problem with your router.
- If your TV will not connect to your hotspot, you have either a software issue with your TV or a hardware problem with the Wi-Fi card in your TV.
Depending on the results of the above test, you can then follow the router troubleshooting steps or TV troubleshooting steps as below. Check out the overview, then the detailed steps follow this.
Router Troubleshooting Steps Overview
| Cause | Explanation |
|---|---|
| Incorrect Password | Double-check that the password for your router has been entered correctly on your TV and/or it hasn’t recently been changed by other members of your household. |
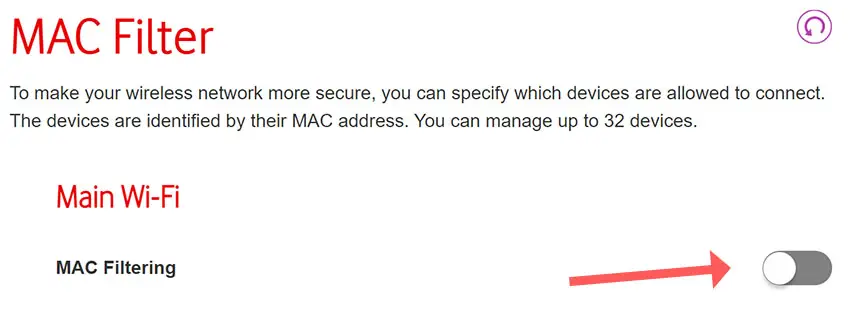
| MAC Address Filtering | Every router can filter which devices are allowed to connect to the Internet through their MAC addresses. If you have MAC address filtering on, your TV will connect to your router but will not get an active Internet connection. |
| Poor Signal | RF interference or too many devices on your WiFi network can prevent a solid connection. |
| Router Software Glitch | Try soft resetting your router and if that doesn’t help, then hard reset it. |
TV Troubleshooting Steps Overview
| Cause | Explanation |
|---|---|
| Software Glitch | If you have a newer model of TV like the Hisense Roku models, then WiFi connection problems can potentially be resolved by power cycling. |
| IP/DNS Conflict | If your TV is set to pull a manual IP/DNS, it can fail to be assigned an IP depending if the address range is outside one that your router provides. In this case, your TV may or may not connect to your phone’s hotspot. |
| Old Firmware | Constant disconnection problems might be resolved by updating firmware, if available. |
| 2.4GHz/5GHz Bandwidth Issues | Even relatively recent TVs (2018 models) might not be able to connect to 5GHz WiFi and/or the bandwidth you are broadcasting on might have high levels of interference. |
| Incorrect Time/Date | IP addresses acquired by DHCP typically expire 24 hours – 1 week after assigning. If your TV’s date is outside this range, it can cause it to reject the IP address offered by your router/your router allow the connection. |
| WiFi Module Failure | If you have ruled out all software issues and potential router problems, then you are left with a WiFi module failure. Open up your TV and checks its connections are firmly seated first, then replace if necessary. |
What To Do If Your Hisense TV Won’t Connect to WiFi
For a quick overview of the steps needed to fix your TV/router, you can take a look at my video below, with the full details for each step following this.
How to Fix Router WiFi Problems
1. Make Sure Your WiFi Password is Correct
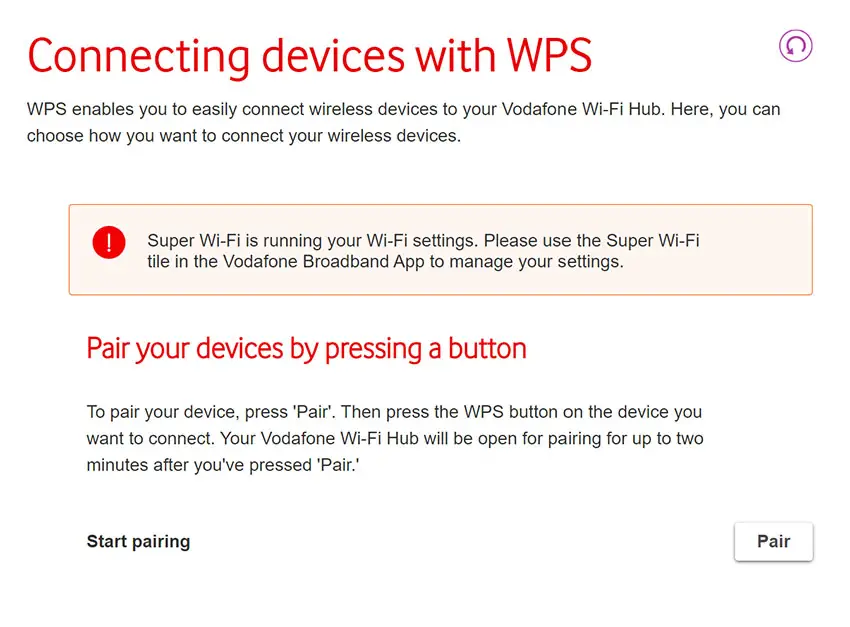
If your WiFi will not connect at all on your TV, this could be a sign that the password you are entering is incorrect, or the WPS setup failed.
2. Check Your Router is Not Set for MAC Address Filtering
MAC address filtering allows you to specify which devices are allowed to connect to the Internet using their unique MAC addresses, which every Internet-capable device has.
So if you do have a connection to your router from your TV, but your TV has no Internet connection, then login to your router by typing the Admin IP address into your phone’s or computer’s browser. This is listed on a label on your router (usually 192.168.1.1 or similar), along with the admin login info.
Go to Advanced or Expert Settings and find MAC Filtering. Make sure this is turned off.
3. Possible WiFi Interference / Too Many Devices
If your Hisense TV is not detecting your home WiFi signal at all, then you need to make sure that your router is switched on and working properly, and that there is no interference or blocking of the WiFi signal between your router and TV.
4. Hisense TV Not Picking Up 5GHz WiFi
Check the user manual for your specific TV to see which bandwidths it supports, but as an example, even some TVs from as late as 2018 only support 2.4GHz, meaning that if your router is only broadcasting a 5GHz signal, your TV cannot connect to it.
Login to your router’s landing page, usually found by typing 192.168.1.1 or 192.168.1.0 into a browser on your phone or computer (the exact IP will be on a label on your router).
Find the login info on your router’s label, and take a look at the overview page to see whether your TV is connecting on 2.4GHz or 5GHz.
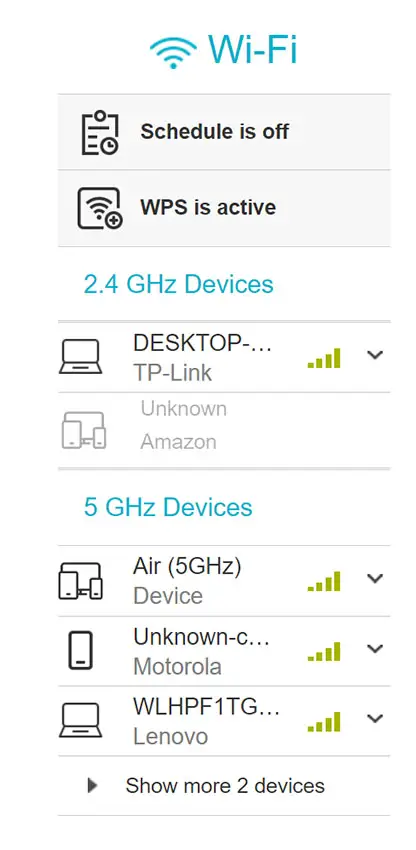
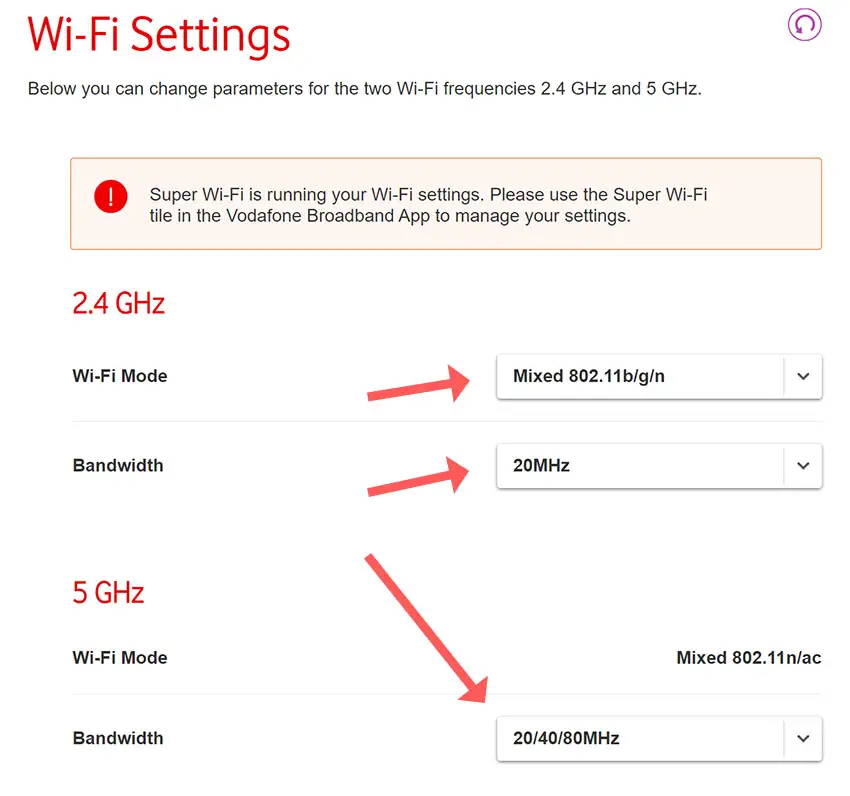
If it is connecting on the 5GHz channel, try changing the settings in your TV’s Network Status page to connect only on 2.4GHz.
You can also update the channel frequencies in the router itself, usually found under Expert Settings or Advanced Settings, changing these values and retesting your TV’s Wi-Fi connection to see if they make any difference.
5. Reset Your Router
You can first try a soft reset of your router – unplugging it for 30 seconds – to see if that fixes your issue.
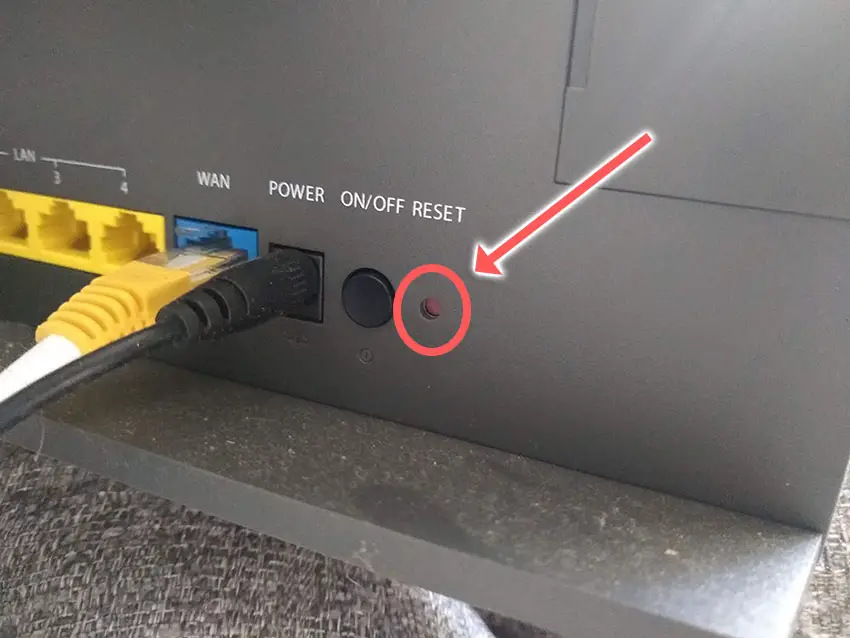
If not, try a hard reset of your router by pressing a paperclip or similar into the small reset hole usually found on the back of your router.
You will need to hold the paperclip on the reset button for at least ten seconds to be sure your router is fully reset.
How to Fix Hisense TV WiFi Problems
1. Reset Your WiFi on Your Hisense TV
Although this might seem a basic step, power cycling your TV is often the best way to fix your Hisense TV not connecting to the Internet.
To soft reset a Hisense TV:
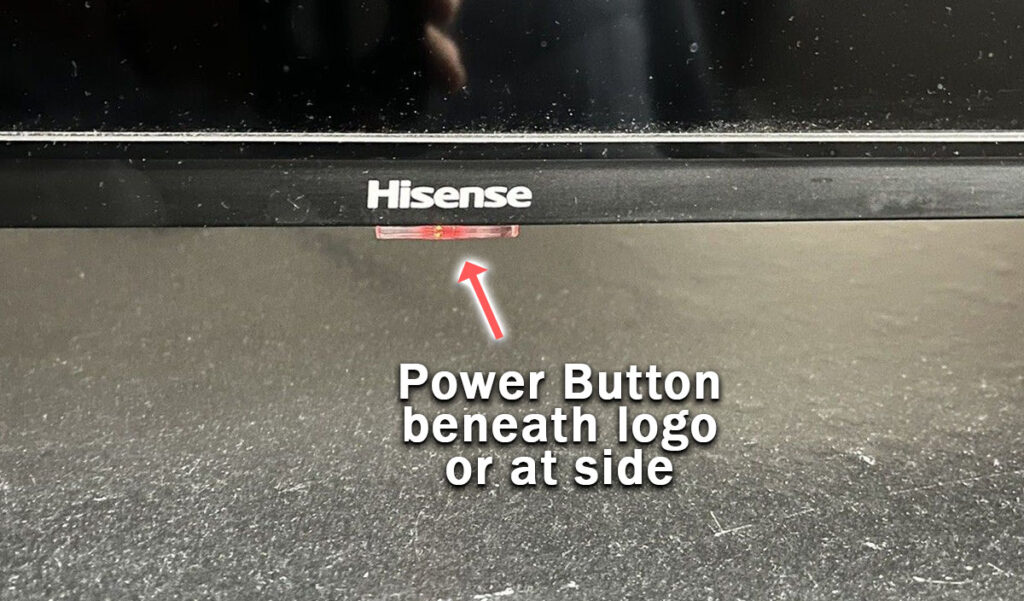
- Unplug your Hisense TV and hold down the physical power button beneath the IR receiver on the TV for at least 15 seconds.
- Wait for at least 30 minutes for any residual power to drain.
- Plug your TV back in and try switching it on. You should see a red light if you have been successful.
- It’s a good idea to try this a couple more times if it doesn’t work at first, as this can sometimes take a few goes to kick in.
Make sure you do wait for the full 30 minutes before plugging your TV back in – you would be surprised how long the components within your TV can hold a charge, and you want to make sure it has fully reset.
If you have a Hisense Roku TV, then you can try clearing the cache.
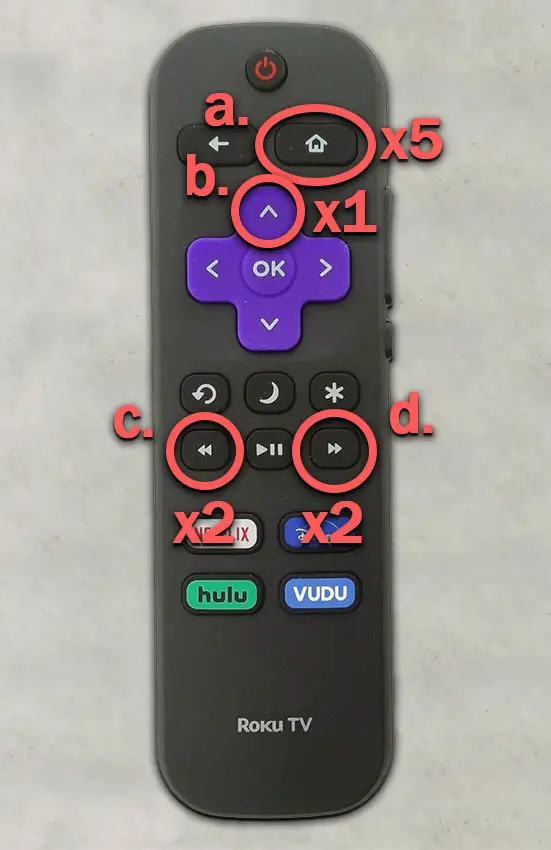
On your remote, and with your TV switched on, restart your TV using the button combination: Home – press 5 times; Up Arrow – press once; Rewind – press 2 times; Fast Forward – press 2 times.
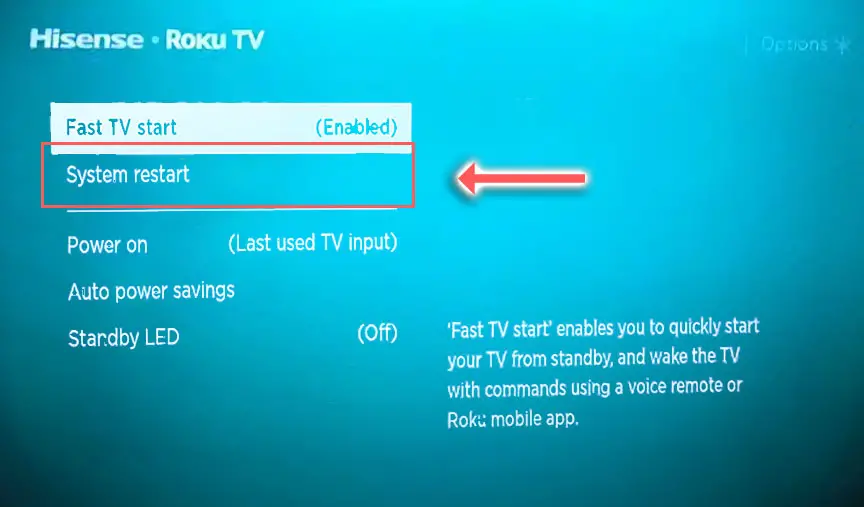
You can also run a system restart from the menu.
To restart a Hisense Roku TV:
- Go to the Home screen.
- Then Settings.
- And System.
- Then Power.
- System restart.
- And click Restart.
2. Hisense TV Not Connecting to WiFi Automatically
In most cases, your TV should be set up to automatically select an IP address from your router, and usually also automatically pulls a DNS address, which is used to resolve IP addresses that your TV connects to, creating the URL that you see in the address bar.
But it’s possible that IP address lookup might have been set to Manual, and your DNS settings might be conflicting between your TV and WiFi router.
To fix this, press Home on your remote, then go to Settings -> Network -> Network Configuration -> Advanced Settings -> IP Settings.
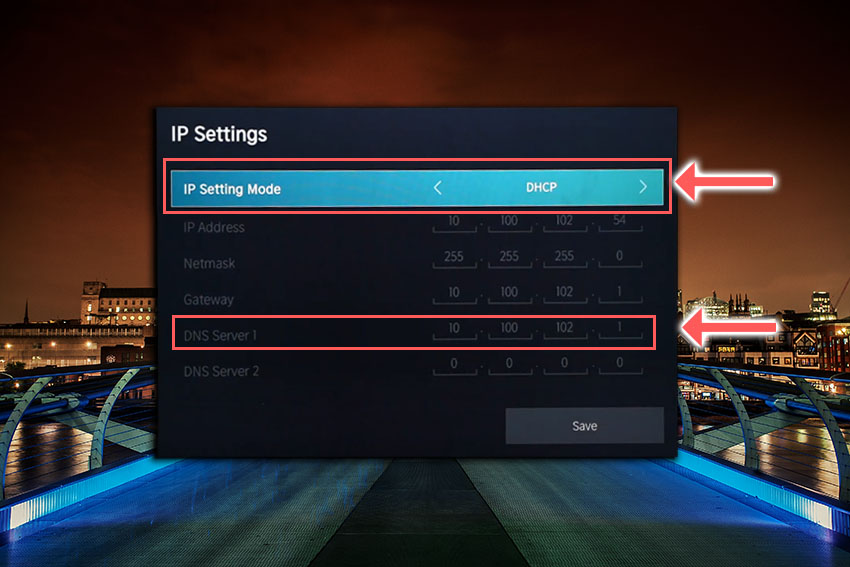
If the IP Setting Mode is set to Manual, then change it to DHCP and restart your TV. This will make your TV select an IP address automatically from your router.
If the IP Setting Mode is set to DHCP, then change it to Manual, and change the DNS Server 1 to 8.8.8.8, which is one of Google’s DNS servers that we know definitely works.
Restart your TV and try your apps again.
3. Hisense Roku TV Not Connecting to Wifi
If you have a Hisense Roku TV that won’t connect to the Internet, then go through the Roku Platform Secret Menu to enable network pings.
This can prevent your Hisense Roku TV from connecting with the Roku servers and this prevents your TV from making an Internet connection. This is a common cause of the timed out connection error.
To access the Roku Platform Secret Menu:
- Open the Home screen.
- On your remote, press the button combination: Home x5; Fast Forward x 1; Play x 1: Rewind x1; Play x 1; Fast Forward x 1.
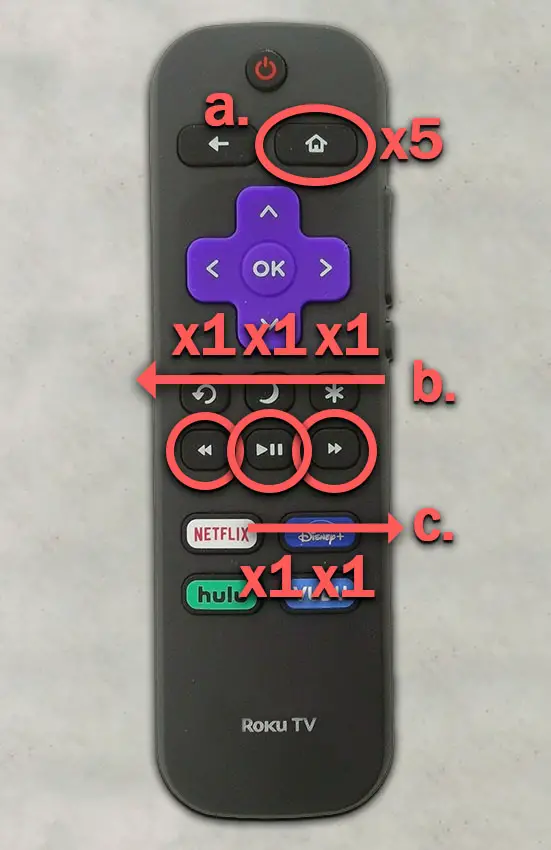
You will then see the Roku Platform Secret Menu screen. You want to select System Operations Menu.
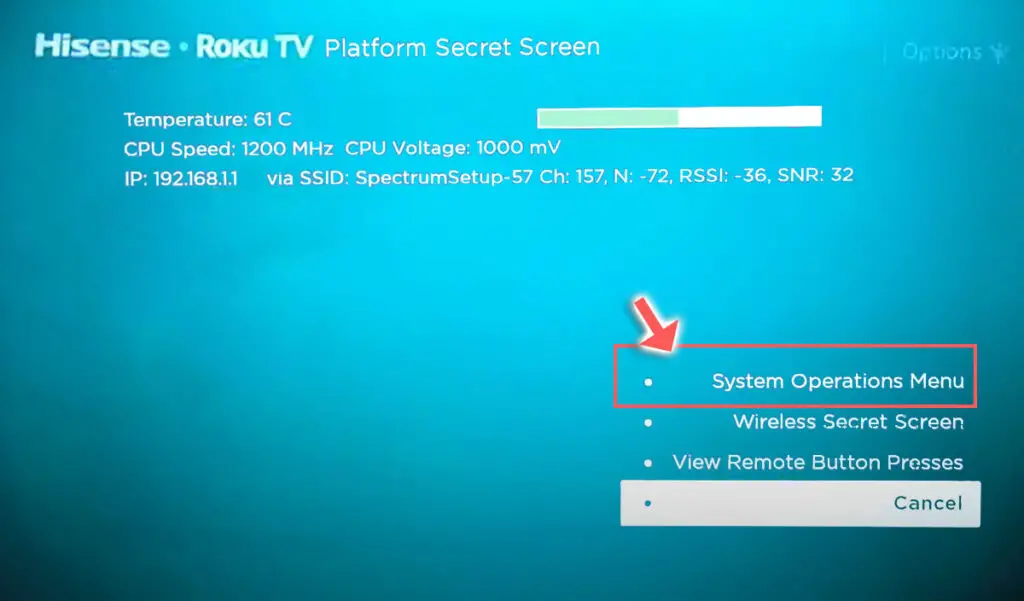
And choose Network Menu.
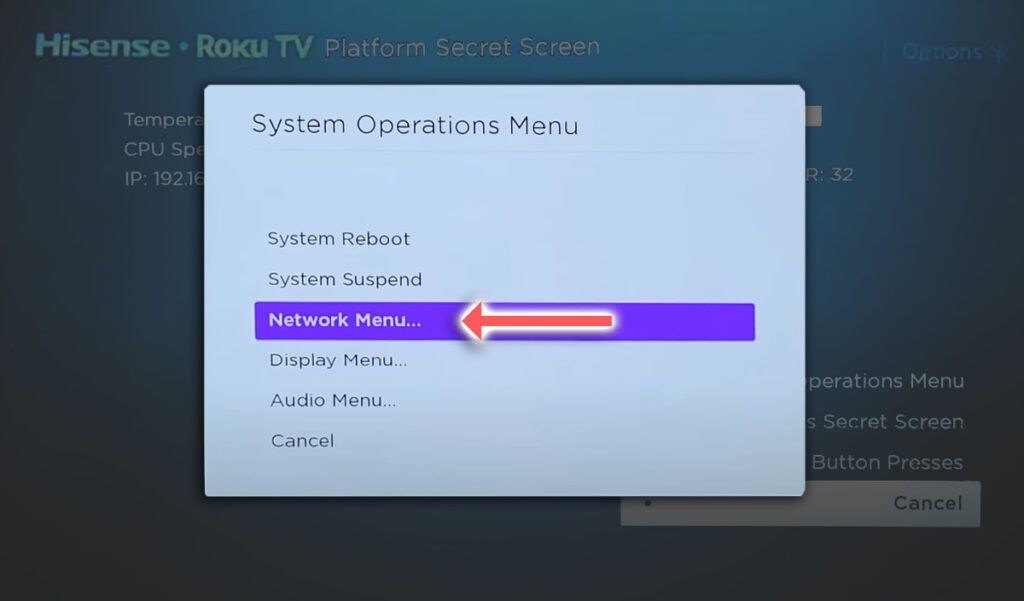
You then want to scroll up to Disable Network Pings and click on it to change it to Enable Network Pings.
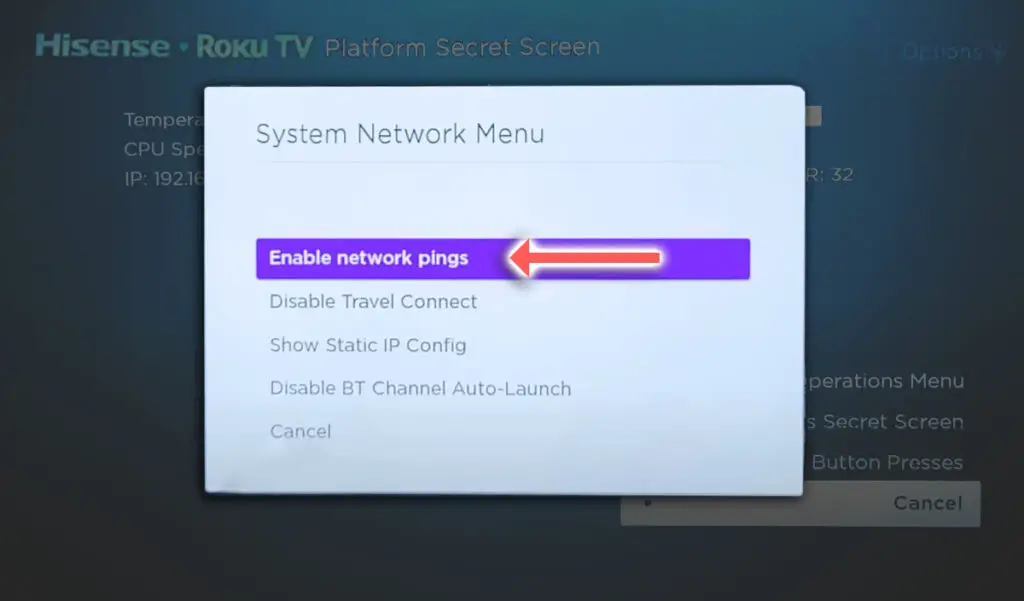
You can then back out of the menus and re-try your connection from the Network menu. You might want to try power cycling your TV again if the WiFi connection doesn’t come on immediately.
4. Update Your TV’s Firmware
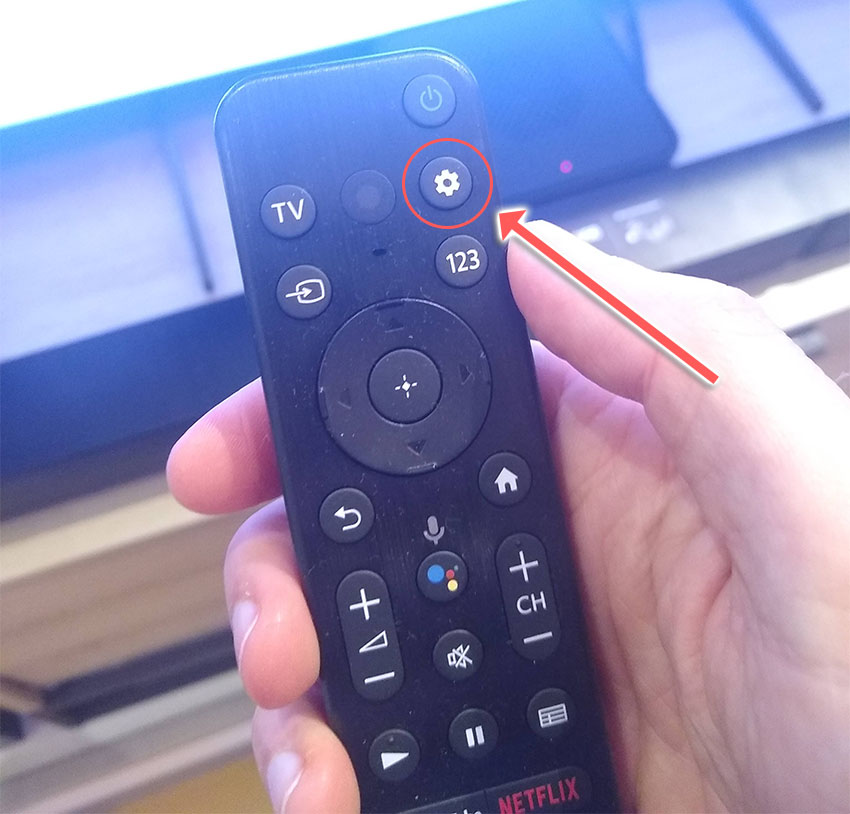
To check that auto-updating is on for firmware/software on your Hisense TV, press the Home button on your remote, then go to the “cog” for settings, then Support and System Update. Make sure the Auto Firmware Upgrade is enabled.
If your TV doesn’t have OTA (over-the-air) support:
- Press Home on your remote.
- Click the “cog” icon.
- Go to All.
- Then About.
- And System Update.
- Click Detect to check for updates.
For older Hisense TVs, even this option for updating your firmware might not be available. In this case, you need to download the latest firmware and install it onto a USB stick to install it manually on your TV. Call Hisense Support and they will be able to guide you through the process.
5. Make Your TV Forget Your Network, Then Reconnect
Within your Hisense TV settings menu, there is the option to reset any connected networks.
This lets you reinstate the network connection manually and will fix any problems caused by an initial bad connection.
To reset your network, press the Settings button on your remote.
Then go to General Settings -> Network Status -> Reset Network. Continue through the warnings and after the network has been reset, try reconnecting using the WiFi login info on your router.
6. Check Your TV’s Time and Date
IP addresses assigned automatically over DHCP have a lease expiration time attached.
This time is typically 24 hours – 1 week, and after this time is up, the router reclaims the IP address and either assigns a new one to your TV or re-leases the old one.
Go into the Settings for your TV and manually update the date and time to today if it is not already showing this.
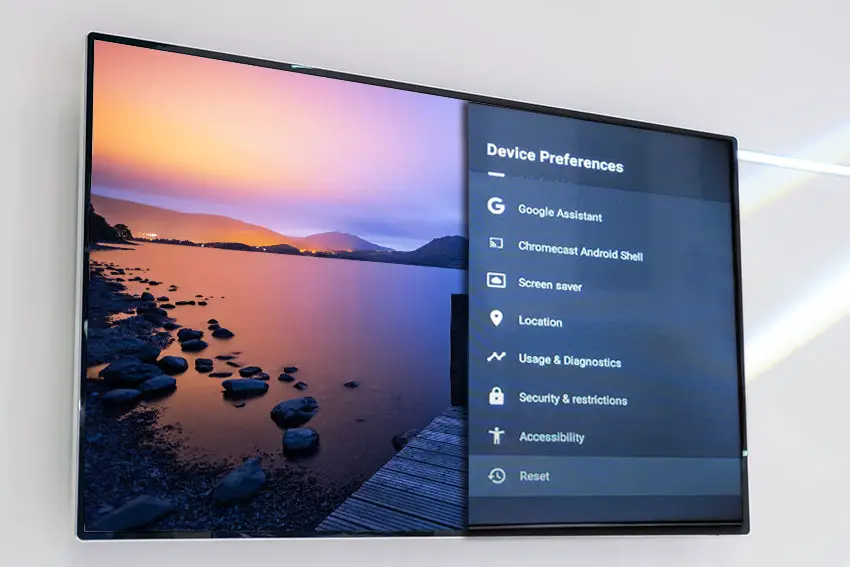
7. Factory Reset Your Hisense TV
To factory reset a Hisense Smart TV:
- Press the Home button on your remote.
- Then the “cog” icon for settings.
- And go to the Device Preferences menu.
- Then choose Reset at the bottom of this screen.
- And click through the further Reset and Erase everything prompts.
- Your TV will then restart, having reset to factory defaults.
8. Use an Ethernet Cable
Finally, if you are still unable to get the WiFi working on your TV, you might have to resort to using an Ethernet cable.
9. Replace the WiFi Module
Take a look at the video below for a step-by-step guide to do this. You will need to open up your TV which will invalidate its warranty, so this is really only a solution for TVs that are over one year old.
Connect Hisense TV to WiFi Without Remote
If you’ve lost your remote or it doesn’t work, then you can connect to Hisense Smart TVs without a remote by the Hisense RemoteNOW app.
As long as you are using a relatively modern Smart TV, and your TV can connect to your home WiFi network, then you can use the apps like the one above on your phone even if your TV can’t connect to the Internet.
If your TV can’t connect to WiFi at all, then apps which use the infrared capabilities of your phone can work, like the Remote for Hisense TV.
Alternatively, try plugging a USB keyboard into your TV’s USB port and use the direction keys in combination with any Menu buttons or similar on the TV case to navigate the internal menus and connect to your home network.
There are some more tips in my guide to connecting your Hisense to WiFi without the remote.
Hisense TV Support and Warranty
It goes without saying that if you are still within the one-year warranty period, then you should contact Hisense, who will most likely come to you and simply replace the panel in your TV.
You can call Hisense on:
- 1-888-935-8880 (Mon – Fri, 9am – 9pm EST & Sat – Sun, 9am – 6pm EST)
Even if Hisense won’t fix your TV, they might still offer you a discount on a future model if you pester them hard enough! This is always worth a try in my experience.
Hisense WiFi Troubleshooting Quick Tips
- Use your phone’s hotspot to localize the WiFi connection problem to either your TV or router.
- If your Hisense TV won’t connect to WiFi, then check the DHCP IP address is set to obtain automatically and that your TV’s date and time are correct.
- If the problem is with your router, check MAC address filtering is off and that it is broadcasting an appropriate 2.4GHz/5GHz signal.
- The most common cause of WiFi connection problems on Hisense TVs are software-related, or failures of the WiFi module.
Hopefully, you’ve now got your TV’s WiFi back up and running. If not, leave me a comment and I’ll see what more I can do to help.
Read More:


2 Responses
Susan
My wifi password is too long for the panel on my tV to log onto my wireless connection
Tim Daniels
You can change your WiFi password by logging into your router on your phone or laptop.
Open a browser and go to your router’s landing page – it will be 192.168.0.1 or similar, with the exact address on a sticker on your router.
Use the login details for your router that are also on the sticker and you can then change the WiFi password from somewhere in your router’s options.