Because the number of blinks can have different meanings for different TV models (or no meaning at all), you can’t rely on the Philips TV LED blinking codes that you might find online.
Instead, use the steps in this guide to diagnose the cause and fix your TV, with just a few minutes of your time.
Why Is My Philips TV Red Light Flashing?
The most common reasons of your Philips TV red light flashing are:
| Possible Cause | Explanation |
|---|---|
| Software Bug | A glitch in your TV’s memory could be stopping it coming on. |
| HDMI Issue | An improperly connected HDMI cable could be making it seem your TV screen isn’t coming on. |
| Power Problem | Your power cord or wall socket might be preventing proper power transmission. |
| Internal Board Failure | Components on your TV’s internal boards might have failed. |
| Backlight Failure | LEDs in your TV’s backlight could have burned out, or their connections might have overloaded, and so your TV won’t come on to prevent further damage. |
How to Fix a Philips TV With a Blinking White Light
Whether your Philips TV red light blinks 2 times, 3 times, or is blinking 6 times or more, the possible causes remain the same, with details on how to fix each problem below.
You can view a quick overview of each fix in my video below if you prefer.
1. Power Cycle Your Philips TV
Although this might seem a basic step, power cycling your TV is often the best way to fix your Philips TV.
To reset your Philips TV:
- Make sure your TV is switched off and unplug it.
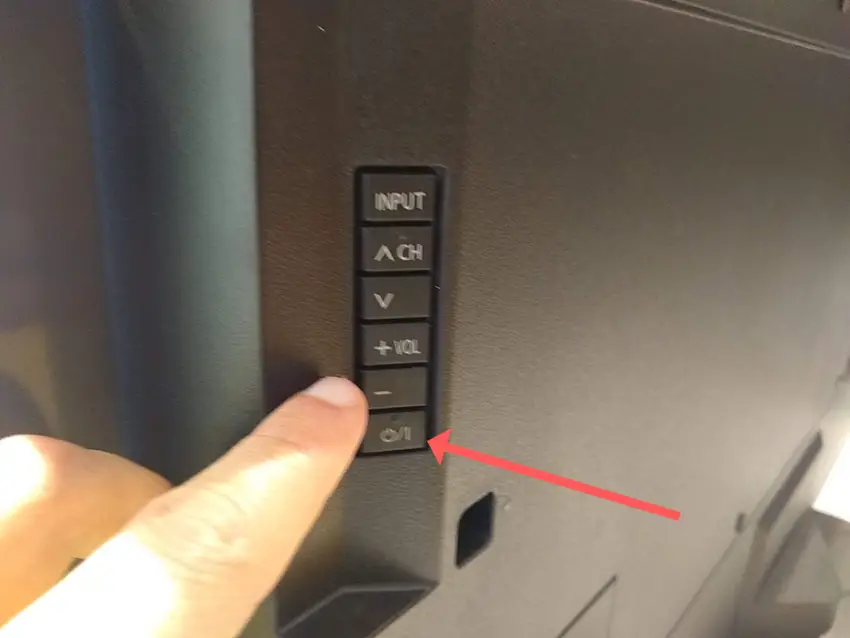
- Hold down the physical power button on the TV for at least 15 seconds.
- Wait for at least 2 minutes for any residual power to drain from the TV’s capacitors (which are capable of storing charge for several minutes).
- Plug your TV back in and try switching it on. You should see a red light if you have been successful.
- It’s a good idea to try this a couple more times if it doesn’t work at first, as this can sometimes take a few goes to kick in.
Make sure you do wait for the full 2 minutes before plugging your TV back in – you would be surprised how long the components within your TV can hold a charge, and you want to make sure it has fully reset.
You can also hard reset some Philips TVs by putting a pen into the recessed Reset button, usually found on the side or back of the TV.
2. Check for Philips TV Remote Control Problems
If the standby light is flashing, this means that your TV is receiving power, but there is a chance that it’s not responding to you because your Philips remote isn’t working.
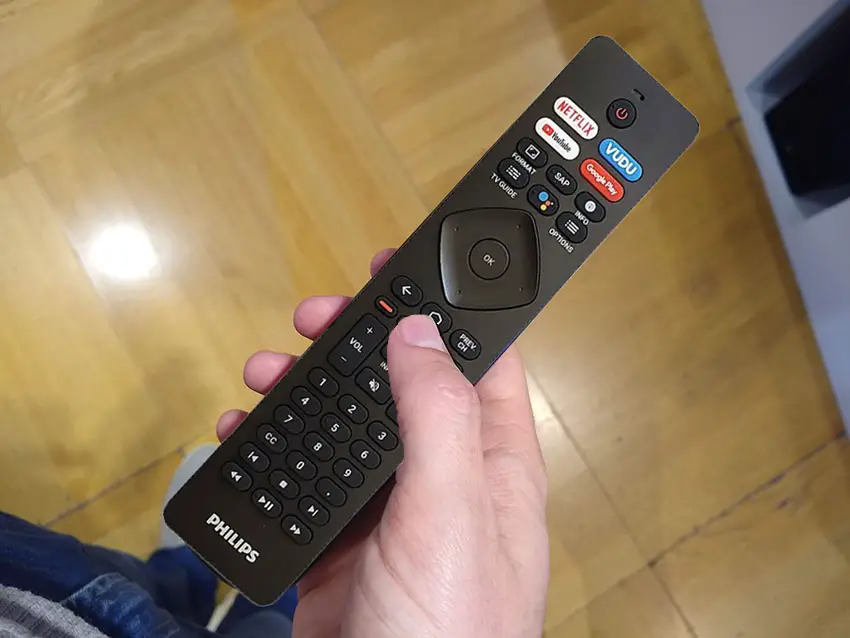
If you are using an IR remote, then confirm that you have a good line of sight to your TV.
If you are using an RF remote, confirm that it is connected to the same local network as your TV.
Don’t forget to check the batteries in your remote, replacing the existing ones with brand new batteries if you have no way of checking them.
For IR remotes, it’s possible to check if the remote is working by using your smartphone’s camera.
Simply point the IR transmitter on the end of your remote at your phone’s camera and you will see a red light appear when you press any button on the remote.
This doesn’t work for some cameras though, notably some iPhones, so check with another remote if in doubt about your camera.
3. Switch Off HDMI-CEC
There’s a strong possibility that a poorly seated cable is automatically switching inputs on your TV, but as it’s not fully connected, it isn’t able to supply a signal so it looks like your TV isn’t working, with the red standby light flashing.
This comes down to either a:
- Faulty HDMI cable with a break in it
- Damaged HDMI port with broken pins
- Poor HDMI connection where the cable and connector are not fully making contact

Start by removing all HDMI and other cables apart from your power cable, then switch your TV on.
If you are now getting a picture, then:
- Take a look at any HDMI or other physical cables that were connected to the back of your TV.
- If you have any compressed air, use that to clean the contacts both of the cable and in the connector on the TV. If you don’t have compressed air, then blow gently on them.
- Make sure your TV is off, then firmly push the cables back into their slots on the TV.
- Switch your TV back on again.
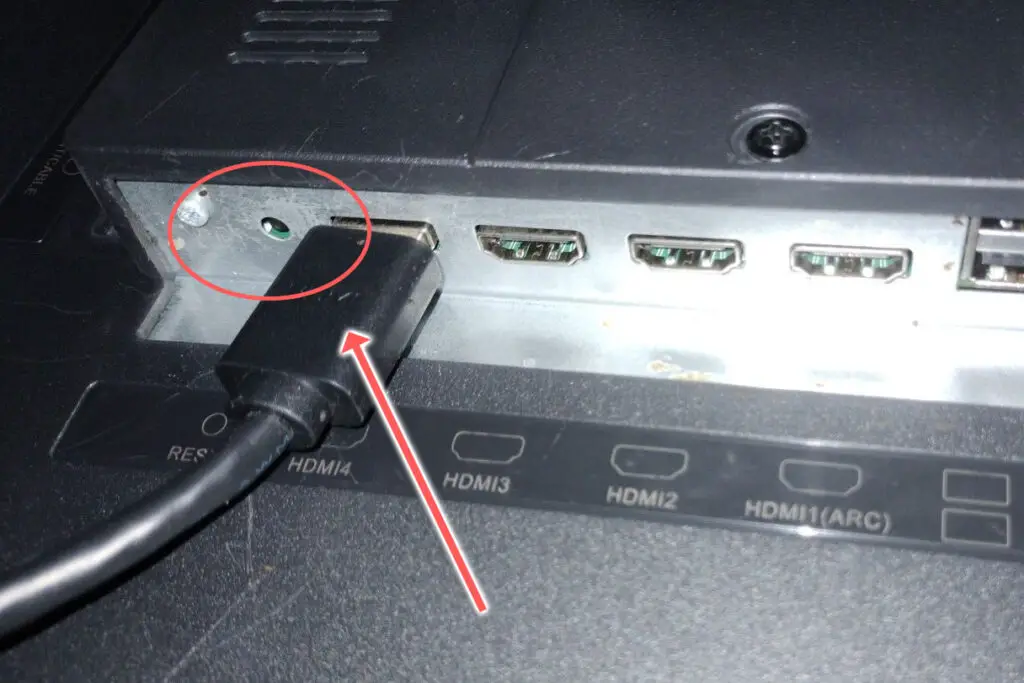
If that hasn’t fixed the problem, then try using a different HDMI input. Most TVs have 3 or 4 HDMI ports.
If you have one that is on a different part of the TV then that would be the best one to try, as this should have a separate connection to the TV’s main board.

If your TV is now working, it could be because a flaw with the HDMI-CEC settings can stop your TV from coming on properly if you have other devices, particularly game consoles, plugged into your TV.
HDMI-CEC allows two-way communication between your TV and console, allowing your console to switch your TV on and off automatically.
The problem is that if you do not switch inputs on your TV away from your console’s input before switching off your TV, then your TV will not “listen” to your remote, and will instead just blink its lights.
To switch off HDMI-CEC on a Philips TV, look in the Settings Menu for Easylink and switch this off.
4. Check Your Wall Socket Works
To thoroughly test your power supply:
- Unplug your Philips TV from your wall socket.
- Remove any surge interrupters or smart plugs so that you have a direct line to your wall socket.
- Plug another large device that you know works into the same socket and check that the new device works as normal. (It’s important that this device draws approximately as much power as your TV, to confirm the socket is fully working).
- Remove the other device and plug your TV back into this socket.
- Switch on the power and switch on your TV using the physical power button located somewhere on its case (usually beneath the Philips logo).
- See if the red light is solid. If so, this means your TV is getting sufficient voltage.
- If your Philips TV’s red light is blinking 5, 6, 10 times, or more, then repeat these steps with another wall socket to confirm your household electricity supply isn’t a problem.
You should also look at your power cord for kinks and knots in the power cable, which can damage the copper wires both mechanically and by increasing the electrical resistance, which generates heat, causing damage that may not necessarily be obvious.
Because of potential damage within the cable that you cannot see due to the protective sheath, it can be a good idea to use a new power cable, if you have one or can borrow one.
Also, be sure to carefully look at the power connector on your TV to confirm that the port is free from corrosion, dirt, and dust.
5. Check for Internal Board Failure
If you’ve checked external connections, then all that’s left are internal connections, and in particular the main board and/or power board.
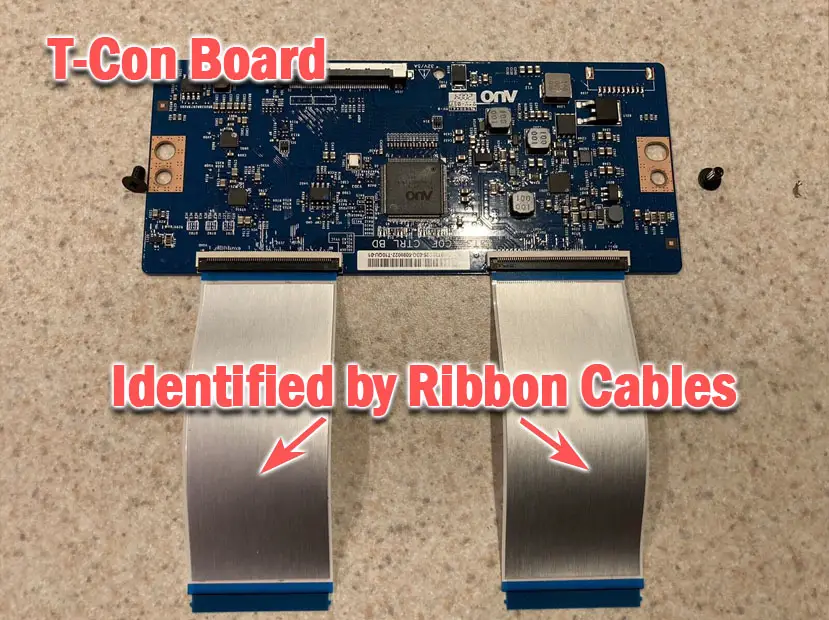
The Timing Control (T-Con) board is a small PCB board that drives your TV’s panel, sending the signal to each pixel row of your screen using internal clocks to keep each row in sync.
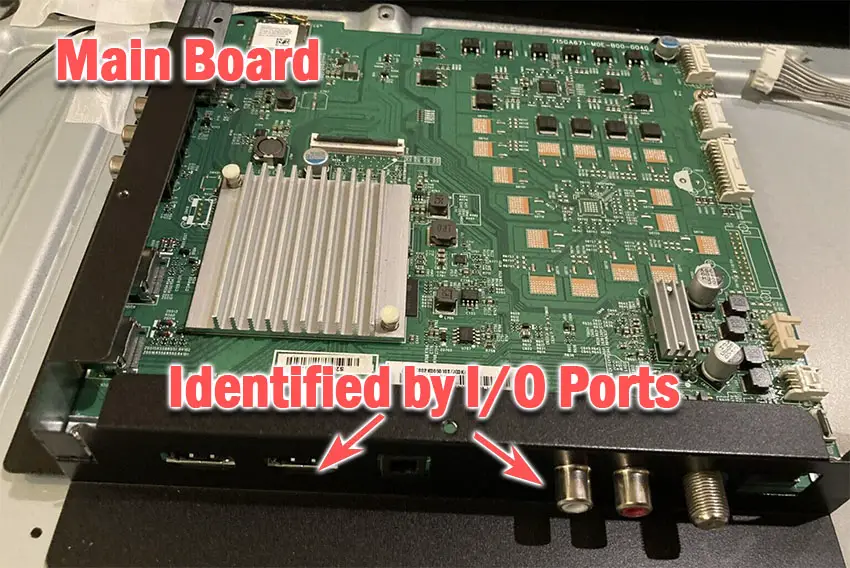
The Main Board is a larger PCB where you plug your HDMI and other connectors into. This does a lot of the work of translating the input into a signal, which then goes to the T-Con board.
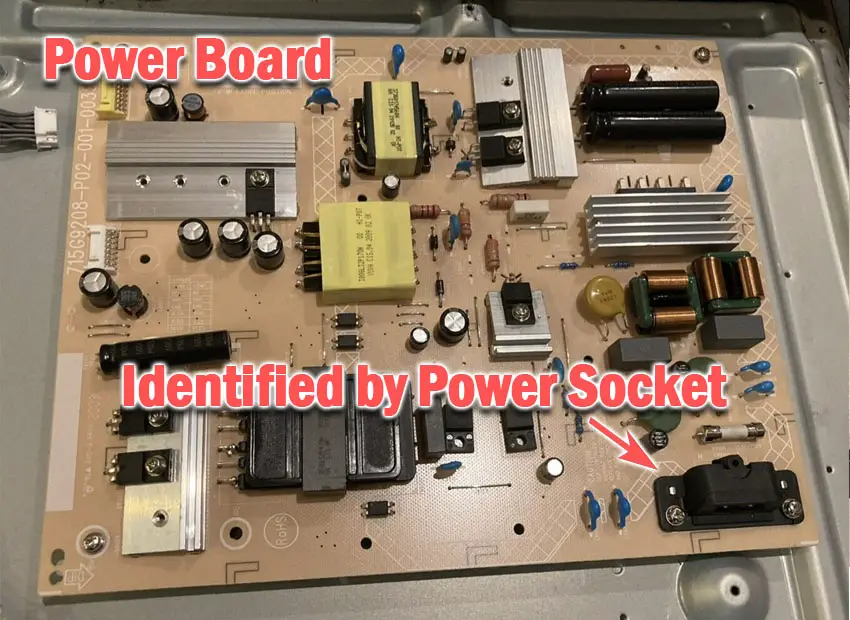
The Power Board is where you plug in your power cable, and it converts your home electricity supply into a voltage and current that your TV can use.
TV backlights require a high voltage, and so there will be a small voltage inverter board in your TV to do this. It can either be on a separate board usually located at one edge of the screen, or located on either the Power Board or Main Board depending on the TV model.
These boards are hidden away under the back panel, behind the screen, and any can be the cause of no picture in your LCD / OLED TV.
Either the cable connectors themselves can come loose or get covered in grime or dust, preventing a clean contact or components on the boards can fail, meaning they don’t power the backlight sufficiently or cannot provide a constant picture signal.
To access the boards, first remove the back panel. If you’re not confident doing this, then now is the time to get an expert in. Otherwise:
- Unplug your TV, hold down the power button, and wait for at least 30 minutes. There are large capacitors in the power board for the backlight and these can hold charge for an extended period of time.
- Place your TV face down on a large table or workbench. Make sure there is nothing that can scratch the screen on your work surface.
- Ground yourself.
- Open your TV by unscrewing the screws in the back panel. It should come apart in two pieces: front and back.
- Put the back panel somewhere out of the way and take a look at the circuit boards that have been revealed.
- You will see a T-Con panel for translating the signal into a TV picture, a power board, and a main board.
Or see this in action in the video below.
It’s a good idea to start your investigation with the T-Con board, as one or more of the internal clocks failing is a regular cause of TV screen problems.
The position of the boards will vary by model, but the T-Con board can be identified by the ribbon cables connecting it to the TV’s panel.
Start by giving everything a good clean, preferably with compressed air or a non-static brush. It’s possible that dust in the connections can block the signal.
Then, you should be able to remove the ribbon-like low voltage differential signaling (LVDS) cables on the T-Con board by pushing the locking cover down and they will then easily come away from the board. Don’t try to force them out without unlocking them first.
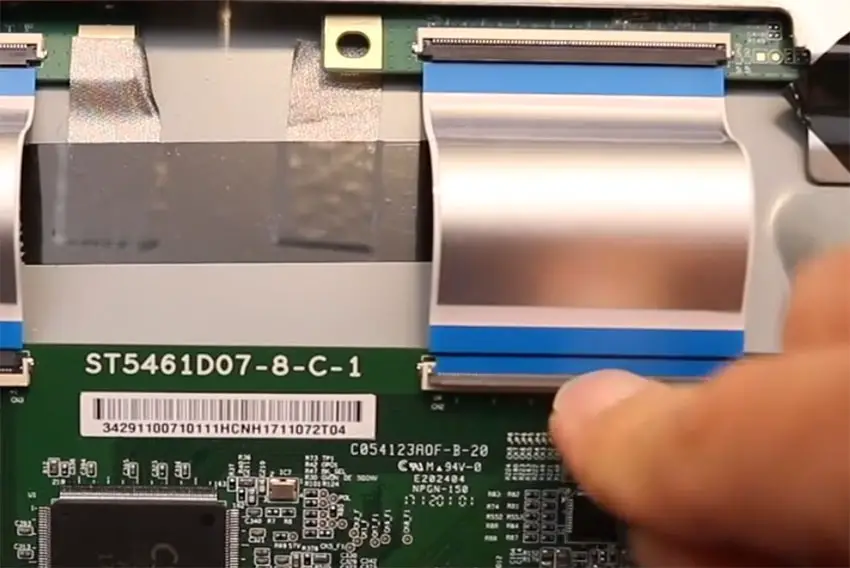
After removing the LVDS cable, take a look at the individual connectors on the ends of the cables, and the connectors in the socket. You are looking for any signs of corrosion, damage, or dust.
The contacts should be a shiny gold or silver color. If they are dull and appear to have a rough, copper-like layer over them, this would indicate oxidation, and therefore a new cable is recommended.
Get your TV back into an upright position, and with one of the LVDS cables connecting the T-Con to the Main Board disconnected, switch your TV back on and see if any picture is there. Disconnect that cable and re-connect the opposite cable.
If your TV is now working with either of the cables connected, then you know the problem is either with your T-Con or Main Boards.
Both T-Con and Main Boards can be replaced for around $30 from eBay.
To get the correct board, note the T-Con / Main Board model number written on the label on the board, and put this into eBay.
If the red light is still flashing, then you can check the boards themselves for failure.
Troubleshooting the main board and power board is easiest to see in video form, so take a look below for how to do this.
The two things that you are looking for are:
- If there is power received by the power socket on the power board, and if all components are receiving power from this.
- No components are showing signs of damage. Particularly look at capacitors as these are prone to swelling after power surges which causes them to fail.
If both the power board and main boards look OK, then take a look at the backlight.
7. Check for Backlight Failure
To check for backlight failure:
- Follow your normal process for switching on your TV.
- Get right up close to the screen and point the light on your phone or a flashlight directly at the screen.
- Try changing channels with your remote, or going into the menu.
- If the backlight is the only part not working, you will see very faint images on your TV screen.
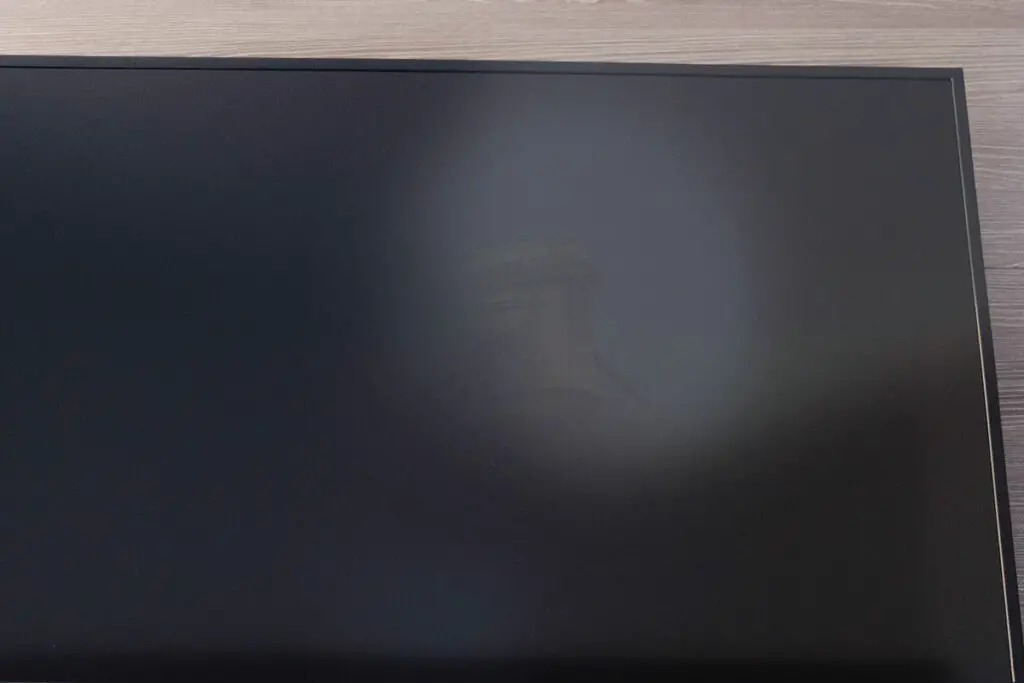
If you see faint images, you can be sure that either the backlight inverter or the backlights themselves are the failure points in your TV.
Confirm that the inverter is properly supplying power, then you will need to completely disassemble your TV to access the backlights.
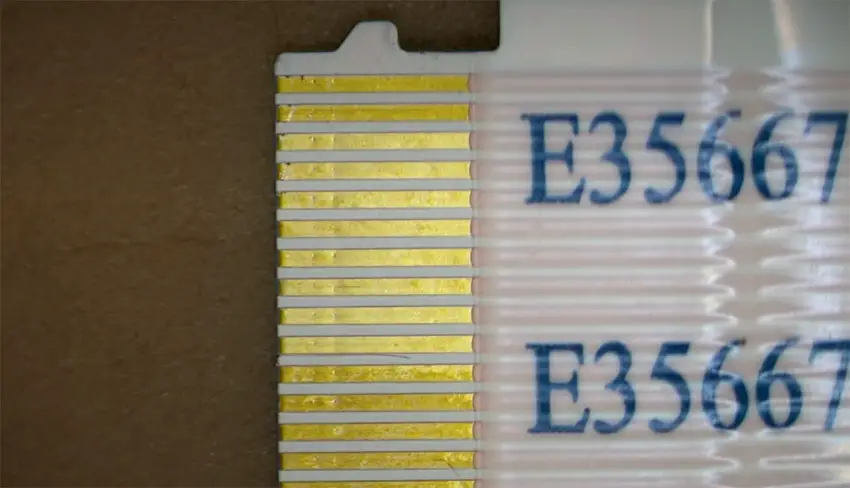
Backlights on modern Philips TVs come in LED strips of varying lengths. Older models used lengths that spanned the entire frame of the TV, but due to cost savings, more recent TVs use a set 16″ LED strip which is connected in series for each row to span your TV.

These cold-soldered connectors are a notorious failure point on Philips TVs but can be easily fixed if you are willing to re-solder a joint yourself.
Equally commonly, the LED backlights themselves can fail. This is due to repeated current overpowering, which over time causes thermal degradation of the LEDs leading to burnout.
You can replace any failed LEDs by just removing the entire strip and replacing it.
The problem with fixing the LEDs is that they are located in the most difficult-to-access part of your TV. So if you are not comfortable with a larger repair job, then now is a good time to seek help from a professional.
You need to remove the back panel, remove all of the circuit boards and connectors, then another layer of screws for the front panel, and only when you have fully removed the LCD panel can you get to the backlights.
You will also need a multimeter to test the backlight strips to find out where the problem lies.
To replace the backlights:
- Any wires or ribbons that are near the edge of the TV should be disconnected.
- Then remove the screws around the edge that hold the bezel of the TV.
- With some care, you should be able to remove the bezel, and panel and reveal the TV backlight underneath, which will be in strips of LED lights.
- Use a voltmeter or TV backlight tester to check whether they are working, and replace any failures.
It’s also possible that one of the connectors linking the LED strips as they span the width of your TV has failed. This can be fixed by checking the connectors with a multimeter and re-soldering any broken connections. This article has a good study on this.
Philips TV Support and Warranty
It goes without saying that if your TV is under one year old, then you should contact Philips customer support to get it replaced under warranty.
You can call Philips directly at:
- 833-978-3323 (Mon – Sat, 10am – 9pm EST)
Or use their live chat.
Even if Philips won’t fix your TV, they might still offer you a discount on a future model if you pester them hard enough! This is always worth a try in my experience.
Philips TV Flashing Red Light: Quick Troubleshooting
- The most common cause of a light blinking on your Philips TV is a component failure on the power board, but main board component failure cannot be discounted.
- Use a multimeter to check the components if there is no obvious sign of burning or damage.
- Before opening up your TV, run through a power cycle, and check the HDMI connections and your household power supply, to ensure one of these simpler-to-fix causes is not the root of the problem.
I’m confident that these steps will fix your TV, although the later steps do require a bit more effort than the earlier ones.
Don’t forget that opening up your TV will void its warranty, but this can’t be helped in most cases.
If you need any further help, then I suggest contacting Philips support directly or checking on YouTube where it’s much easier to see how to open up your TV, for example.
Read More:


Leave a Reply