Why do technically poor photos become successful? We’ve all seen it – photos that don’t get anywhere near the technical highs, yet people like them, share them, comment on them. Why?
You’ve paid attention to techniques, you’ve watched all the videos, you’ve practised but … what? Nothing happens. No one is paying attention. You’ve taken all the courses, you’ve done the right things you think, you’re photos meet the technical criteria, they should be as successful, if not more so than the others, but they aren’t, so what has gone wrong?
Every single course out there is technique based. Techniques are easy to sell. ‘I used this technique to create this popular image, therefore if you learn this technique, you will create amazing, popular images too’. Which is great until you try it and it doesn’t.
But techniques and technical skill aren’t everything.
There is something deeper going on beneath the surface. Most people are not giving an image the thumbs up because it is technically accomplished, they like it because it emotionally resonates. Every single super successful photo you can think of works because it speaks to our emotions. We fall in love with it a little bit.
Techniques can help, but only if used in pursuit of emotion. Using a technique because you don’t know what else to do is not enough.
And no one teaches how to chase this emotion, bottle it and put it into your photos. No one tells us why to use the techniques, only how. The why is apparently down to us and our ‘creativity’. But guess what, learning how to capture that emotion can be learned, the same as any technique. Finding emotion isn’t random, it’s a repeatable process.
Part of finding this emotion is in open ended, but structured, experimentation. Most photography tools and tutorials have a specific outcome in mind, they direct you down a set path to the teacher’s goal. It doesn’t have to be like this.
I’ve been playing with the idea of creating a free email course to tackle this subject. If that sounds like something you would be interested in, then leave a comment and I’ll let you know when it’s ready. The course isn’t ready yet, and may not be for a while, but I will try to make it both useful(!) and free.
How This Photo Was Made
Aperture: f/4
ISO: 640
GPS: 34°58’1″ N 135°46’20” E
Lens: Canon 24-105 mm f/4L IS @ 50 mm
No. of Exposures: 1
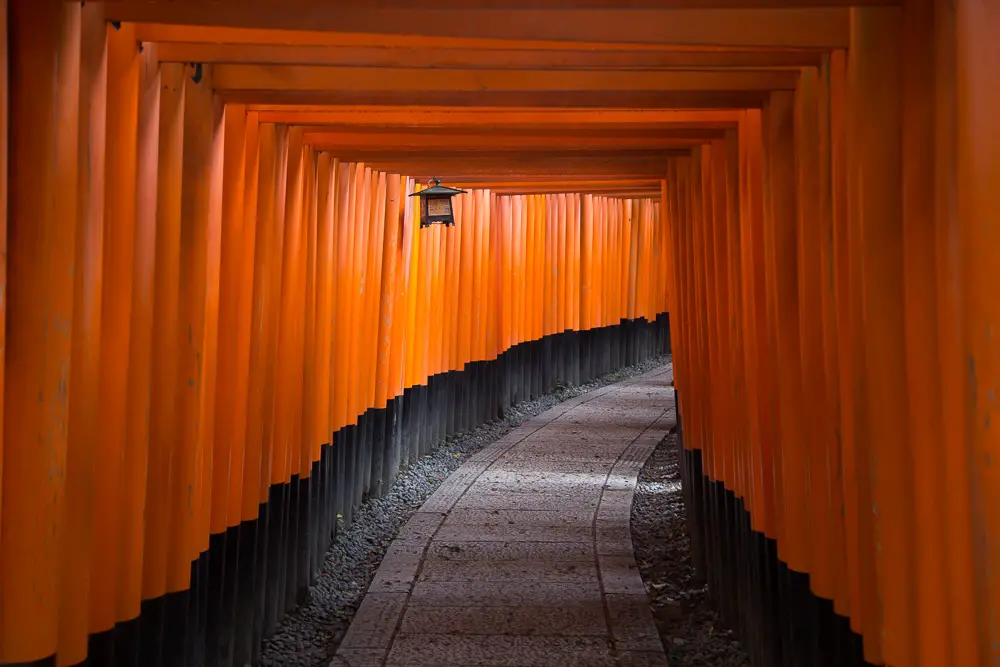

This photo is of the famous Fushi Inarii Shrine in Kyoto. There are hundreds if not thousands of these Torii gates leading up a hillside to a shrine on the top. It’s a fascinating experience to walk through them, both in the day with others and at night when you can have them all to yourself. Kyoto has an awful lot to offer us photographers and I have many more photos from my week or so there. I also saw this dog about half way up. I now know why Japan is so clean.

Like with most of my photos, the majority of the processing was done in Lightroom, using the Lightroom Develop System (in Recipes, use preset ‘2k Sidelit Sunset Cooler’ to replicate this look).
I first added colour depth by pushing the white balance down to 3550, and using graduated filters to selectively restore it, as in the how to add colour depth with white balance tutorial.
I then pushed highlights, whites and blacks down, boosted shadows slightly and added contrast using the tone curve. In HSL, I boosted the red and yellow saturation, and shifted the yellow and orange hues towards red, and added a vignette.
This is all contained within the ‘2k Sidelit Sunset Cooler’ preset within the Lightroom Develop System.
Using circular gradient filters and the brush presets 8e-h, Turn on Streetlights, I switched on the streetlight, as shown in this tutorial.
In Photoshop, I created saturation masks and used them to adjust colour balance and contrast according to the get colours like the pros tutorial, then I ran the pro contrast, highlights glow and shadows sharpening actions found in the free Photoshop Colour Control ActionPack.
If you want to create them yourself, without using the actions, take a look at the end of the Landscapes Masterclass tutorial.
Subscribe to the mailing list and get a free download link right now