This site is part of various affiliate programs. Links may give us a small compensation for any purchases you make, at no additional cost to you. Please read the disclaimer policy for full details.
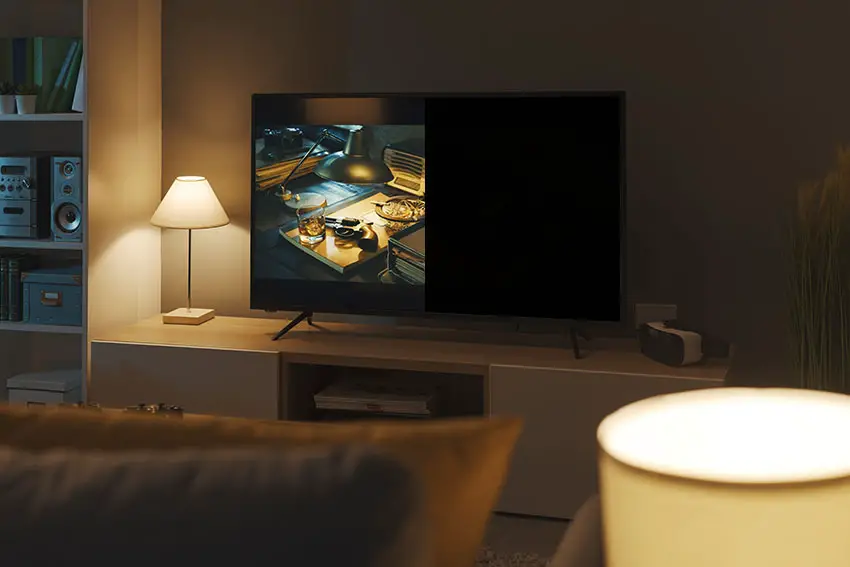
A Sharp TV with the top half of screen darker means that you have a backlight problem.
But if your Sharp Aquos TV has a dark left or right side with no picture, then that is caused by a faulty clock signal or loose connection on the T-Con board.
There can also be a few software or hardware gremlins that can cause this.
So that you can get your TV back up and running again in the shortest amount of time, I’ve arranged this guide from the simplest to most complex fixes, covering every possible situation. Just follow it in order to fix your TV in a few minutes of your time.
Why Is Half My Sharp TV Screen Dark?
The most common reasons for your Sharp TV with half screen dark are:
| Possible Cause | Explanation |
|---|---|
| Software Bug | A glitch in your TV’s memory could be affecting the display. |
| HDMI Issues | A poorly seated HDMI cable could be giving a weak input signal. |
| Power Supply Problems | Surge protectors or dirt on the power connector might be preventing your TV from receiving a conisistent voltage. |
| Incorrect Picture Settings | Changing picture settings can restore the correct brightness across the screen. |
| T-Con Faulty Chip | Adding strips of tapes to the T-Con cable can compensate for faulty clock signals from the T-Con board. |
| Backlight Failure | LEDs or connectors in the backlight failing results in a dim patch or dark area on your screen. |
Because there are a number of causes of your Sharp TV having half a black screen and it’s not always obvious which one is appropriate for you, it’s best to go through the fixes below, ordered from simplest to most complex.
How to Fix an Sharp TV Half Screen Dark
1. Clear Cache On Your Sharp Roku TV
Resetting your TV and remote can help resolve any issues, and with the Roku Voice remote this doesn’t require you to go through any on-screen menus.
On your Sharp Roku remote, restart your TV using the button combination: Home – press 5 times; Up Arrow – press once; Rewind – press 2 times; Fast Forward – press 2 times.
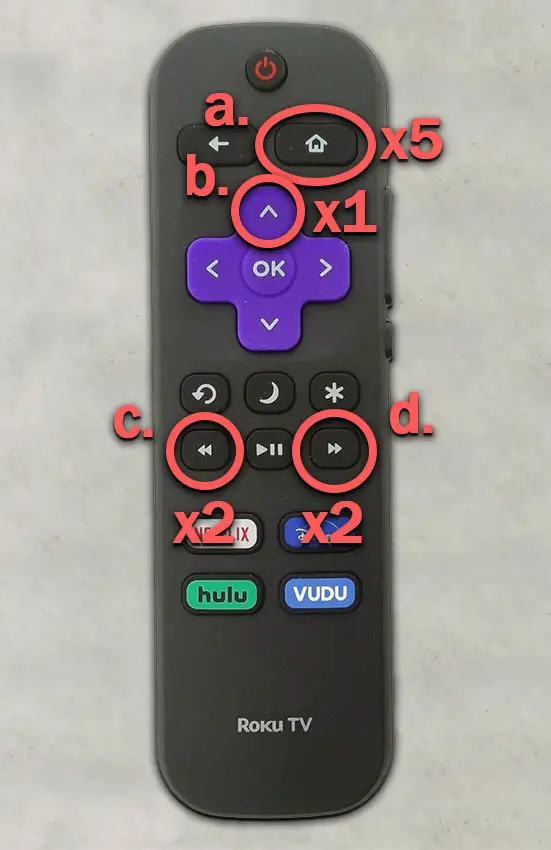
Your Sharp Roku TV should then restart.
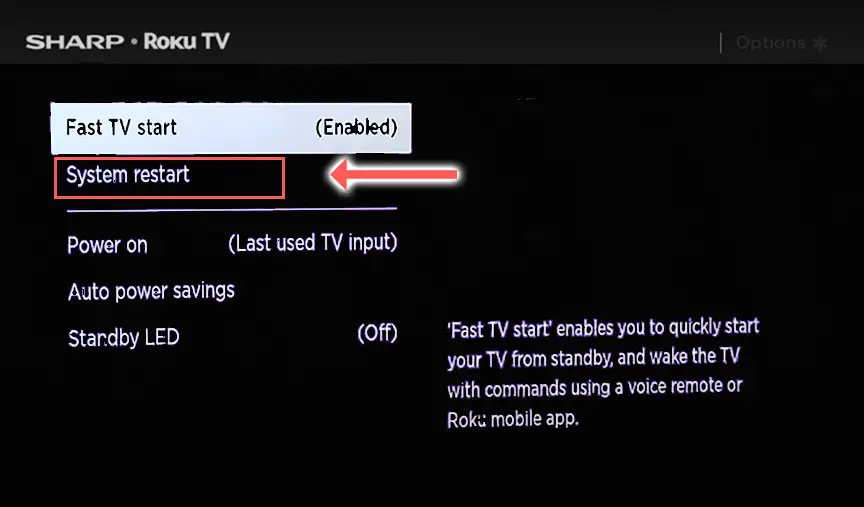
You can also run a system restart from the menu.
To restart a Sharp Roku TV:
- Go to the Home screen.
- Then Settings.
- And System.
- Then Power.
- System restart.
- And click Restart.
2. Power Cycle Your Sharp TV
Although this might seem a basic step, power cycling your TV is often the best way to fix your Sharp TV.
Resetting your TV will clear out any issues with non-permanent memory and reset your main board without losing your personal settings.
This is quick and painless and won’t cause you to lose any of your saved settings.
To reset your Sharp TV:
- Make sure your TV is switched off and unplug it.
- Hold down the physical power button on the TV for at least 15 seconds.
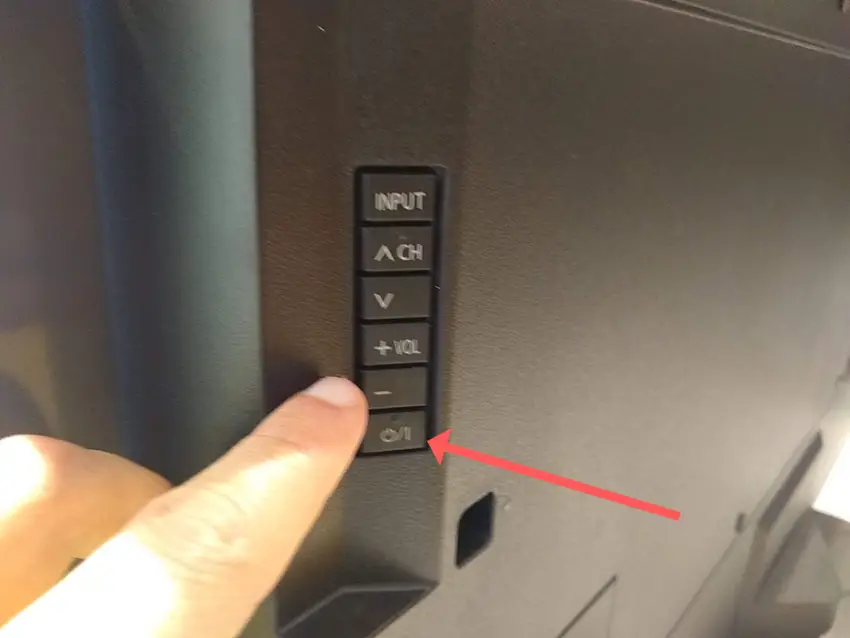
- Wait for at least 2 minutes for any residual power to drain from the TV’s capacitors (which are capable of storing charge for several minutes).
- Plug your TV back in and try switching it on. You should see a light blinking if you have been successful.
Make sure you do wait for the full 2 minutes before plugging your TV back in – you would be surpised how long the components within your TV can hold charge, and you want to make sure it has fully reset.
Although this seems a very basic step, don’t overlook it because in the vast majority of cases a simple soft reset fixes most issues.
Most people will now have their TV fixed and back up and running, but if your Sharp TV still has a dim screen, then we’ve got a few more basic fixes to try before getting into the hardware fixes.
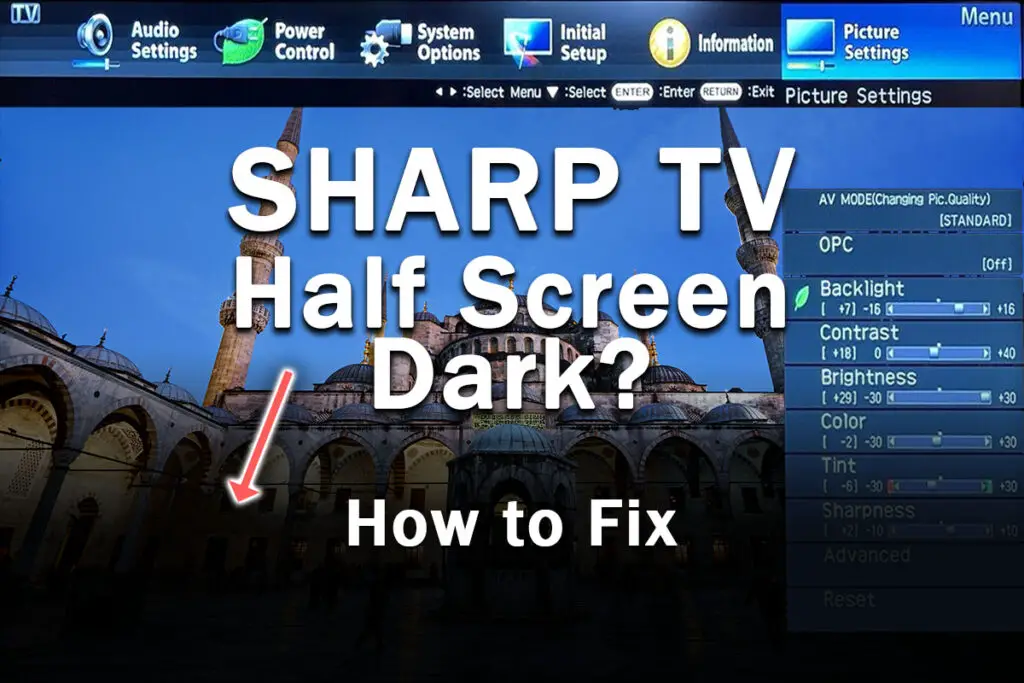
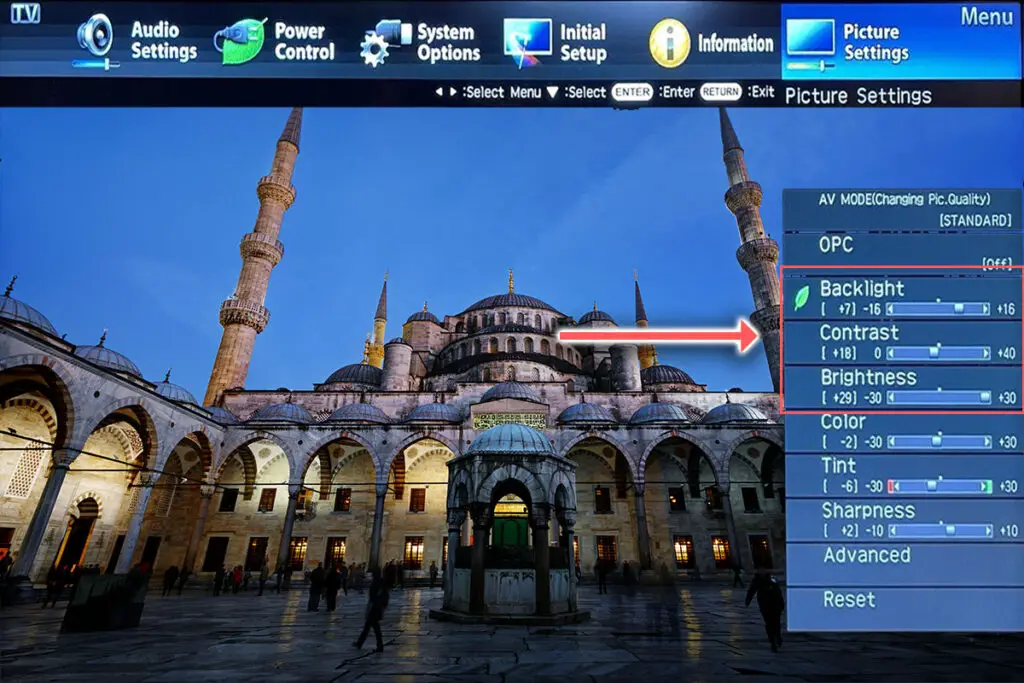
3. Adjust Your Backlight Settings
Most Sharp TVs have an option to change the brightness, contrast or other aspects of the picture, which can help to fix issues with the backlight.
Reducing brightness can often help to fix backlight issues. If this does help, then you likely have a backlight or voltage inverter that is about to fail, which you can learn more about below.
To change picture settings on standard Sharp TVs:
Press Menu on your remote, then navigate to the Picture menu. You can reduce the Backlight, along with the overall Brightness and Contrast.
To change picture settings on Sharp Roku TVs:
While watching a program, press the * key on your Roku remote to jump into the menu.
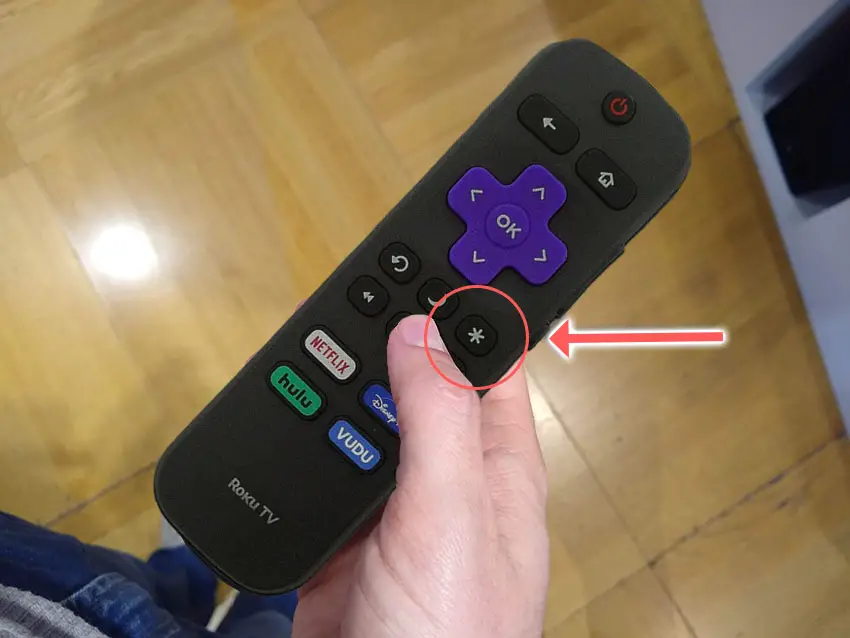
Go to Picture Settings.
Then try changing the Brightness.
You can also Fine Tune the picture to reduce Backlight Brightness and contrast.

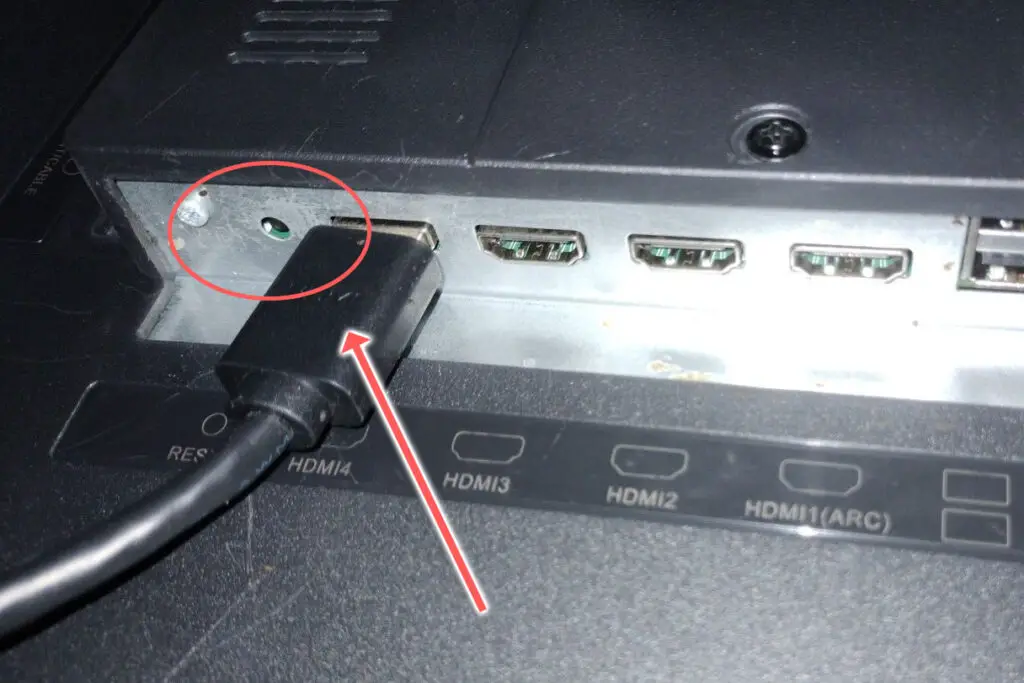
4. Reconnect HDMI Cables
There’s a strong possibility that a poorly seated cable is creating signal noise which is displaying as a half dark screen, and is also a common cause of horizontal lines in Sharp TVs.
This comes down to either a:
- Faulty HDMI cable with a break in it
- Damaged HDMI port with broken pins
- Poor HDMI connection where the cable and connector are not fully making contact

To check your HDMI and other cables:
- Switch off your TV.
- Remove any HDMI or other physical cables connected to the back of your TV.
- If you have any compressed air, use that to clean the contacts both of the cable and in the connector on the TV. If you don’t have compressed air, then blow gently on them.
- Firmly push the cables back into their slots on the TV.
- Switch your TV back on again.
It that hasn’t fixed the problem, then try using a different HDMI input. Most TVs have 3 or 4 HDMI ports.
If you have one that is on a different part of the TV then that would be the best one to try, as it this should have a separate connection to the TV’s main board.

Plug you HDMI cable into the new port, note the number next to it, then choose this HDMI input on your TV, by using the Home or Input button on your TV remote and selecting the new input tile on your home screen, or the Input or Menu button on your TV itself.
You can also try removing all external devices, including those connected by Bluetooth and any coaxial or signal cables, so that the TV only has a power cable going into it.
When you turn your TV on, this means the screen will be black as it is not receiving any picture, potentially making it tough to see if half the screen is working or not.
Pull up the on-screen menu to see if half the screen is still dark. If it is, this means that your external connections are fine and the problem is located within the hardware of your TV.
If the screen is uniformly bright, then try re-seating your HDMI and other cables one by one, until you find the damaged cable that needs replacing.
5. Make a Direct Line Between Your TV and Wall Socket
When your TV isn’t working properly, you naturally jump to thinking that there must be a fault within your TV itself.
Actually, the fault is often within your household power supply, or more specifically within the surge protector or smart plug that your TV is plugged into.
So, you need to confirm that your wall socket is supplying enough power, and there is no interruption of supply during use.
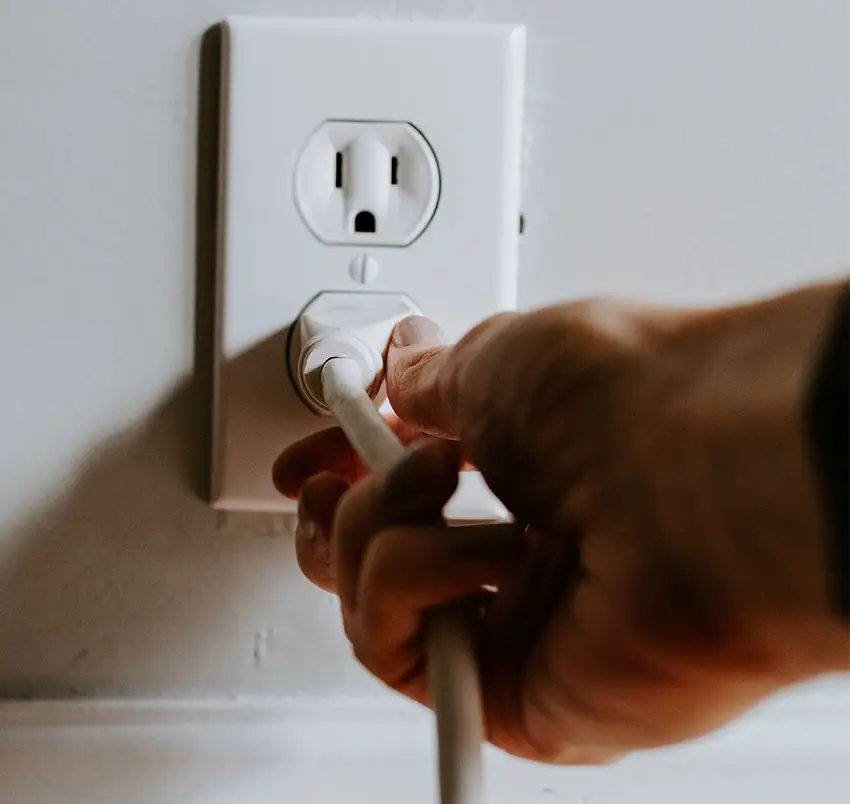
There’s a few methods that you can use:
- Unplug your Sharp TV from your wall socket.
- Remove any surge interruptors or smart plugs so that you have a direct line to your wall socket.
- Plug another large device that you know works into the same socket and check that the new device works as normal. (It’s important that this device draws approximately as much power as your TV, to confirm the socket is fully working).
- Remove the other device and plug your TV back into this socket.
- Switch on the power and switch on your TV using the physical power button located somewhere on its case (usually beneath the Sharp logo).
- See if the power light is solid. If so, this means your TV is getting sufficient voltage.
- If your Sharp TV’s light is flashing 5, 6, 10 times or more, then repeat these steps with another wall socket to confirm your household electricity supply isn’t a problem.
Also make sure to look at your power cord, checking there are no knots or kinks that could have damaged the internal copper wires and that could be affecting electricity transmission.
6. Update Your Sharp TV’s Firmware
It’s important to keep any electronic devices up to date with the latest firmware, none more so than smart TVs.
You should follow the system update procedure on your TV as this has been known to fix picture issues.
If your Sharp TV remote is not working and you can’t access your TV’s menus to perform the update, then use a remote control app on your phone.
To update firmware on a Sharp Aquos TV:
- Press Menu on your remote.
- Go to Settings.
- Then Setup.
- And choose Software Update (NET) in the first instance.
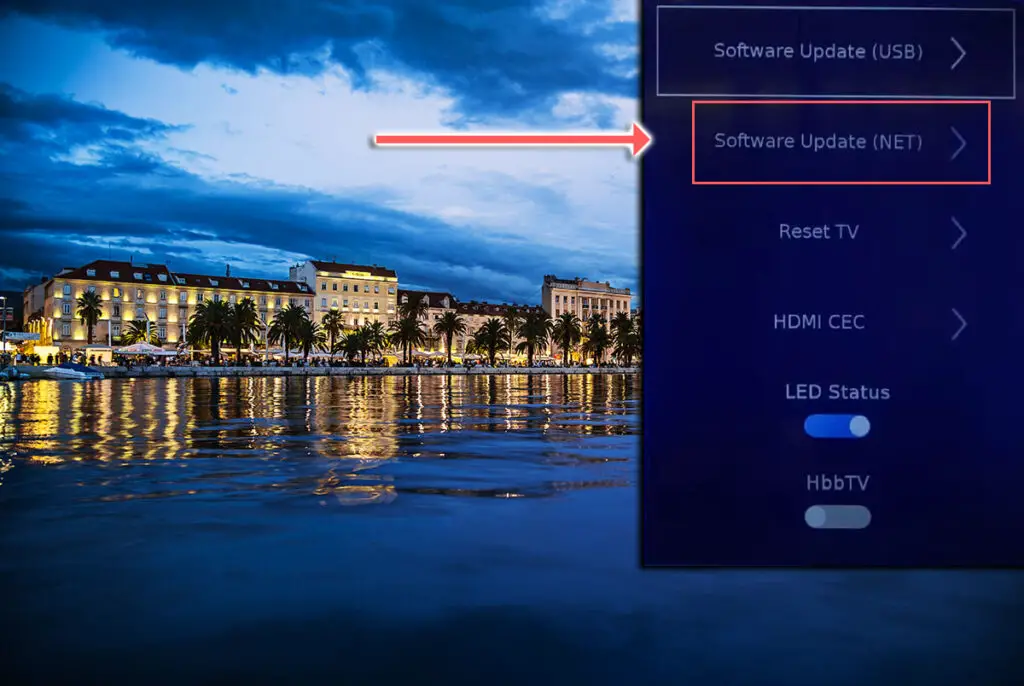
If you do not have an active Internet connection on your TV, then use the Software Update (USB) and download the updated firmware from Sharp’s website to a USB drive.
To update your Sharp Roku TV you need to make sure it is connected to a network:
- On your remote, press the Cog icon for Settings.
- Then go to Network.
- And Network Configuration.
- Check this says Network connected or similar.
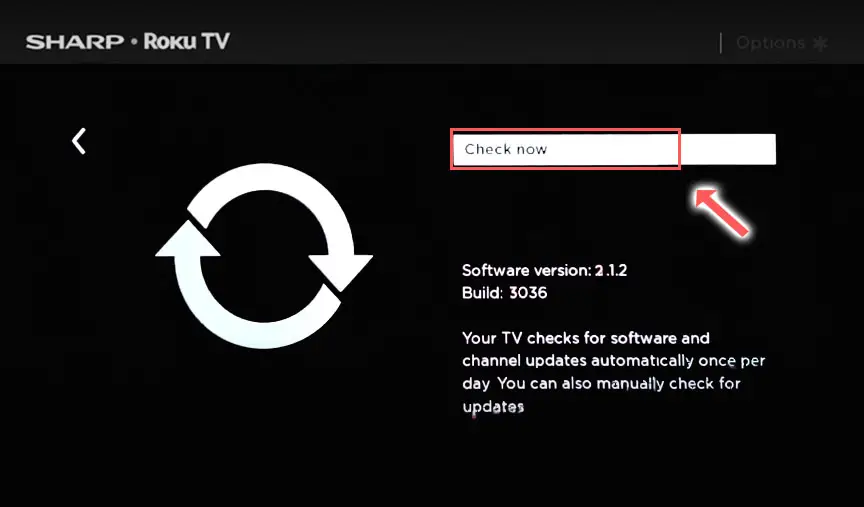
If you want to be double-sure that your TV is up to date, you can update it manually via USB.
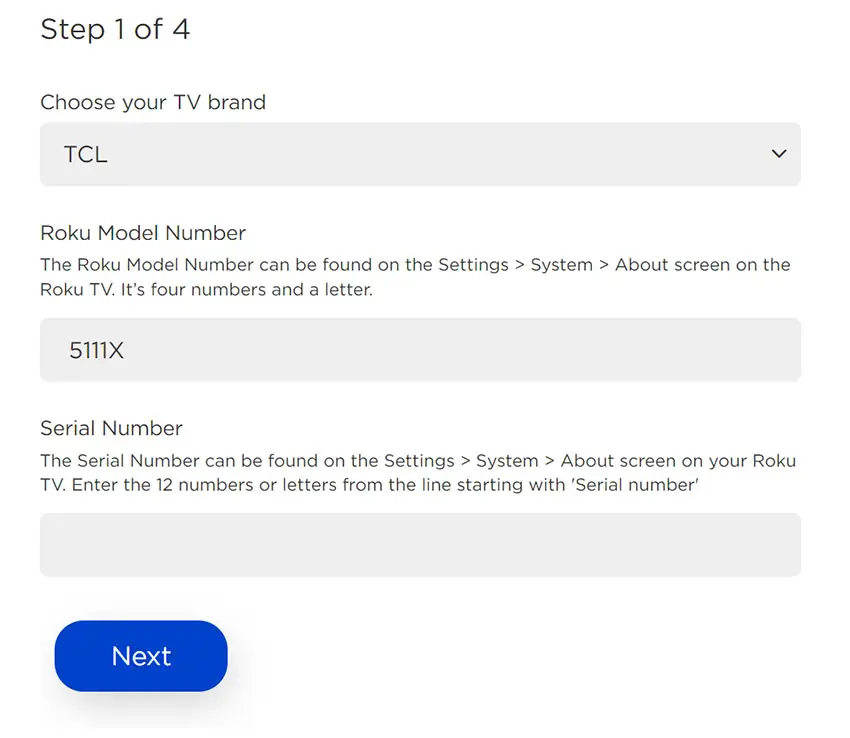
- Go to the Roku update site on your computer and enter your TV model number or serial number and click Next. Both numbers are found at Settings -> System -> About, with the mode number being four numbers followed by a letter and the serial number twelve numbers or letters.
- Choose Download Software from the prompt to get your new firmware.
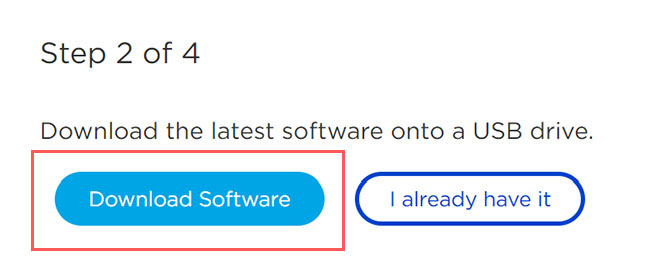
- Put a USB flash drive into your computer and copy the software your downloaded onto it, making sure it doesn’t go into any directories on your flash drive.
- Eject the flash drive from your computer and put it into the USB port on your TV.
- Go to Settings -> System -> System Update -> I can’t connect on your TV’s menu.
- If you see the error, “Contents of the update file are invalid“, then you are running the most recent firmware on your TV, and you can move onto the next fix.
- If your firmware needs updating, you will get a 12-digit code on your TV.
- Enter this code into the Roku update website, and you will get a 6-digit code that you need to enter into your TV.
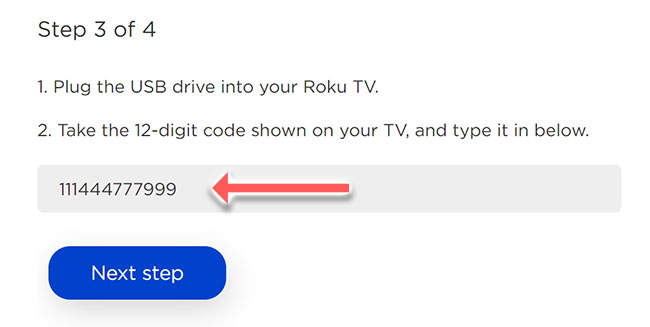
- The update process will then commence.
7. Factory Reset Your Sharp TV
Returning your TV back to its factory settings is a more extreme step, as it will delete any personalization features, downloaded apps or connected devices, but it’s always worth a shot when other methods haven’t worked.
To factory reset a Sharp TV:
- Press Menu on your remote.
- Select Settings.
- Then Initial Setup.
- And Reset.
If your remote isn’t working, you can get some tips on how to reset your Sharp TV in the video below.
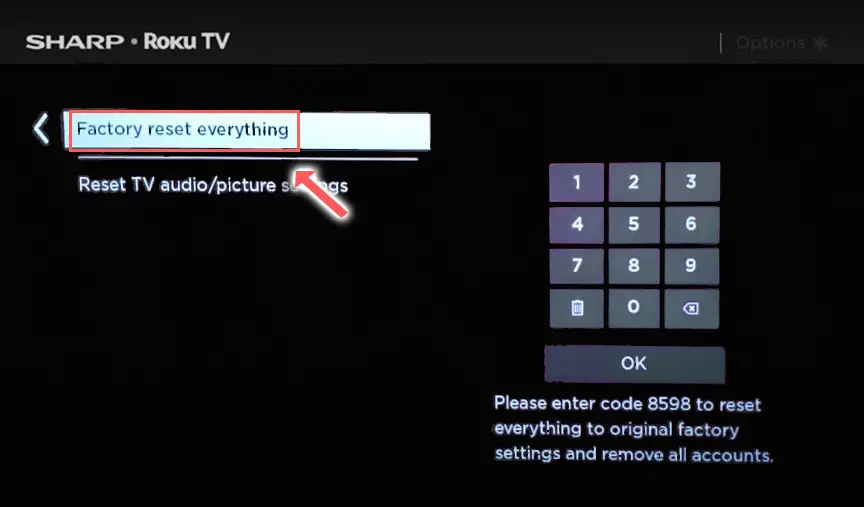
To factory reset a Sharp Roku TV:
- Press Home on your remote.
- Go to System -> Advanced System Settings -> Factory Reset.
- Choose Factory Reset Everything.
- Enter the code shown and click OK to reset your TV.
You can also hard reset most Sharp Roku TVs by putting a pen into the recessed Reset button, usually found on the side or back of the TV.
8. Sharp TV Top Half Screen Darker Indicate Backlight Failure

If you are seeing dark areas on screen, or either the top half, bottom half, left side or right side is darker than its counterpart, or your Sharp TV screen is darker than normal, then you have a backlight issue.
Backlights on modern Sharp TVs come in LED strips of varying lengths. Older models used lengths that spanned the entire frame of the TV, but due to cost savings, more recent TVs use a set 16″ LED strip which is connected in series for each row to span your TV.
These cold soldered connectors are a notorious failure point on Sharp TVs, but can be easily fixed if you are willing to re-solder a joint yourself.
Equally commonly, the LED backlights themselves can fail. This is due to repeated current over powering, which over time causes thermal degradation of the LEDs leading to burnout. You can replace any failed LEDs by just removing the entire strip and replacing it.
The problem with fixing the LEDs is that they are located in the most difficult to access part of your TV. So if you are not comfortable with a larger repair job, then now is a good time to seek help from a professional.
You need to remove the back panel, remove all of the circuit boards and connectors, then another layer of screws for the front panel, and only when you have fully removed the LCD panel can you get to the backlights.
You will also need a multimeter to test the backlight strips to find out where the problem lies.

To fix a failed backlight:
- Unplug your TV, hold down the power button and wait for at least 30 minutes. There are large capacitors in the power board for the backlight and these can hold charge for an extended period of time.
- Place your TV face down on a large table or workbench. Make sure there is nothing that can scratch the screen on your work surface.
- Ground yourself.
- Open your TV by unscrewing the screws in the backpanel. It should come apart in two pieces: front and back.
- Put the back panel somewhere out of the way and take a look at the circuit boards that have been revealed.
- You will see a T-Con panel for translating the signal into a TV picture, a power board and a main board. Any wires or ribbons that are near the edge of the TV should be disconnected.
- Then remove the screws around the edge that hold the bezel of the TV.
- With some care, you should be able to remove the bezel, panel and reveal the TV backlight underneath, which will be in strips of LED lights.
- Use a voltmeter or TV backlight tester to check whether they are working, and replace any failures.
The video below covers checking and replacing the LED backlights, with some additional tips on when you should seek to replace your backlight driver board instead.
It’s also possible that one of the connectors linking the LED strips as they span the width of your TV has failed. This can be fixed by checking the connectors with a multimeter and re-soldering and broken connections. This article has a good study on this.
Rarely, the backlight issue can be caused by a faulty main board. You can follow the next step to identify it, clean the contacts going into it and replace it if necessary.
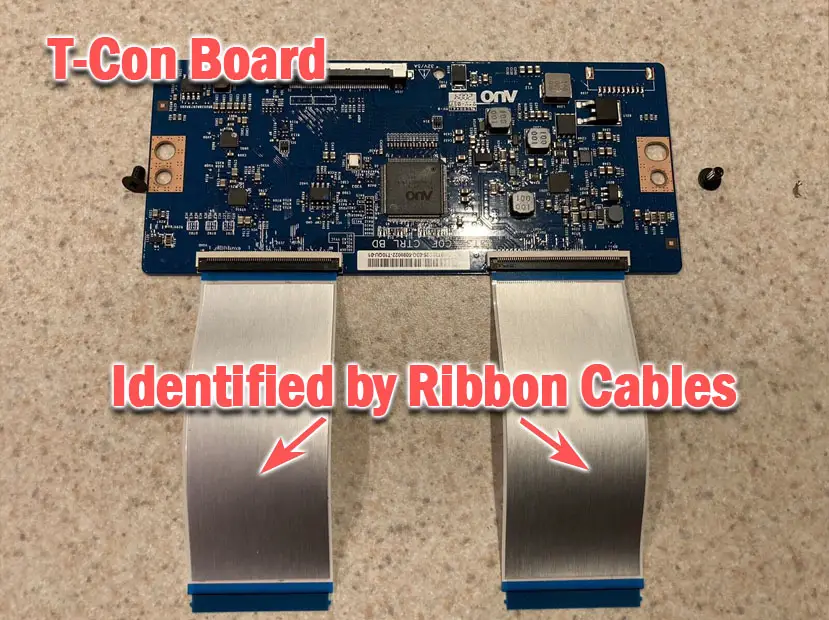
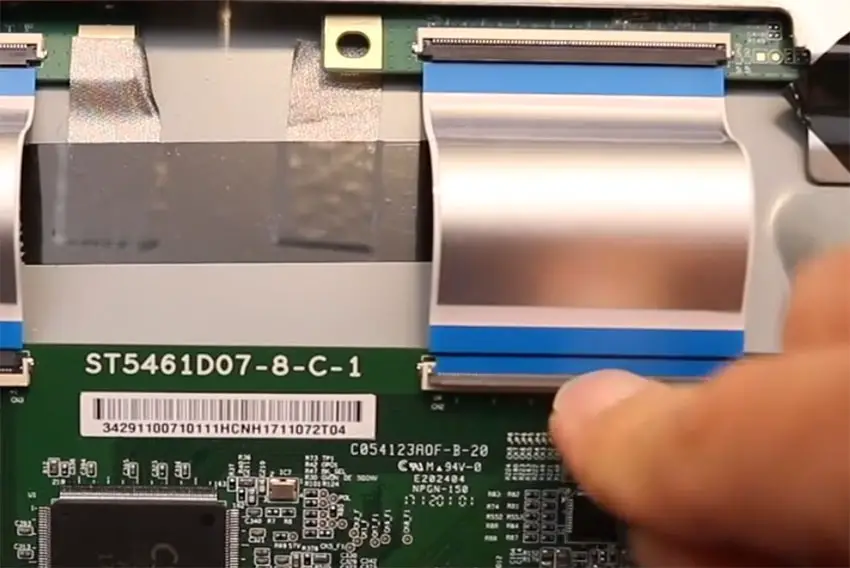
9. Check Your T-Con Board for Left or Right Half Screen Black
If either the left or right hand side of your Sharp TV screen is totally black, extending from the edge to the center or your screen, then there is a problem with your T-Con board or the cabling connecting it to your screen.
The Timing Control (T-Con) board is a small PCB board that drives your TV’s panel, translating the signal into a picture on your screen.
It’s hidden away under the back panel, behind the screen, and is the cause of a half black TV screen because it connects to the LCD / OLED panel with ribbon connectors which can come loose or get covered in grime or dust, impeding their contact.
To access the T-Con board, you need to remove the back panel. If you’re not confident doing this, then now is the time to get an expert in. Otherwise:
- Unplug your TV, hold down the power button and wait for at least 30 minutes. There are large capacitors in the power board for the backlight and these can hold charge for an extended period of time.
- Place your TV face down on a large table or workbench. Make sure there is nothing that can scratch the screen on your work surface.
- Ground yourself.
- Open your TV by unscrewing the screws in the backpanel. It should come apart in two pieces: front and back.
- Put the back panel somewhere out of the way and take a look at the circuit boards that have been revealed.
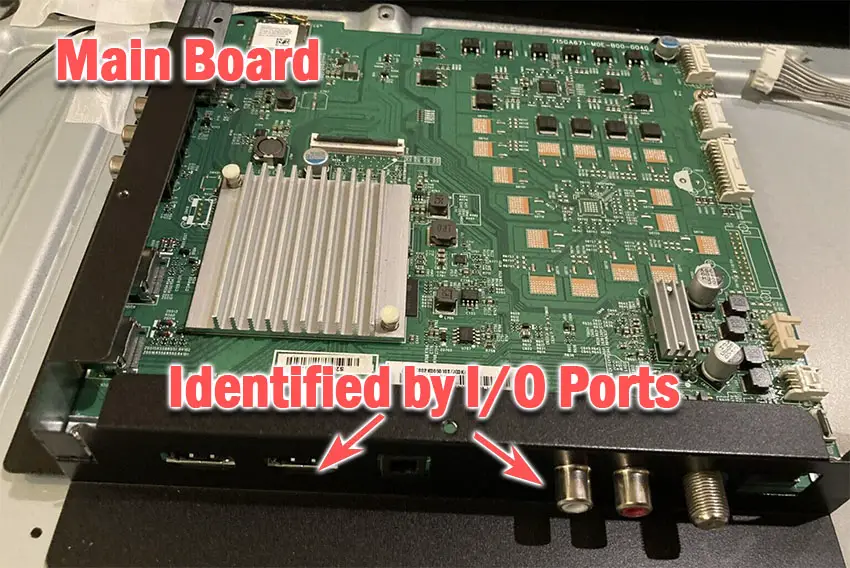
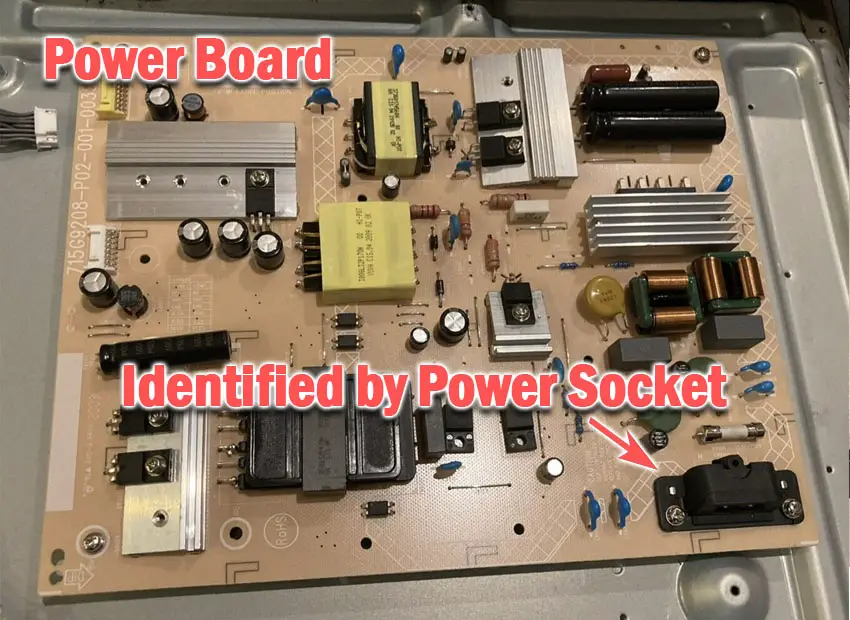
- You will see a T-Con panel for translating the signal into a TV picture, a power board and a main board.
Or see this in action in the video below.
The position of the boards will vary by model, but the T-Con board can be identified by the ribbon cables connecting it to the TV’s panel. Identify the main three boards you will see in the images below.
Start by giving everything a good clean, preferably with compressed air or a non-static brush. It’s possible that dust in the connections can block the signal.
Then, you should be able to remove the cables on the T-Con board by pushing the locking cover down and they will then easily come away from the board. Don’t try to force them out without unlocking them first.
After removing the ribbon cable, take a look at the individual connectors on the ends of the cables, and the connectors in the socket. You are looking for any signs of corrosion, damage or dust.
The contacts should be a shiny gold or silver color. If they are dull and appear to have a rough, copper-like layer over them, this would indicate oxidation and therefore a new cable is recommended.
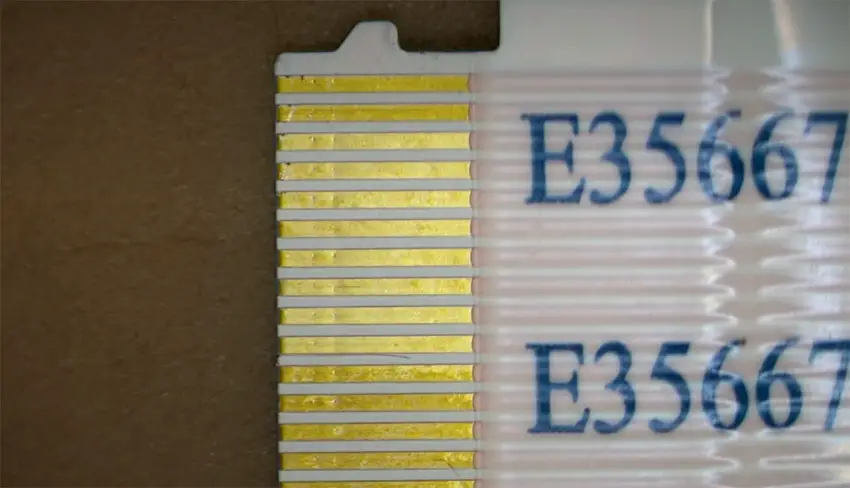
Give the cable and socket a good clean with compressed air, then put the cable back in, put the back panel back on your TV and fire it up.
If half the screen is still black, there’s a good chance that there is a fault somewhere on the T-Con board itself. These can be replaced for around $30 from eBay.
To get the correct board, note the T-Con model number written on the label on the board, and put this into eBay.
But before you replace the T-Con Board, try the final step which can fix faulty boards without you needing to replace them.
10. Block the T-Con Signal with Tape
This might seem like a bit of a hacky approach, but it is possible to use small pieces of non-conductive tape to block the indiviual contacts on the T-Con cable.
This blocks the “bad” signal getting sent through that contact, and can actually clear up the image.
This works because the T-Con cable sends a clock signal through a handful of the pins (usually 8 pins per cable) which is implicated in the most common issues of half your screen going black.
And with two cables, one for each side of the TV, you can use the signal from the working side of the T-Con board to fill in for the faulty clock signals on the other side.
This method can also work well for fixing horizontal lines on an Sharp TV.
It can take some trial and error to get this right, so I recommend you check out the video below for a good demonstration of how to follow this approach.
Sharp TV Support & Warranty
It goes without saying that if your TV is under one year old, then you should contact Sharp customer support to get it replaced under warranty.
You can call Sharp directly on:
- 1-888-935-8880 (Mon – Sat, 10am – 9pm EST,)
Even if Sharp won’t fix your TV, they might still offer you a discount off a future model if you pester them hard enough! This is always worth a try in my experience.
Sharp TV Half Screen Darker: Next Steps
I’m confident that these steps will fix your TV, although the later steps do require a bit more effort than the earlier ones.
Don’t forget that opening up your TV will void its warranty, but this can’t be helped in most cases.
If you need any further help, then I suggest contacting Sharp support directly, or checking on YouTube where it’s much easier to see how to open up your TV, for example.
And if you’ve tried all of these steps and still can’t get your TV to work, then it may be worth looking at one of the most highly rated new TVs.
Read More:


Leave a Reply