This site is part of various affiliate programs. Links may give us a small compensation for any purchases you make, at no additional cost to you. Please read the disclaimer policy for full details.
If you’ve got a Frame TV and an X1 cable box, then you almost certainly have seen the blue screen of death recently.
Unfortunately, this is firmware-related so there are no fantastic ways to fix your TV, but I would recommend running through the steps below as they help in about 75% of cases.
If you’ve got a regular Samsung TV and you can’t clear the screen by power cycling, then I would try checking your internal boards and backlight, as detailed below.
What Causes the Blue Screen of Death on Samsung TVs?
| Cause | Explanation |
|---|---|
| Software Glitch | Problems introduced by software updates, such as the recent one for Samsung Frame TVs, can cause glitches with certain HDMI sources, which can best be fixed by power cycling. |
| HDMI Cable Damage | An improperly seated HDMI cable, or one not rated to the correct HDMI specification, can make your TV hang on a blue screen. |
| Internal Component Failure | Component failure on the power board/mainboard can crash your TV to the blue screen of death. |
| Backlight Failure | If you can see faint images on screen beneath the blue color, then your backlight LEDs have burned off their phosphor coating and so aren’t showing a white light any more. This is a $30 fix. |
How to Fix the Samsung TV Blue Screen
The blue screen can vary from a full blue that completely blocks out your picture to a blue tint where you can still see what’s going on on-screen. I’ll cover fixes applicable to both in this guide.
You can also watch a quick overview of the fixes in my video below.
1. Cold Boot your Samsung TV
Power cycling or cold booting your TV will clear out any issues with non-permanent memory and reset your mainboard without losing your personal settings.
This is the best temporary solution if you are dealing with the Frame/X1 blue screen issue.
This is quick and painless and won’t cause you to lose any of your saved settings.
To cold boot your Samsung TV:
- Plug your TV in and switch it on.
- Pull the plug out of the wall socket.
- Wait a full 10 seconds.
- Plug your TV back in and try switching it on. You should see a red light if you have been successful.
You can also power cycle your Samsung TV if this hasn’t been successful:
- Switch off and unplug your TV.
- Hold down the physical power button on the TV for at least 15 seconds.
- Wait for at least 30 minutes for any residual power to drain from the TV’s capacitors (which are capable of storing charge for several minutes).
- Plug your TV back in and try switching it on.
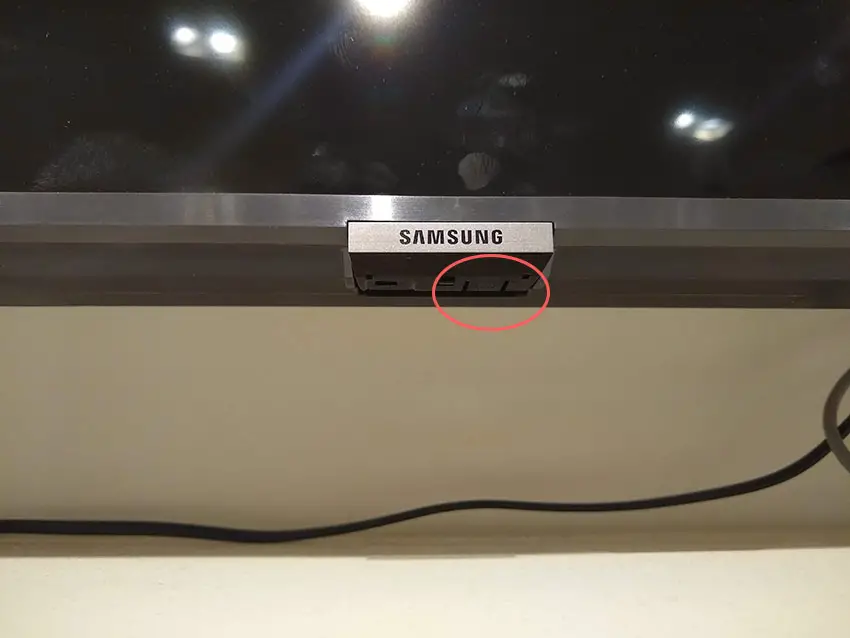
Make sure you do wait for the full 30 minutes before plugging your TV back in – you would be surprised how long the components within your TV can hold a charge, and you want to make sure it has fully reset.
Although this seems a very basic step, don’t overlook it because, in the vast majority of cases, a simple soft reset fixes most issues.
2. Check Your External Connections
If you’re only seeing the blue screen issue when your HDMI cables are connected and you have been able to localize the problem to them, it might be worth looking at the cables and connectors themselves for any damage. This is also a common cause of flickering on Samsung TVs.
This comes down to either a:
- Faulty HDMI cable with a break in it
- Damaged HDMI port with broken pins
- Poor HDMI connection where the cable and connector are not fully making contact
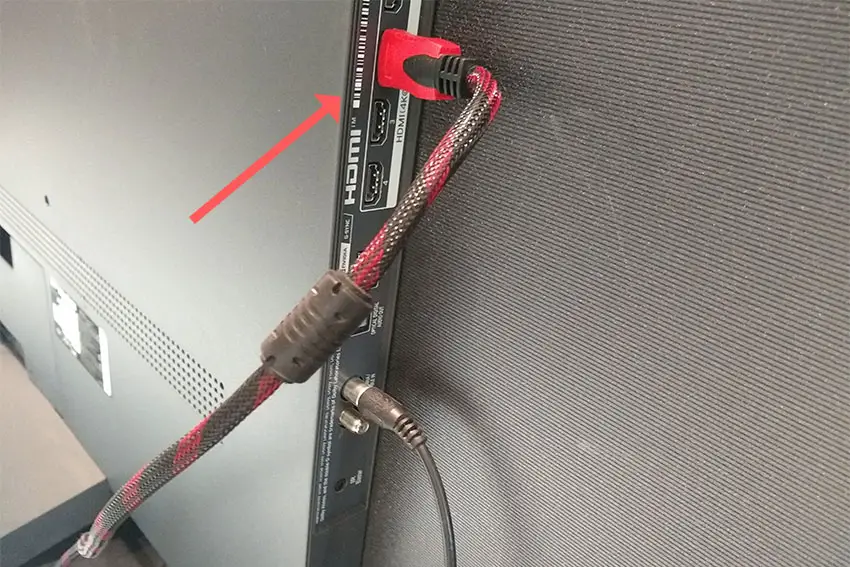
To check your HDMI and other cables:
- Switch off your TV.
- Remove any HDMI or other physical cables connected to the back of your TV.
- If you have any compressed air, use that to clean the contacts both of the cable and in the connector on the TV. If you don’t have compressed air, then blow gently on them.
- Firmly push the cables back into their slots on the TV.
- Switch your TV back on again.
If that hasn’t fixed the problem, then try using a different HDMI input. Most TVs have 3 or 4 HDMI ports.
If you have one that is on a different part of the TV then that would be the best one to try, as this should have a separate connection to the TV’s main board.
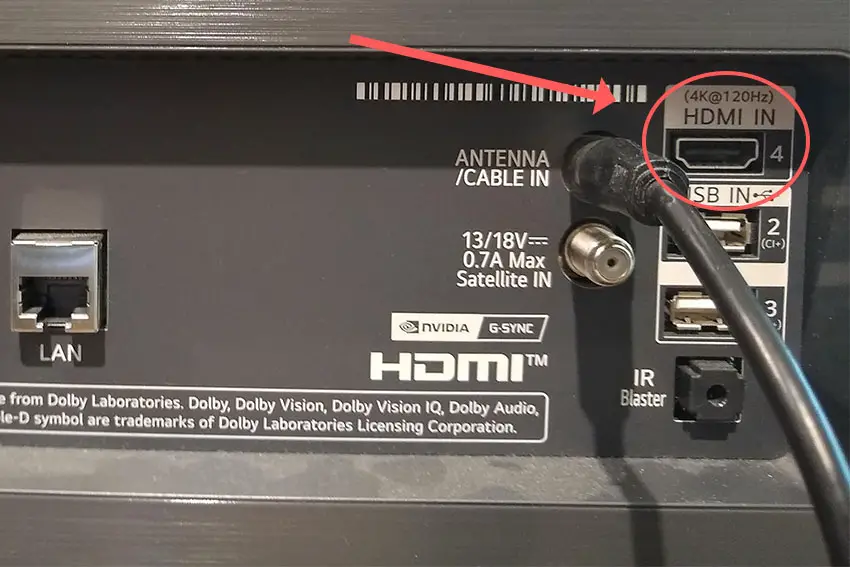
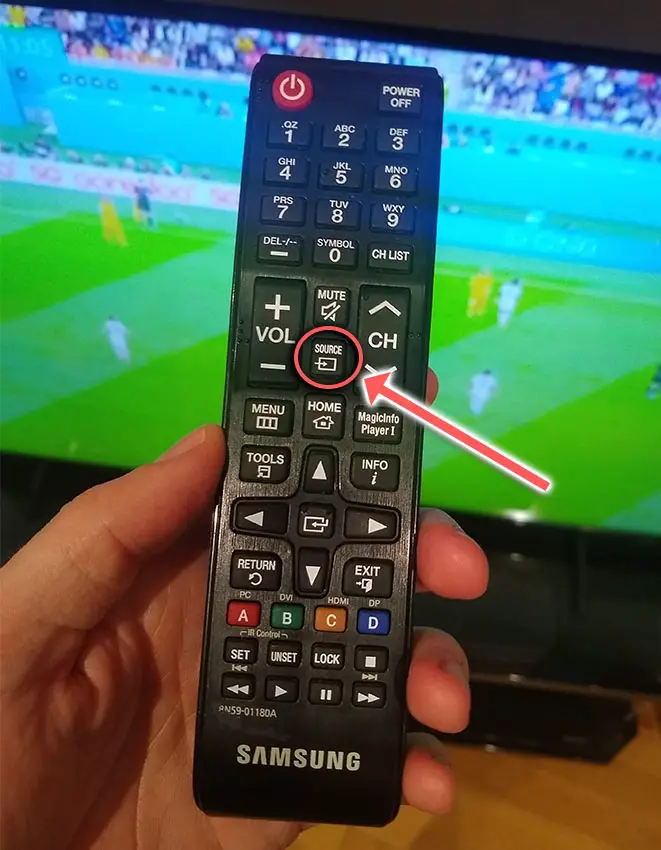
Plug your HDMI cable into the new port, note the number next to it, and then choose this HDMI input on your TV, by using the Input or Source button on your TV remote or the Input or Menu button on your TV itself.
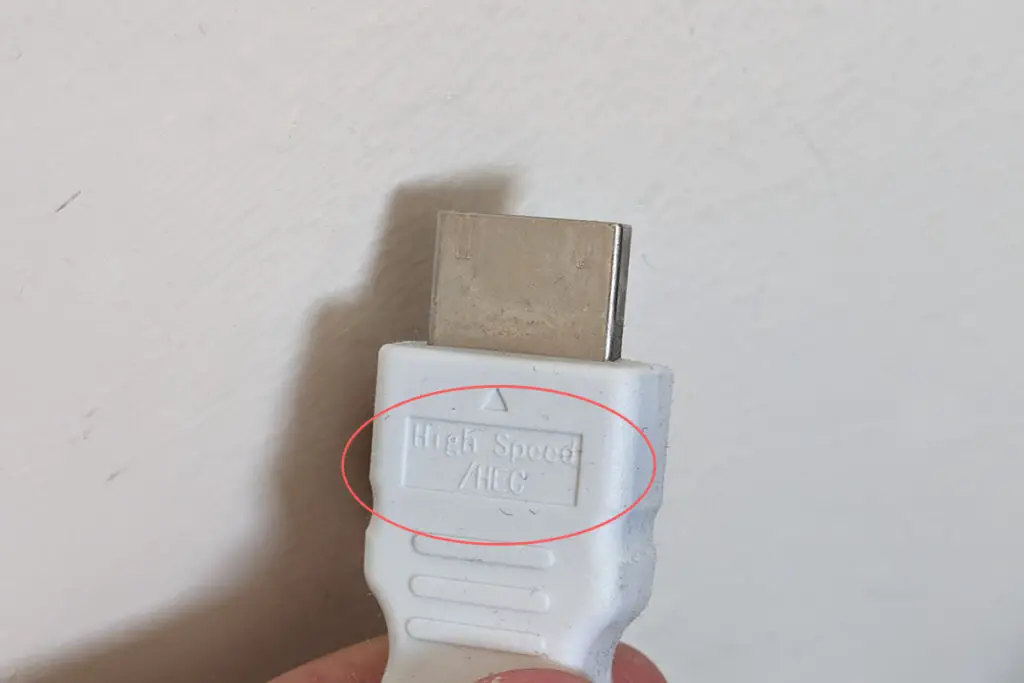
Although unlikely to be a problem, you should note that there are different specifications of HDMI cable, and some newer 4K devices do not necessarily play well with older HDMI cable versions like HDMI 1.0.
You can tell which HDMI version your cables are by the number printed next to the connector or by the text.
The most recent HDMI version is 2.1b/Ultra High Speed, but you only really need HDMI 2.0/High Speed for decent 4K performance.
3. Update Your TV’s Firmware
The problem with Frame TVs and the X1 cable box is firmware-related, so the only way this will be permanently fixed is by getting a firmware update.
Smart Samsung TVs support auto-updating of firmware, but you can’t assume that this is turned on for you.
To check that auto-updating is on for firmware/software on your Samsung TV:
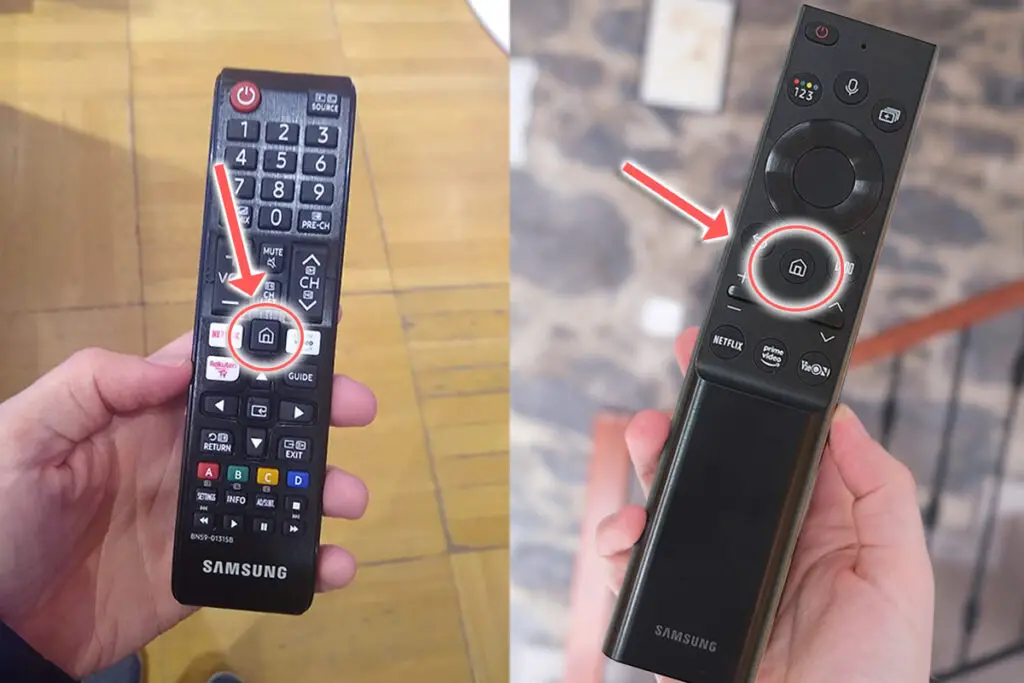
- Press the Menu or Home button on your remote and go to Settings.
- Click Support.
- Then Software Update.
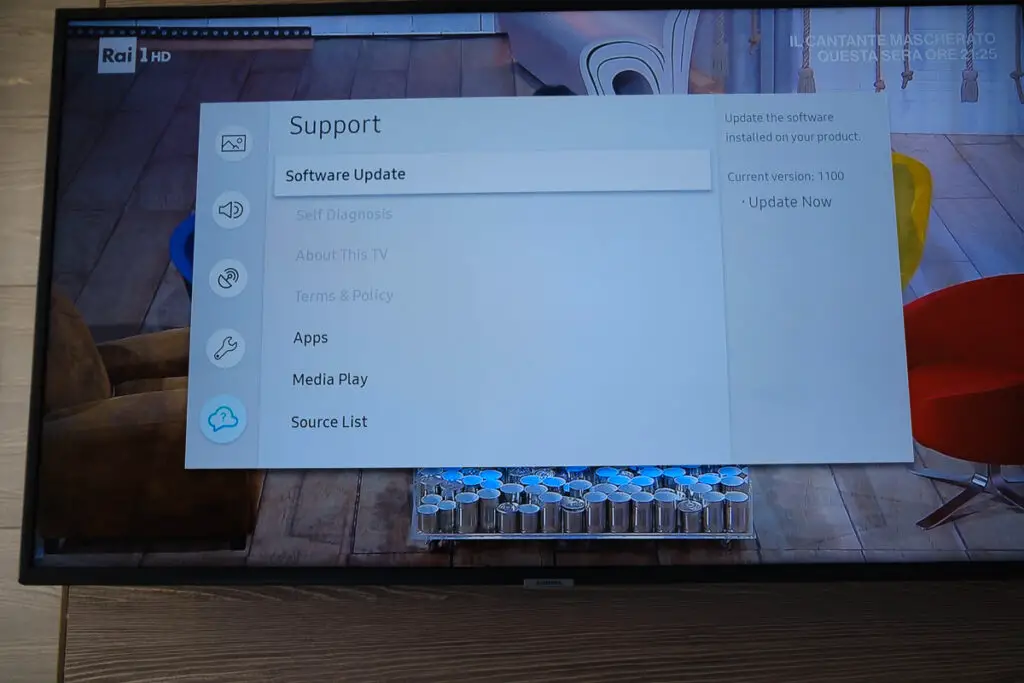
- Agree to any terms and conditions that may pop up, then switch on Auto Update.
- Some models will also have the option to check for updates with the Update Now button.
For older Samsung TVs, you’ll need to update the firmware by USB. To do this:
- Press the Menu or Home button on your remote and go to Settings.
- Go to Support.
- Then Contact Samsung or About This TV.
- Take note of the Model Code and Software Version currently installed.
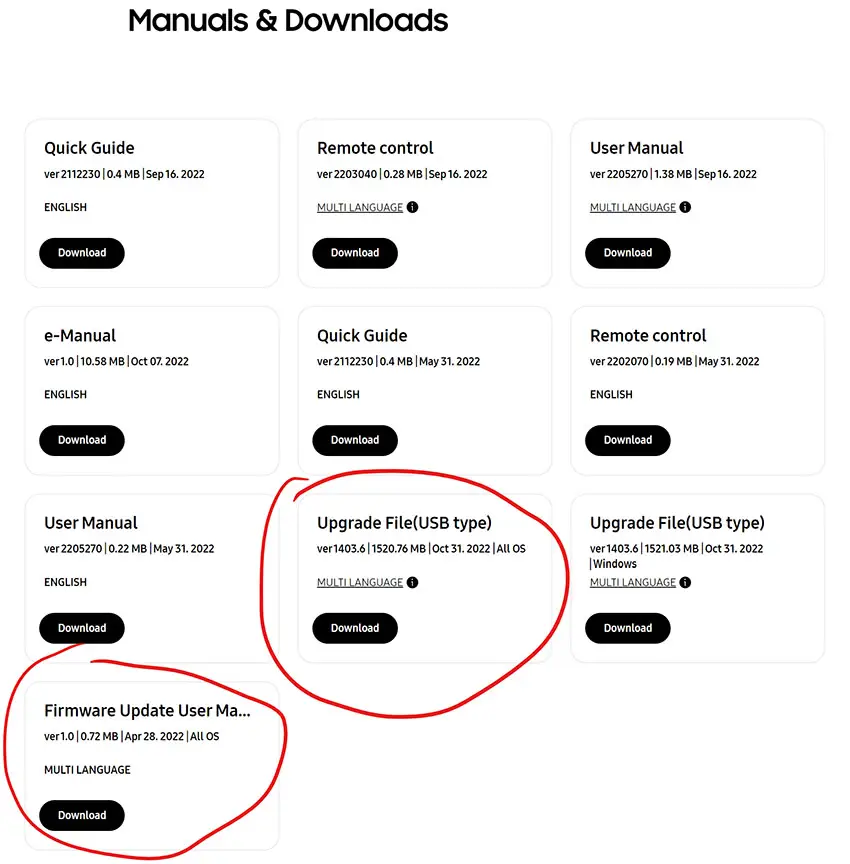
- Go to Samsung’s Support site and enter your model number.
- Select Manuals & Downloads and look for the newest firmware version.
- If this Firmware Version is later than the version you noted was installed on your TV, then download it, along with the Firmware Update User Manual which will give you full instructions on how to install your update.
4. Check Your TV’s Internal Components
If your TV has totally crashed and you can’t get past a blue screen on startup, then something has likely gone wrong with one of the internal components or connections.
There are three main types of board within your TV:
- Timing Control (T-Con)
- Power board
- Mainboard
- And additional boards such as Wi-Fi modules or remote receivers depending on the model.
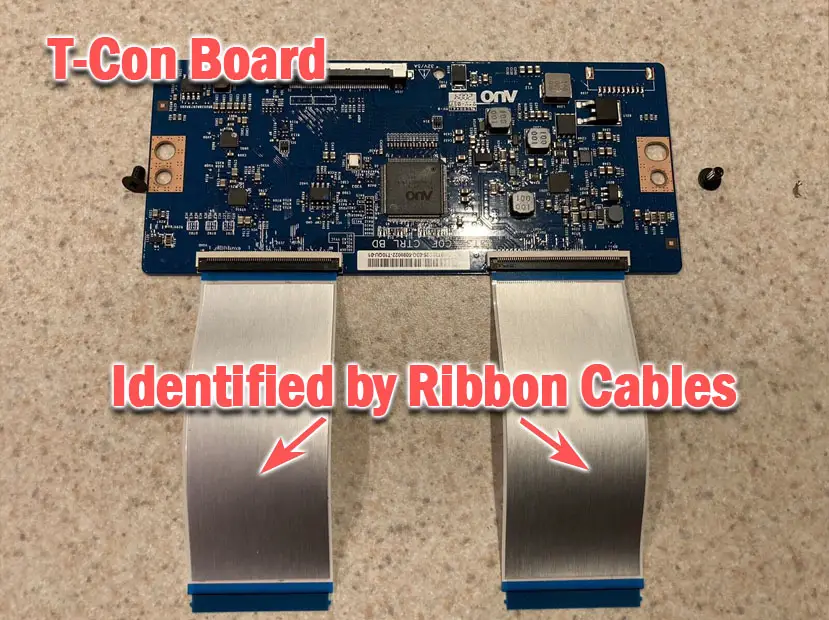
The Timing Control (T-Con) board is a small PCB board that drives your TV’s panel, sending the signal to each pixel row of your screen using internal clocks to keep each row in sync.
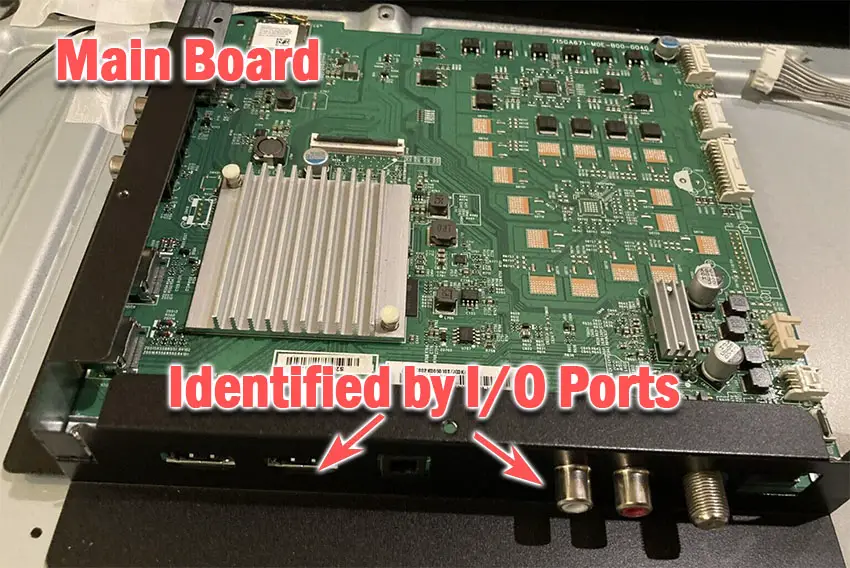
The Main Board is a larger PCB where you plug your HDMI and other connectors into. This does a lot of the work of translating the input into signal, which then goes to the T-Con board.
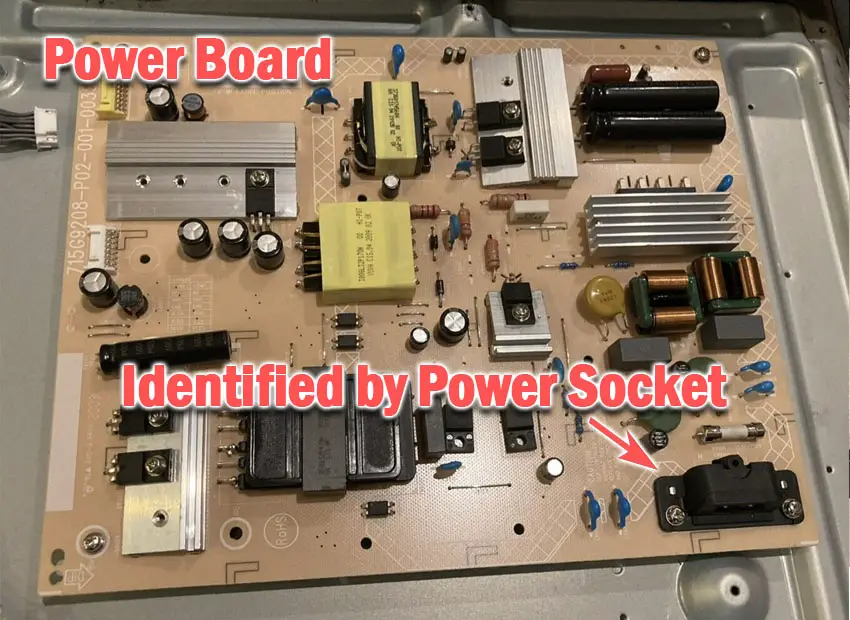
The Power Board is where you plug in your power cable, which converts your home electricity supply into a voltage and current that your TV can use.
TV backlights require a high voltage, and so there will be a small voltage inverter board in your TV to do this. It can either be on a separate board usually located at one edge of the screen, or located on either the Power Board or Main Board depending on the TV model.
These boards are hidden away under the back panel, behind the screen, and any can be the cause of a blue screen of death in your LCD / OLED TV.
Either the cable connectors themselves can come loose or get covered in grime or dust, preventing a clean contact or components on the boards can fail, meaning they don’t power the backlight sufficiently or cannot provide a constant picture signal.
The first step is to simply check that the ribbon cables are tightly seated, particularly those between the power board/mainboard and T-Con, and between the T-Con and panel.
A loose cable is a very common cause of a TV with a blue screen of death.
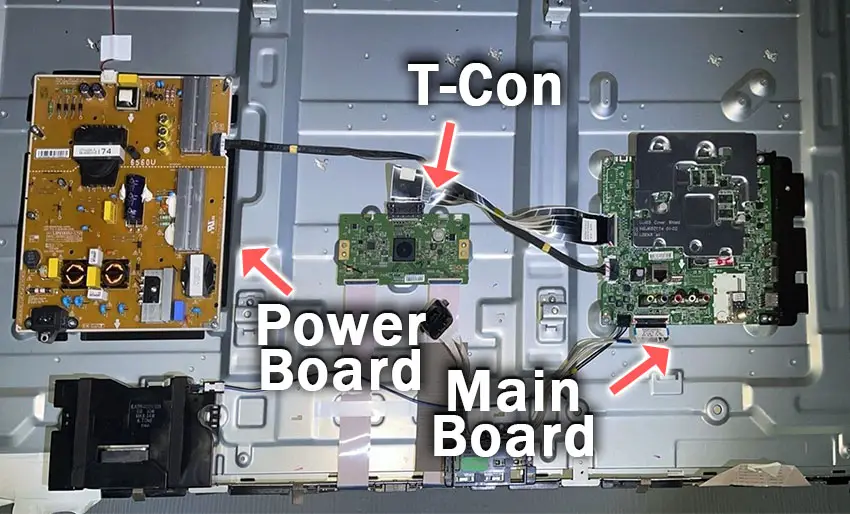
To access the boards, first remove the back panel. If you’re not confident doing this, then now is the time to get an expert in. Otherwise:
- Unplug your TV, hold down the power button, and wait for at least 30 minutes. There are large capacitors in the power board for the backlight and these can hold charge for an extended period of time.
- Place your TV face down on a large table or workbench. Make sure there is nothing that can scratch the screen on your work surface.
- Ground yourself.
- Open your TV by unscrewing the screws in the back panel. It should come apart in two pieces: front and back.
- Put the back panel somewhere out of the way and take a look at the circuit boards that have been revealed.
- You will see a T-Con panel for translating the signal into a TV picture, a power board, and a main board.
Or see this in action in the video below.
It’s a good idea to start your investigation with the T-Con board, as one or more of the internal clocks failing is a regular cause of TV screen problems.
The position of the boards will vary by model, but the T-Con board can be identified by the ribbon cables connecting it to the TV’s panel.
Start by giving everything a good clean, preferably with compressed air or a non-static brush. It’s possible that dust in the connections can block the signal.
Then, you should be able to remove the ribbon-like low voltage differential signaling (LVDS) cables on the T-Con board by pushing the locking cover down and they will then easily come away from the board. Don’t try to force them out without unlocking them first.
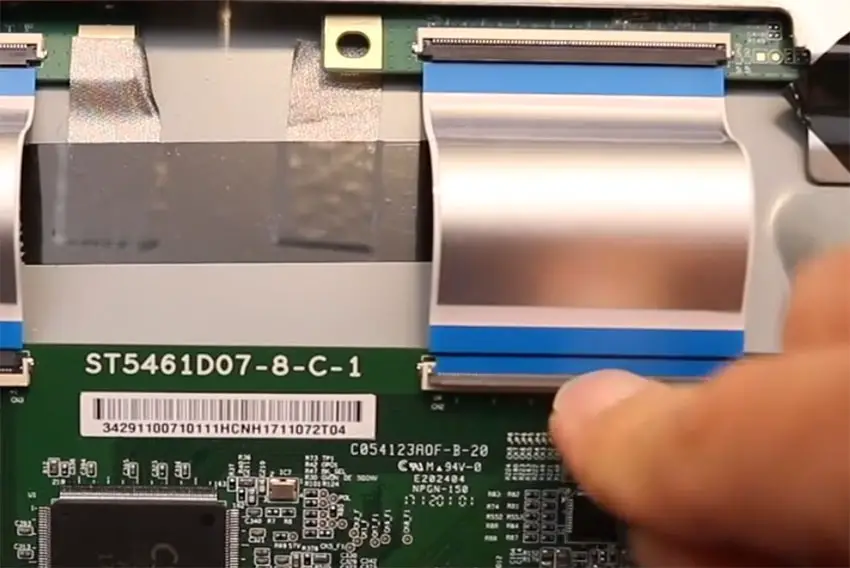
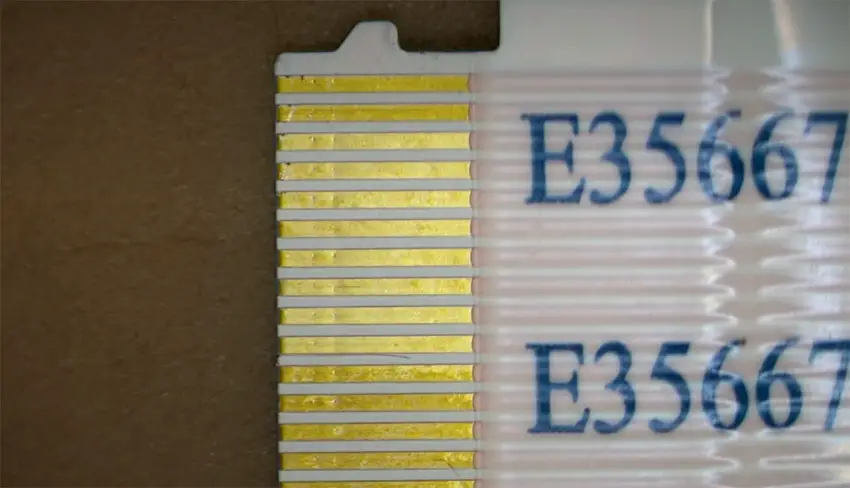
After removing the LVDS cable, take a look at the individual connectors on the ends of the cables, and the connectors in the socket. You are looking for any signs of corrosion, damage, or dust.
The contacts should be a shiny gold or silver color. If they are dull and appear to have a rough, copper-like layer over them, this would indicate oxidation, and therefore a new cable is recommended.
Get your TV back into an upright position, and with one of the LVDS cables connecting the T-Con to the Main Board disconnected, switch your TV back on and see if any picture is there. Disconnect that cable and re-connect the opposite cable.
If your TV is now working with either of the cables connected, then you know the problem is either with your T-Con or Main Boards.
Both T-Con and Main Boards can be replaced for around $30 from eBay.
To get the correct board, note the T-Con / Main Board model number written on the label on the board, and put this into eBay.
If all cables are connected and you’re still seeing a blue screen, then you can check the boards themselves for failure.
Troubleshooting the main board and power board is easiest to see in video form, so take a look below for the full details on doing this.
The two things that you are looking for are:
- If there is power received by the power socket on the power board, and if all components are receiving power from this.
- No components are showing signs of damage. Particularly look at capacitors as these are prone to swelling after power surges which causes them to fail.
If both the power board and main boards look OK, then take a look at the backlight.
5. Replace Your Samsung’s Backlights
If you only have a blue coloring to your screen and can still see faint images underneath it, then you are suffering from a backlight issue. This is very common on TVs older than two or three years and is because of the design of the LEDs used in the backlight and the fact that they can easily burn out.
Samsung TV backlight panels use blue-light LEDs as their base, with a phosphor yellow coating over the LED.
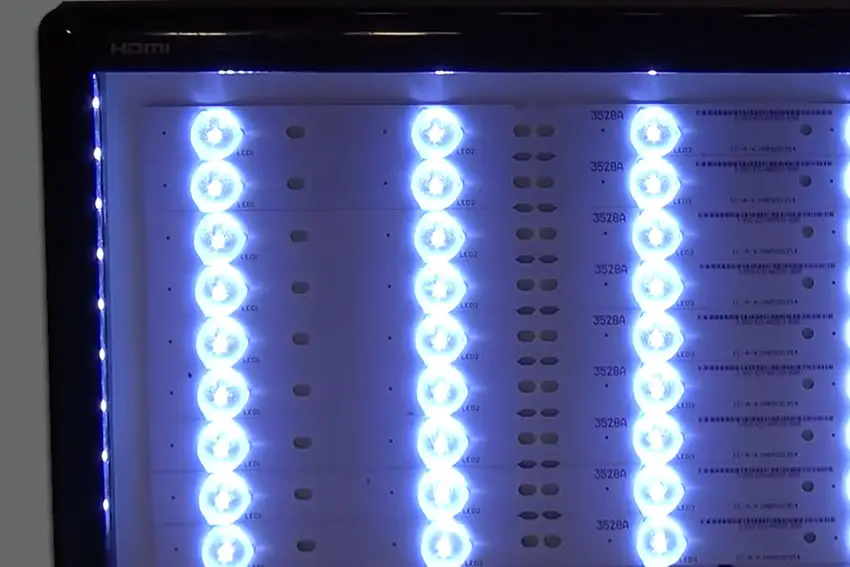
The blue light shining through the yellow phosphor creates white light, which is what you see on a correctly functioning TV.
But after a couple of years, the phosphor can burn off, meaning that blue light shines through unfiltered, giving your screen a blue color.
These LEDs must be replaced, but luckily this is not a terribly expensive job, although it does require some work on your part.
If you’re not comfortable totally disassembling your TV, then now is the time to get a professional in, or to get a new TV.
Backlights on modern Samsung TVs come in LED strips of varying lengths. Older models used lengths that spanned the entire frame of the TV, but due to cost savings, more recent TVs use a set 16″ or smaller LED strip which is connected in series for each row to span your TV.
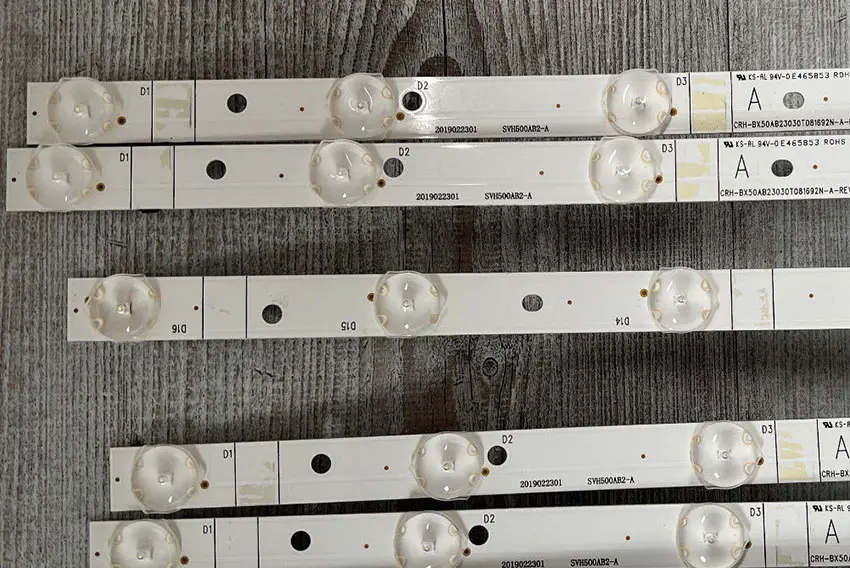
You can get replacement LED strips quite easily from eBay – just put in your TV model number to be sure you are buying the correct type.
If you have a TV backlight tester to hand, then you could get away with testing every backlight strip in your TV individually and only replacing the broken strips, but it’s a lot less work to just replace every backlight and skip the testing, particularly given the relatively low price of LED backlights.
See the full process for replacing backlights below. This isn’t for the faint-hearted, but it will save you a considerable amount of money from either professionally repairing or replacing your TV.
To prevent LEDs from burning off their phosphor layer in the future, make sure you do not set your backlight to 100% brightness. The phosphor layer is destroyed by the thermal degradation of the LEDs, caused by a too-bright backlight setting. Reduce this to the lowest level you are comfortable with to prolong your backlight’s life.
Samsung TV Support and Warranty
You can check your current warranty status at Samsung’s warranty site.
Unfortunately, warranties typically only last a year unless you have already paid to extend it.
Because TV problems can occur at any time, if your TV is under one year old, return your TV under warranty and get it fixed.
You can also try to contact Samsung support directly to see if they can offer any help.
You can use the Samsung support site to help diagnose your problem, but if you are at this stage, then you are better off calling them directly at:
- 1-800-SAMSUNG (726-7864)
They are in the office 7 am – 12 am EST, 7 days a week, but their automated chatbot is available on their site 24/7.
Even if Samsung won’t fix your TV, they might still offer you a discount on a future model if you pester them hard enough! Always worth a try!
Recap
- The blue screen of death on a Frame TV with an X1 cable box can only be permanently fixed by a firmware update, but power cycling will temporarily fix it.
- A blue screen on an older Samsung TV is usually caused by a loose LVDS cable.
- If all of your TV’s cables are firmly connected and undamaged, then take a look at the components on the power board and mainboard using a multimeter.
- Make sure you are using an up-to-date HDMI cable, of at least version 2.0.
Hopefully, you’ve fixed your TV, but if not, give me a shout in the comments and I’ll see what I can do to help.
Read More:
How to clear cache on a Samsung TV
Samsung TV white screen of death?
Fix Samsung TV not connecting to WiFi
Samsung TV purple spots (Fixed)




Leave a Reply