Samsung LED TV backlight problems are very common on older TVs, particularly if you have been running your backlight too hot at 100% brightness.
But there can also be power board issues that mean the backlight isn’t receiving power, or even t-con issues that mean your Samsung TV has a backlight but no picture, meaning it looks like the backlight has failed.
Pulse Width Modulation (PWM) settings and Local Dimming are the most common causes, if your backlight doesn’t seem to respond to you changing its brightness, or if too large a brightness change between dark and light scenes.
I’ll cover every possible Samsung backlight problem in this troubleshooting guide and include tips on your Samsung TV backlight replacement and repair.
The Most Common Samsung TV Backlight Issues
| Common Issues | Fixes |
|---|---|
| Half the Screen has Gone Dark | This is usually a poorly seated cable on the T-Con which can be fixed by cleaning the cable’s contacts and firmly re-inserting it. |
| Backlight Flickering | A failure on the power board or loose connection causes flickering. |
| No Backlight At All | Failed components on the power board are most common. |
| Faint Images | Burned out backlight strips which can easily be replaced for a few dollars. |
| Bright Patches | The glue on the LED’s diffusers has failed. This can be stuck back on with epoxy if you open your TV’s case. |
| Backlight Brightness Not Changing/Changing Too Much | Incorrect PWM settings can cause auto dimming and cause your TV to get brighter and darker during light and dark scenes. These can be changed in the service menu. |
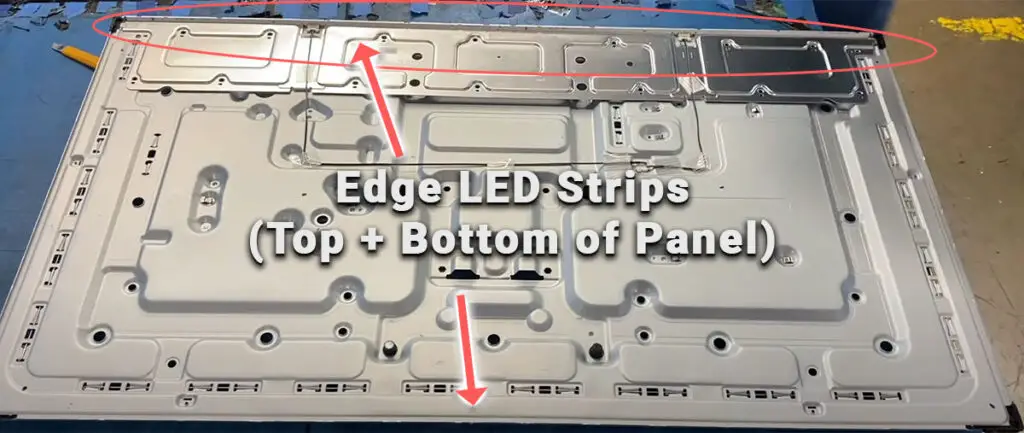
| Vertical Dark Patches | Samsung Edge TVs have one LED strip at the top and bottom of the panel. Edge LED failure causes vertical dark bands which can be fixed by replacing these backlights. |
3-Minute Troubleshooting for Samsung Backlight Problems
You can watch a quick overview of the fixes in my short video below, with more detail on each in the rest of this guide.
How to Fix Backlight Problems in Samsung TVs
1. Samsung TV Backlight But No Picture
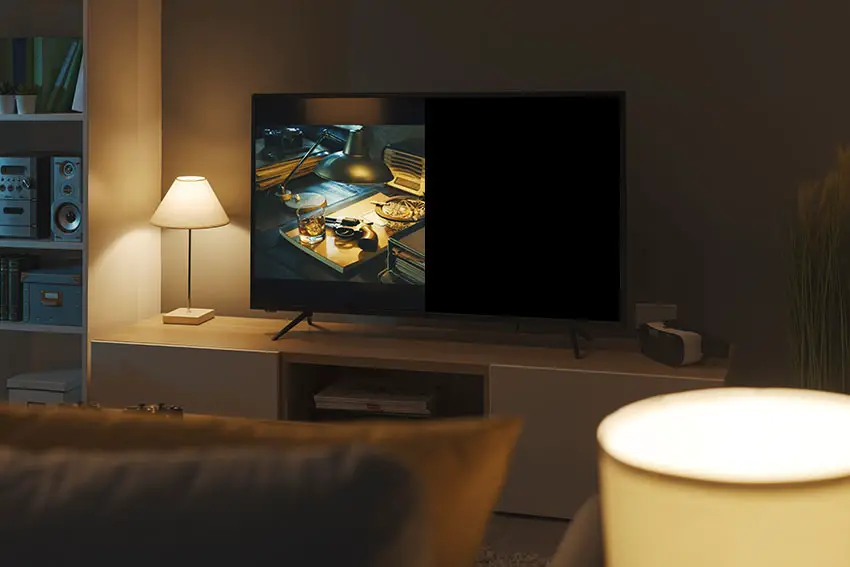
If you are seeing half a black screen on your Samsung TV, or you know that the backlight is working but you have no picture, then this is most likely not a backlight issue, but is instead a problem with the timing control or t-con board, and specifically is often a sign that there is a failure of the LVDS cable connecting the T-Con board to the display panel itself.
To access the boards, first remove the back panel. If you’re not confident doing this, then now is the time to get an expert. Otherwise:
- Unplug your TV, hold down the power button, and wait for at least 30 minutes. There are large capacitors in the power board for the backlight and these can hold charge for an extended period of time.
- Place your TV face down on a large table or workbench. Make sure there is nothing that can scratch the screen on your work surface.
- Ground yourself.
- Open your TV by unscrewing the screws in the back panel. It should come apart in two pieces: front and back.
- Put the back panel somewhere out of the way and take a look at the circuit boards that have been revealed.
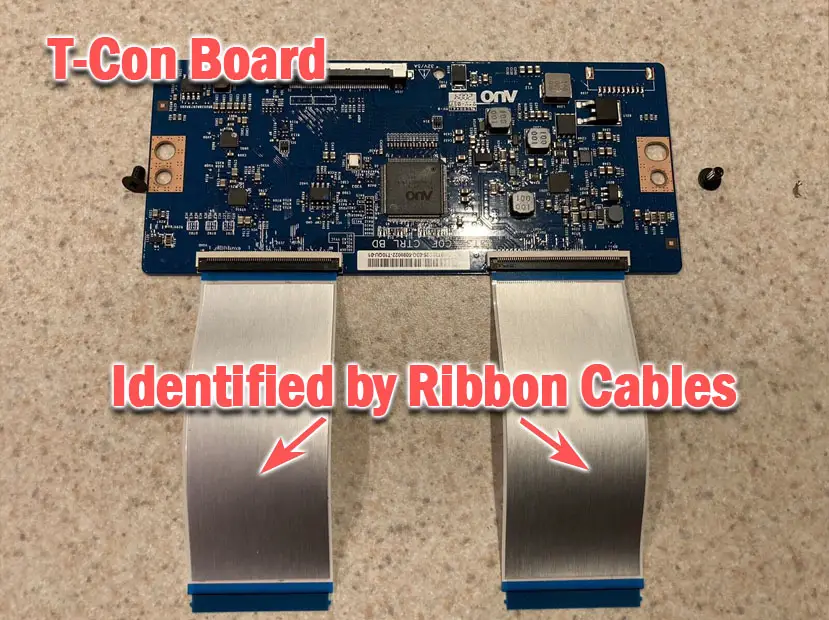
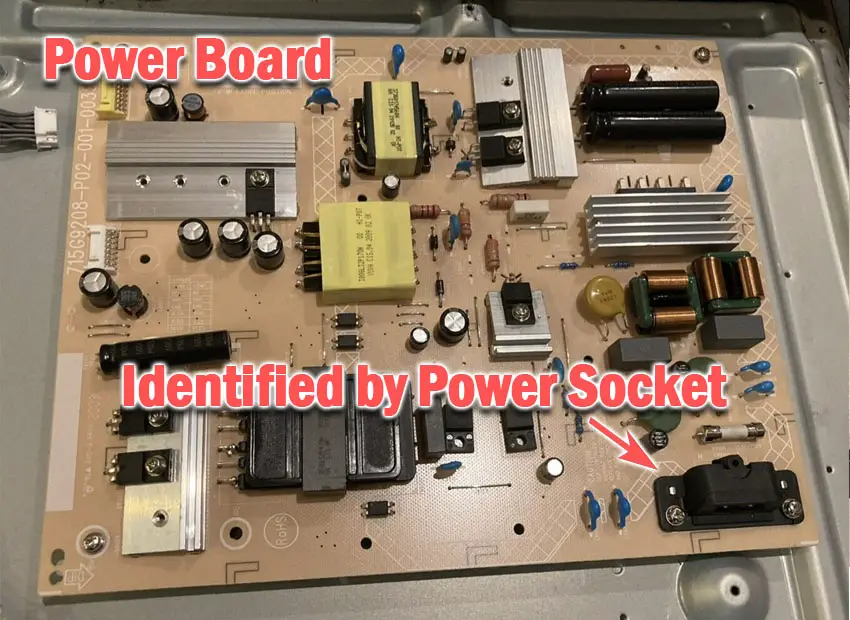
- You will see a T-Con board for translating the signal into a TV picture, a power board, and a main board.

See how to open a Samsung TV in the video below.
It’s a good idea to start your investigation with the T-Con board, as one or more of the internal clocks failing is a regular cause of TV screen problems.
Start by giving everything a good clean, preferably with compressed air or a non-static brush. It’s possible that dust in the connections can block the signal.
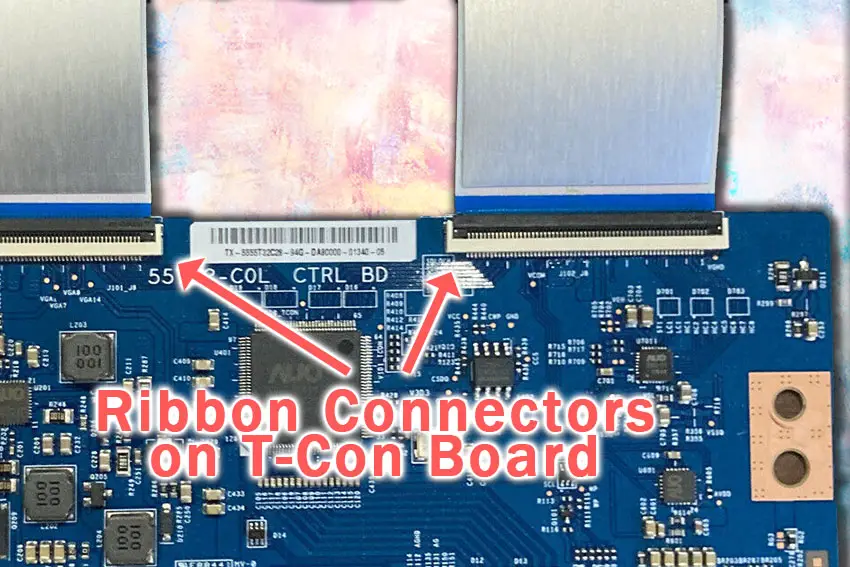
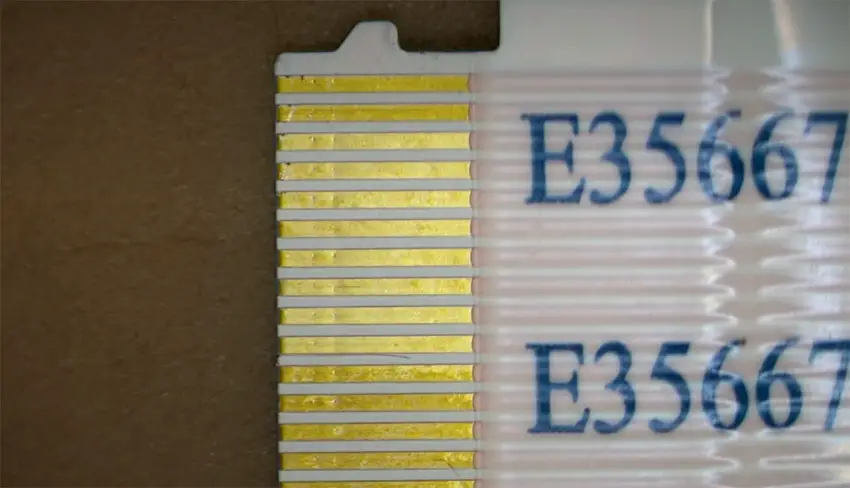
Then, you should be able to remove the ribbon-like low voltage differential signaling (LVDS) cables on the T-Con board by pushing the locking cover down and they will then easily come away from the board.
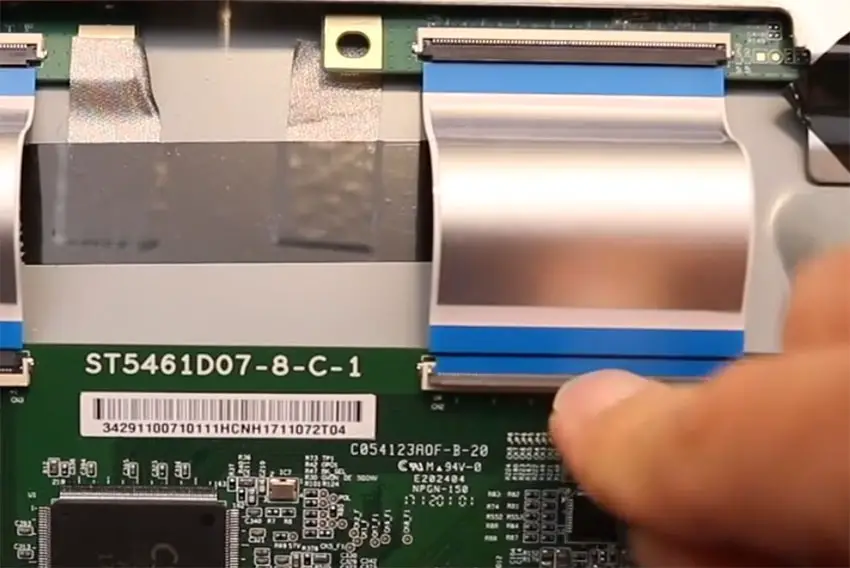
After removing the LVDS cable, take a look at the individual connectors on the ends of the cables, and the connectors in the socket. You are looking for any signs of corrosion, damage, or dust.
If they are dull and appear to have a rough, copper-like layer over them, this would indicate oxidation, and therefore a new cable is recommended.
If cleaning and reseating the cables does not fix the picture, then you most likely need a new T-Con.
Read More:
A comprehensive guide to fixing your Samsung TV with half the screen black
2. Flickering Backlight
You need to open up your TV as before and identify the main board and power board, which will be in addition to the t-con board that we have already looked at.
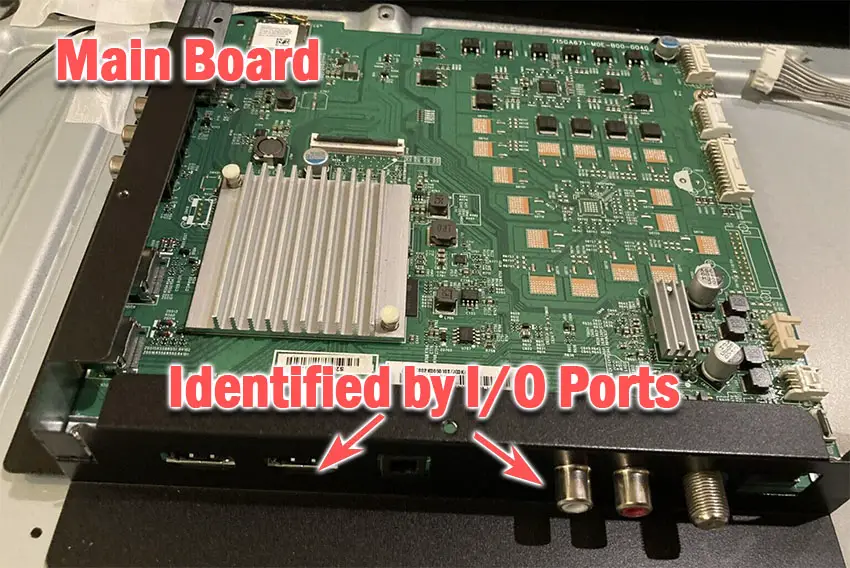
You will then need to find the ribbon cable that powers your backlight (either via a voltage inverter or directly to the backlight), which will be connected to your power board.
Look for any signs of damage or burning, and check that the connector is firmly in place.
Take a look at the video below for a good look at how to troubleshoot your power board using a multimeter.
If you need to, it’s much easier to replace the entire power board rather than any individual components (unless you happen to have those components lying around).
3. If You Can See a Faint Image, Then Look for Burned Out Backlights
Older TV models have a backlight inverter that powers the backlight of your TV by uprating the standard voltage and current of your home supply to the higher levels required by the backlight.
More recent TVs integrate this onto the power board.
An error message relating to a burned-out LED in the backlight, which is sent from the voltage inverter to your main board will often cause your TV to turn on and off repeatedly.
To check for backlight failure:
- Follow your normal process for switching on your TV.
- Get right up close to the screen and point the light on your phone or a flashlight directly at the screen.
- Try changing channels with your remote, or going into the menu.
- If the backlight is the only part not working, you will see very faint images on your TV screen.
You can see this process in the video below.
| Flashlight Test Result | Explanation |
|---|---|
| Faint Images | Most likely a backlight failure. |
| No Faint Images | – If the backlight is working (screen is “glowing”), you most likely have a T-Con issue. – If the backlight is not working, you most likely have a main board issue. |
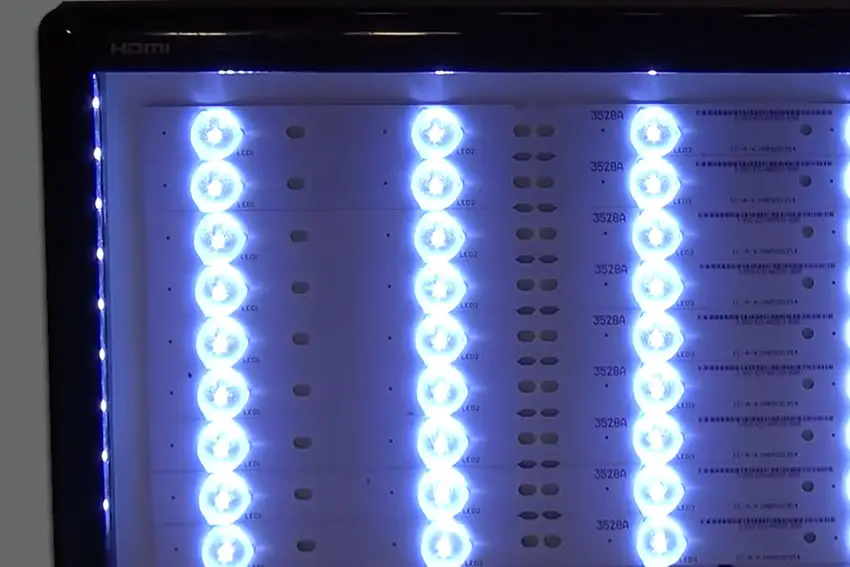
Backlights on modern Samsung TVs come in LED strips of varying lengths. Older models used lengths that spanned the entire frame of the TV, but due to cost savings, more recent TVs use a set 16″ LED strip which is connected in series for each row to span your TV.

These cold-soldered connectors are a notorious failure point on Samsung TVs, but can be easily fixed if you are willing to re-solder a joint yourself.
Equally commonly, the LED backlights themselves can fail. This is due to repeated current overpowering, which over time causes thermal degradation of the LEDs leading to burnout.
The problem with fixing the LEDs is that they are located in the most difficult-to-access part of your TV. So if you are not comfortable with a larger repair job, then now is a good time to seek help from a professional.
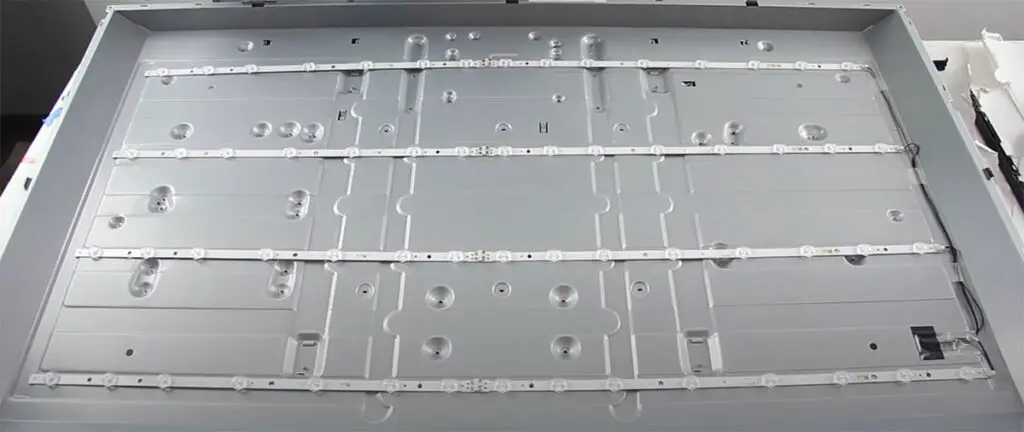
You need to remove the back panel, remove all of the circuit boards and connectors, then another layer of screws for the front panel, and only when you have fully removed the LCD panel can you get to the backlights.
Assuming you have followed the steps to check the T-Con, Power, and Main Boards:
- Any wires or ribbons that are near the edge of the TV should be disconnected.
- Then remove the screws around the edge that hold the bezel of the TV.
- With some care, you should be able to remove the bezel and panel and reveal the TV backlight underneath, which will be in strips of LED lights.
- Use a voltmeter or TV backlight tester to check whether they are working, and replace any failures.
This can be fixed by checking the connectors with a multimeter and re-soldering and broken connections. This article has a good study on this.
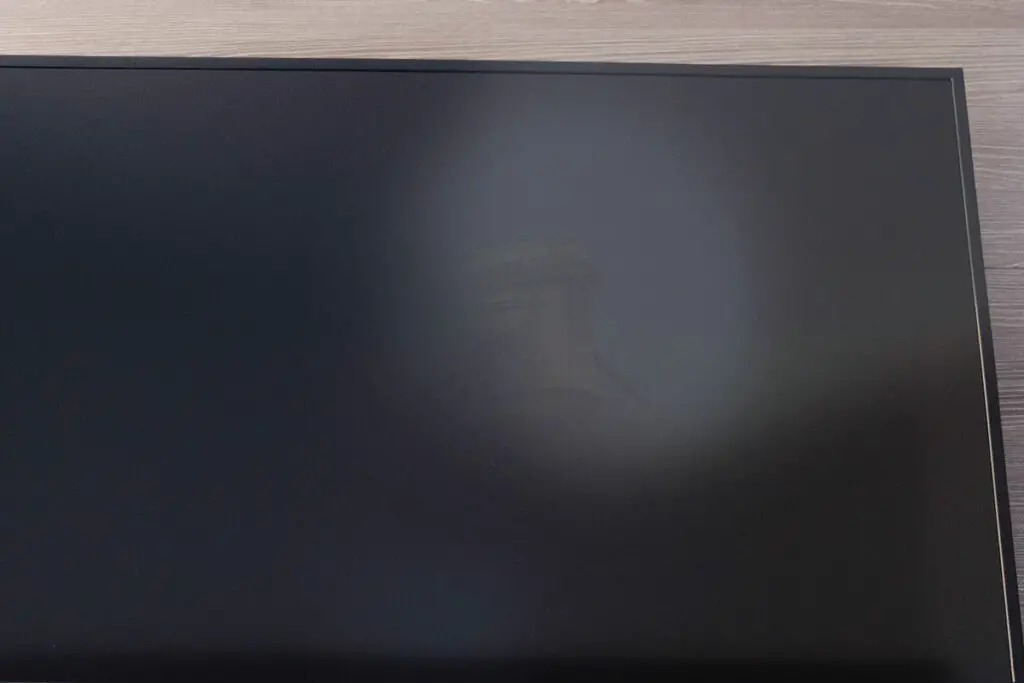
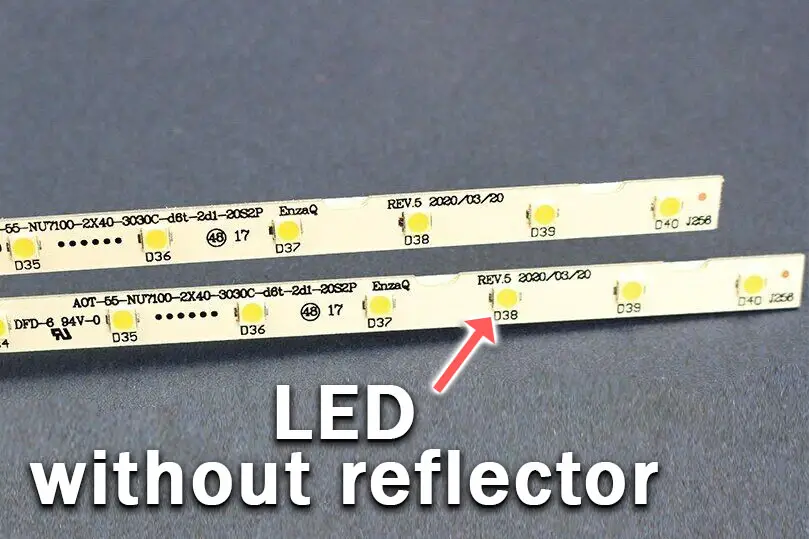
4. Bright Patches Indicates Failed Diffusers
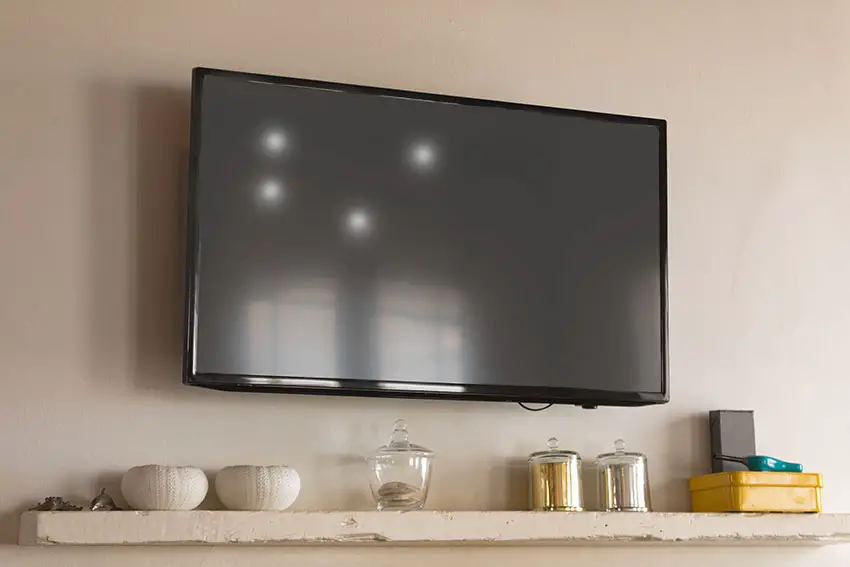
This is because of the design of the LEDs used in the backlight and the fact that the glue holding the reflector over the LED can burn off over time, causing the reflector to fall to the bottom of the panel.
The basic design of these backlight LEDs is that they come in strips of LEDs with a lens over each LED to diffuse the light and make sure there are no hot spots, but just a general glow.
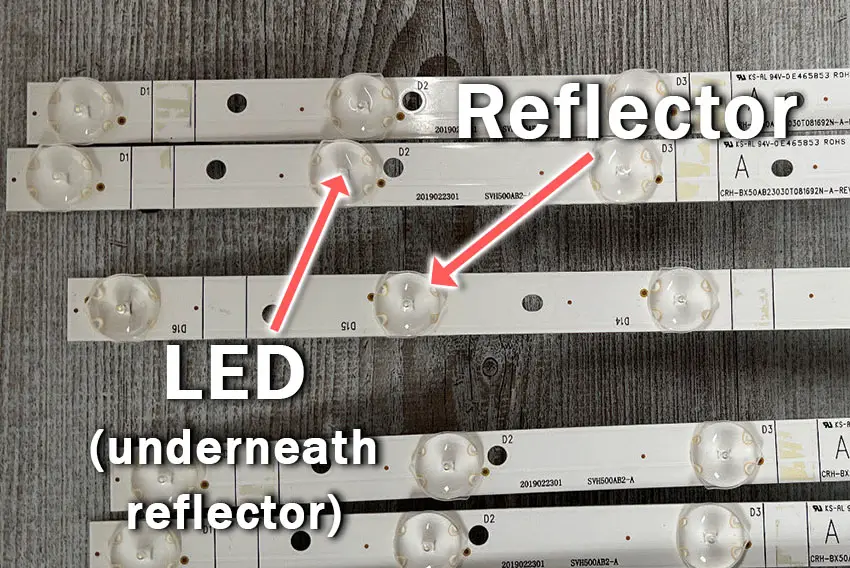
You can see a set of working LEDs with reflectors in the image below, and you can see the circular reflector covering the LED diffusing the light.
With Samsung LEDs specifically, the glue holding the reflector on can fail, usually caused by thermal degradation from the LED itself.
This means that the light from the LED is no longer being spread out, and creates a hot spot of white light on your TV.
This rattling is the fallen reflectors.
The easiest way to deal with this is to open your TV up, carefully removing the back panel and internal components until you uncover the backlight LED strips.
You should see one or more LEDs without reflectors which correspond to the position of the white spots on your screen.
The reflectors/diffusers themselves should be at the bottom of the TV’s case, and they most likely would fall out when taking your TV apart.
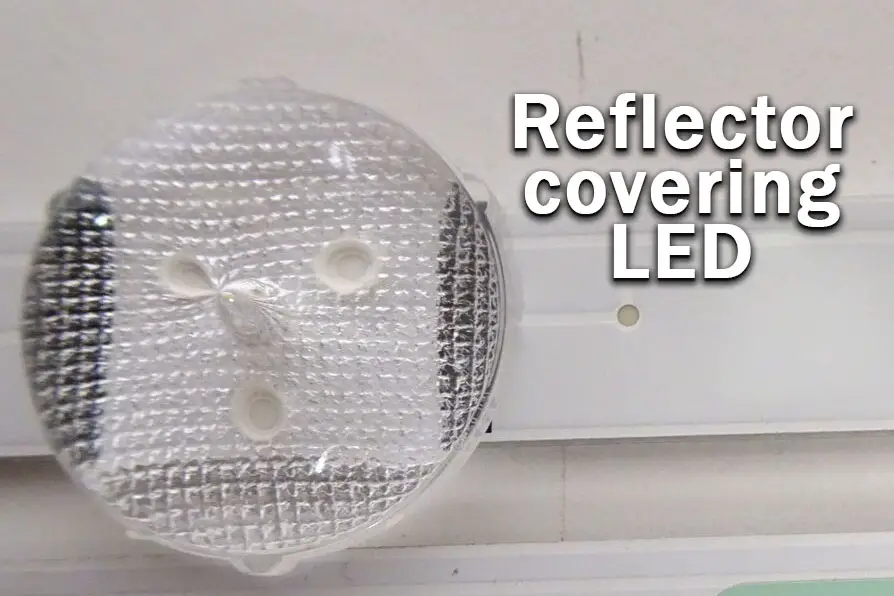
Most Samsung TV backlight diffusers will be connected by three points to the LED strip.
- Get some toothpicks and clear epoxy. Superglue is not recommended as it is not heat-stable.
- Put a small amount of epoxy onto a waste card or paper if it is pre-mixed, or if not pre-mixed, put each component onto separate parts of your card.
- Use the toothpick to pick up some of this epoxy (mixing both components if necessary) and carefully apply it to the three points on the LED strip where the diffuser connects.
- Carefully place the diffuser back into place on the LED strip and hold it until the epoxy has set.
5. Adjust PWM and Local Dimming in the Service Menu
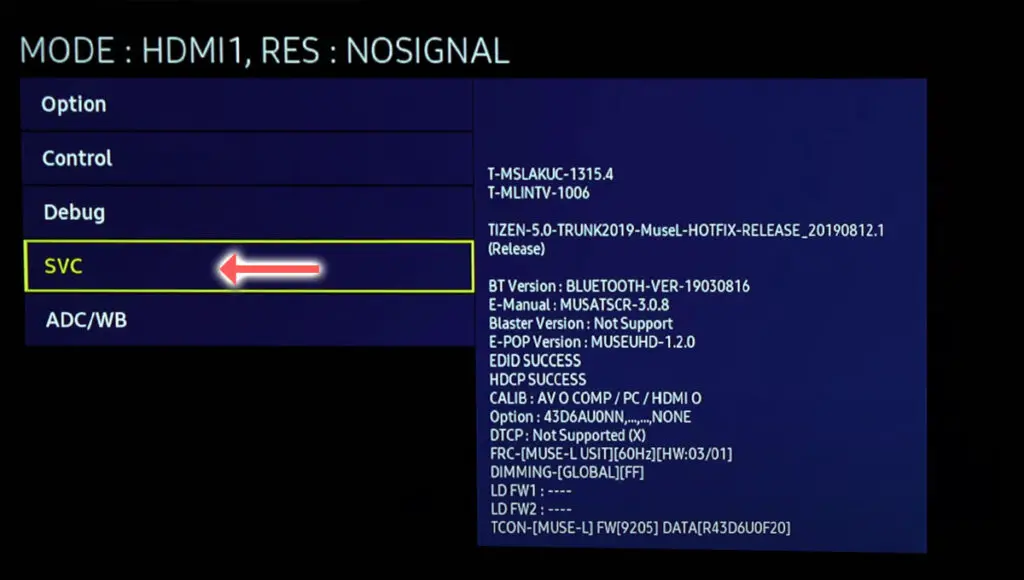
The service menu on Samsung TVs lets you access areas designed for TV engineers.
You have to tread carefully here, but there are some options here that you should change if your TV is auto-dimming too much or you cannot get the backlight brightness to change when you adjust it in the regular menu.
To access the Samsung TV service menu:
- Switch your TV off.
- Enter one of the below button sequences using your remote:
- Info + Settings + Mute + Power
- Mute + 1 + 1 + 9 + Power
- Mute + 1 + 8 + 2 + Power
- Sleep + P.STD + Mute + Power
- P.STD + Menu + Sleep + Power
- Display/Info + P.STD + Mute + Power
- Display/Info + Menu + Mute + Power
- Your TV will start up and show the Service Menu.
- Follow the menu options SVC -> Other Setting -> CAL Data Restore.
- Press OK to skip the USB prompt, then back up to the main Service Menu by using Return on your remote.
- Scroll to Advanced, which will have now appeared.
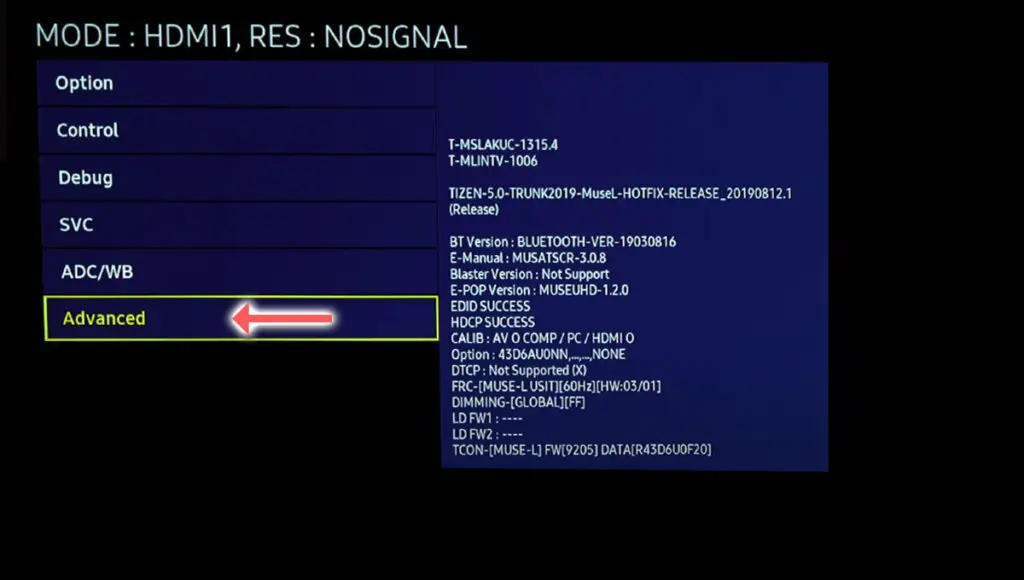
- For older Samsung TVs, press 0000 (four zeroes) on the number pad. If you are using a Frame TV or newer model with the Bluetooth remote, then press and hold the Volume + button for 5 seconds.

- Go to Picture_2D, which will now appear on the main menu.
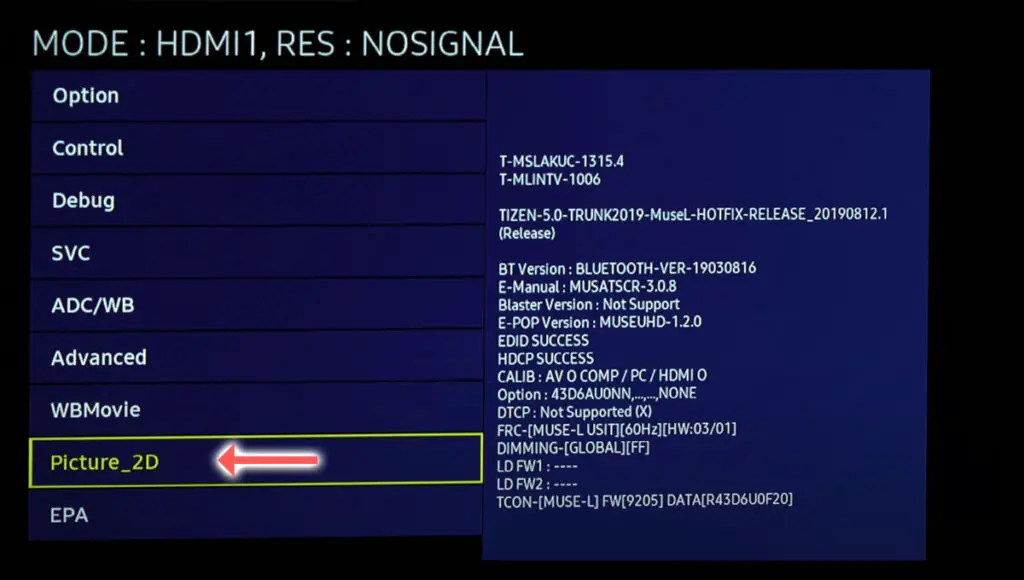
- Then go to SubSetting.
- Change all five of the PWM settings to 100. This will effectively disable Pulse Width Modulation (PWM), which is the cause of your TV getting brighter and dimmer according to each scene of your movie.
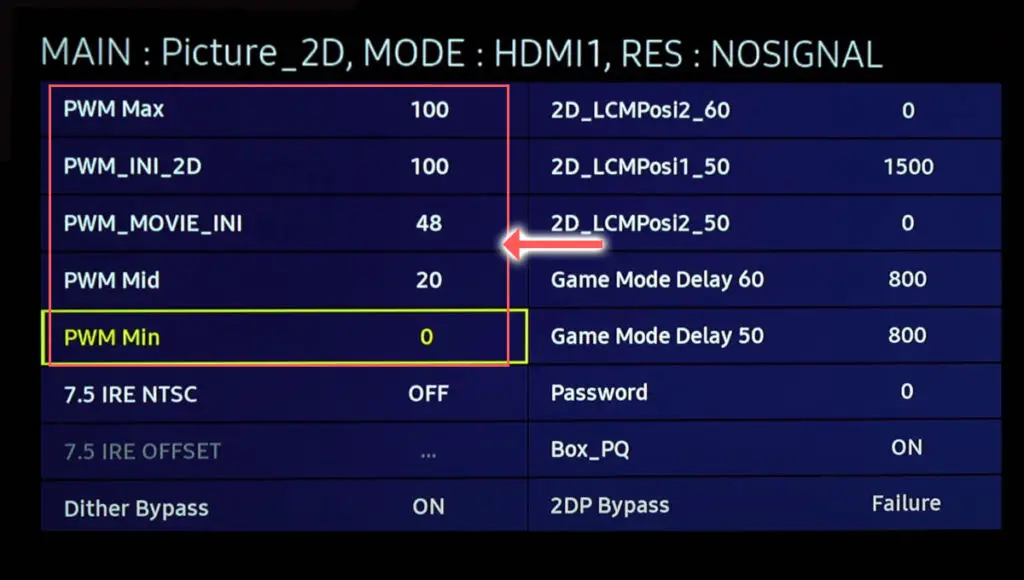
Switching all of these PWM settings to 100 will stop your Samsung TV auto-dimming.
Depending on your model, you might instead see Local Dimming options here. In this case, change Local Dimming to 1 and restart your TV.
6. Problems With Samsung Edge TVs
Samsung Edge TVs have non-traditional backlights.
While older Samsung TVs have backlights arranged in horizontal strips, Edge TVs have a single LED strip at both the top and bottom edge that shines light vertically through a series of reflectors and diffusers to light the whole screen.
You can follow the same process to replace these Edge LED strips, if you are seeing a dark vertical band, as for a standard Samsung TV, but you do need to buy specific Edge LEDs, which are around $50 per pair on eBay.
You can see more details on replacing the Samsung Edge TV backlights in the video below.
Samsung TV Support and Warranty
You can check your current warranty status at Samsung’s warranty site.
Unfortunately, warranties typically only last a year unless you have already paid to extend it.
Because backlight problems can occur at any time, if your TV is under one year old, return your TV under warranty and get it fixed.
You can also try to contact Samsung support directly to see if they can offer any help.
You can use the Samsung support site to help diagnose your problem, but if you are at this stage, then you are better off calling them directly at:
- 1-800-SAMSUNG (726-7864)
They are in the office 7 am – 12 am EST, 7 days a week, but their automated chatbot is available on their site 24/7.
Even if Samsung won’t fix your TV, they might still offer you a discount on a future model if you pester them hard enough! Always worth a try!
Samsung TV Backlight Repair Quick Fixes
- The main cause of backlight issues with Samsung TVs are failed backlights where one LED has burned out and taken the entire LED strip with it.
- These can be replaced at home by opening up your TV and getting a new set of LED strips from eBay or elsewhere for a few dollars.
- You should check your T-Con LVDS connection if half your screen has gone black.
- If a multimeter confirms that your LEDs are working normally but you don’t have any picture, then look for failed components on the power board.
- Bright patches mean that the LED diffusers have fallen off and need to be glued back on.
- Access the Service Menu to disable PWM if your TV is auto-dimming.
If you are still having trouble, then I would suggest contacting Samsung support or leaving a comment and I’ll see what I can do to help.
Read More:


4 Responses
p
Thank you so much! I’m pretty sure that I have a fallen diffuser…
Happy Sunday!
Tim Daniels
Thanks!
P
…after the picture of the T-con cable….”IF YOUR TV IS ‘NOW’ WORKING”….or should it say
“IF YOUR TV IS ‘NOT’ WORKING”…..???
Tim Daniels
The article is correct – it’s if your TV is NOW working without the cables connected.
If you’ve taken the T-Con out of the loop by disconnecting it and your TV now works, but it stops working when the T-Con is connected, then you know that the T-Con is the source of your problems.